Claim Listing
Configure the claim listing
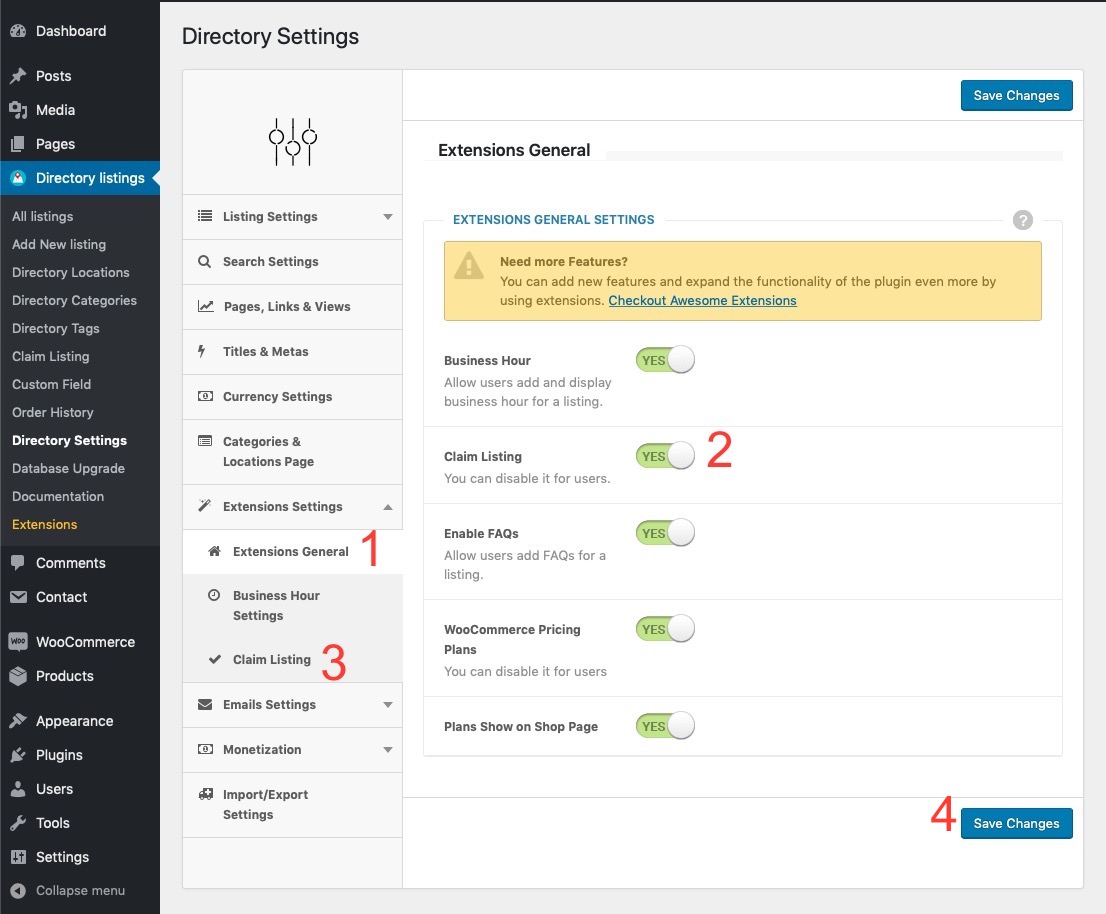
The next thing is to configure the claim listing add-on. Luckily, it is very easy to configure this add-on. Most of the settings have a default value set, so you just need to skim through them quickly and hit the "Save Changes" button. Read through the docs and see the attached screenshot for clear understanding. Setting up Claim Listing's basic options The first thing you need to do after installing the plugin is to make sure some basic settings related to claim listing is properly set. Go to Directory Settings > Extensions Settings > Extension General Make sure the following options are set to 'yes'- Claim Listing option should be set to Yes. It controls the global display of the claim listings on your site. It is the master control of your claim listing controls. If you set this option to 'No', all functionalities of the claim listing add-on will be disabled all over the site. You can enable or disable the claim listing functionality from this one place.
- WooCommerce Pricing Plan
- Or Pricing Plan
 A brief explanation of the above settings.
- Claim Widget Title: This controls how the title will appear in the claim listing widget. (See the image below)
- Description: This controls the description of the claim listing widget.
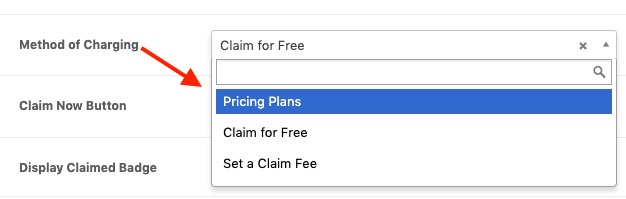
- Method of Charging: This is probably the most important control of claim listing. This control lets you set the global method of charging a claimer of a listing. What it means is that, you can also set the method of charging a claimer on each listing edit screen and if you do not set the method of charging for a claim on each listing, then this setting will be used, this is why it is called global charging method of a claim.
- Claim Now Button: Customize the text of the claim button using this option.
- Display Claim Now Button on Listing Details: Admin can show Claim Now button in single listing by using this option.(Default is Disable)
- Display Claimed Badge: If you set this option to 'Yes' then a badge will be displayed beside the listing title. It is useful because it distinguishes between claimed/verified listings and unclaimed/unverified listings.(see the image below)
- Verified Text: You can customize the text for the claimed badge using this option. For example: claimed or verified etc. It depends on the "Display Claimed Badge" option. (see the image below)
Set a claim fee
In the edit listing screen, you will see the "Claim Details" meta box on the top-right corner. Select the 'Set a claim fee' option and enter a price to charge an owner when a claim is made.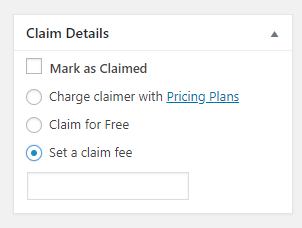
Setting up Directorist Pricing Plans
Once you have installed it, you should see a new submenu called Pricing Plans under the directorist listings menu.Adding Plans
Go to Directory Listings > Pricing Plans > and click "Add New" to add a new pricing plan.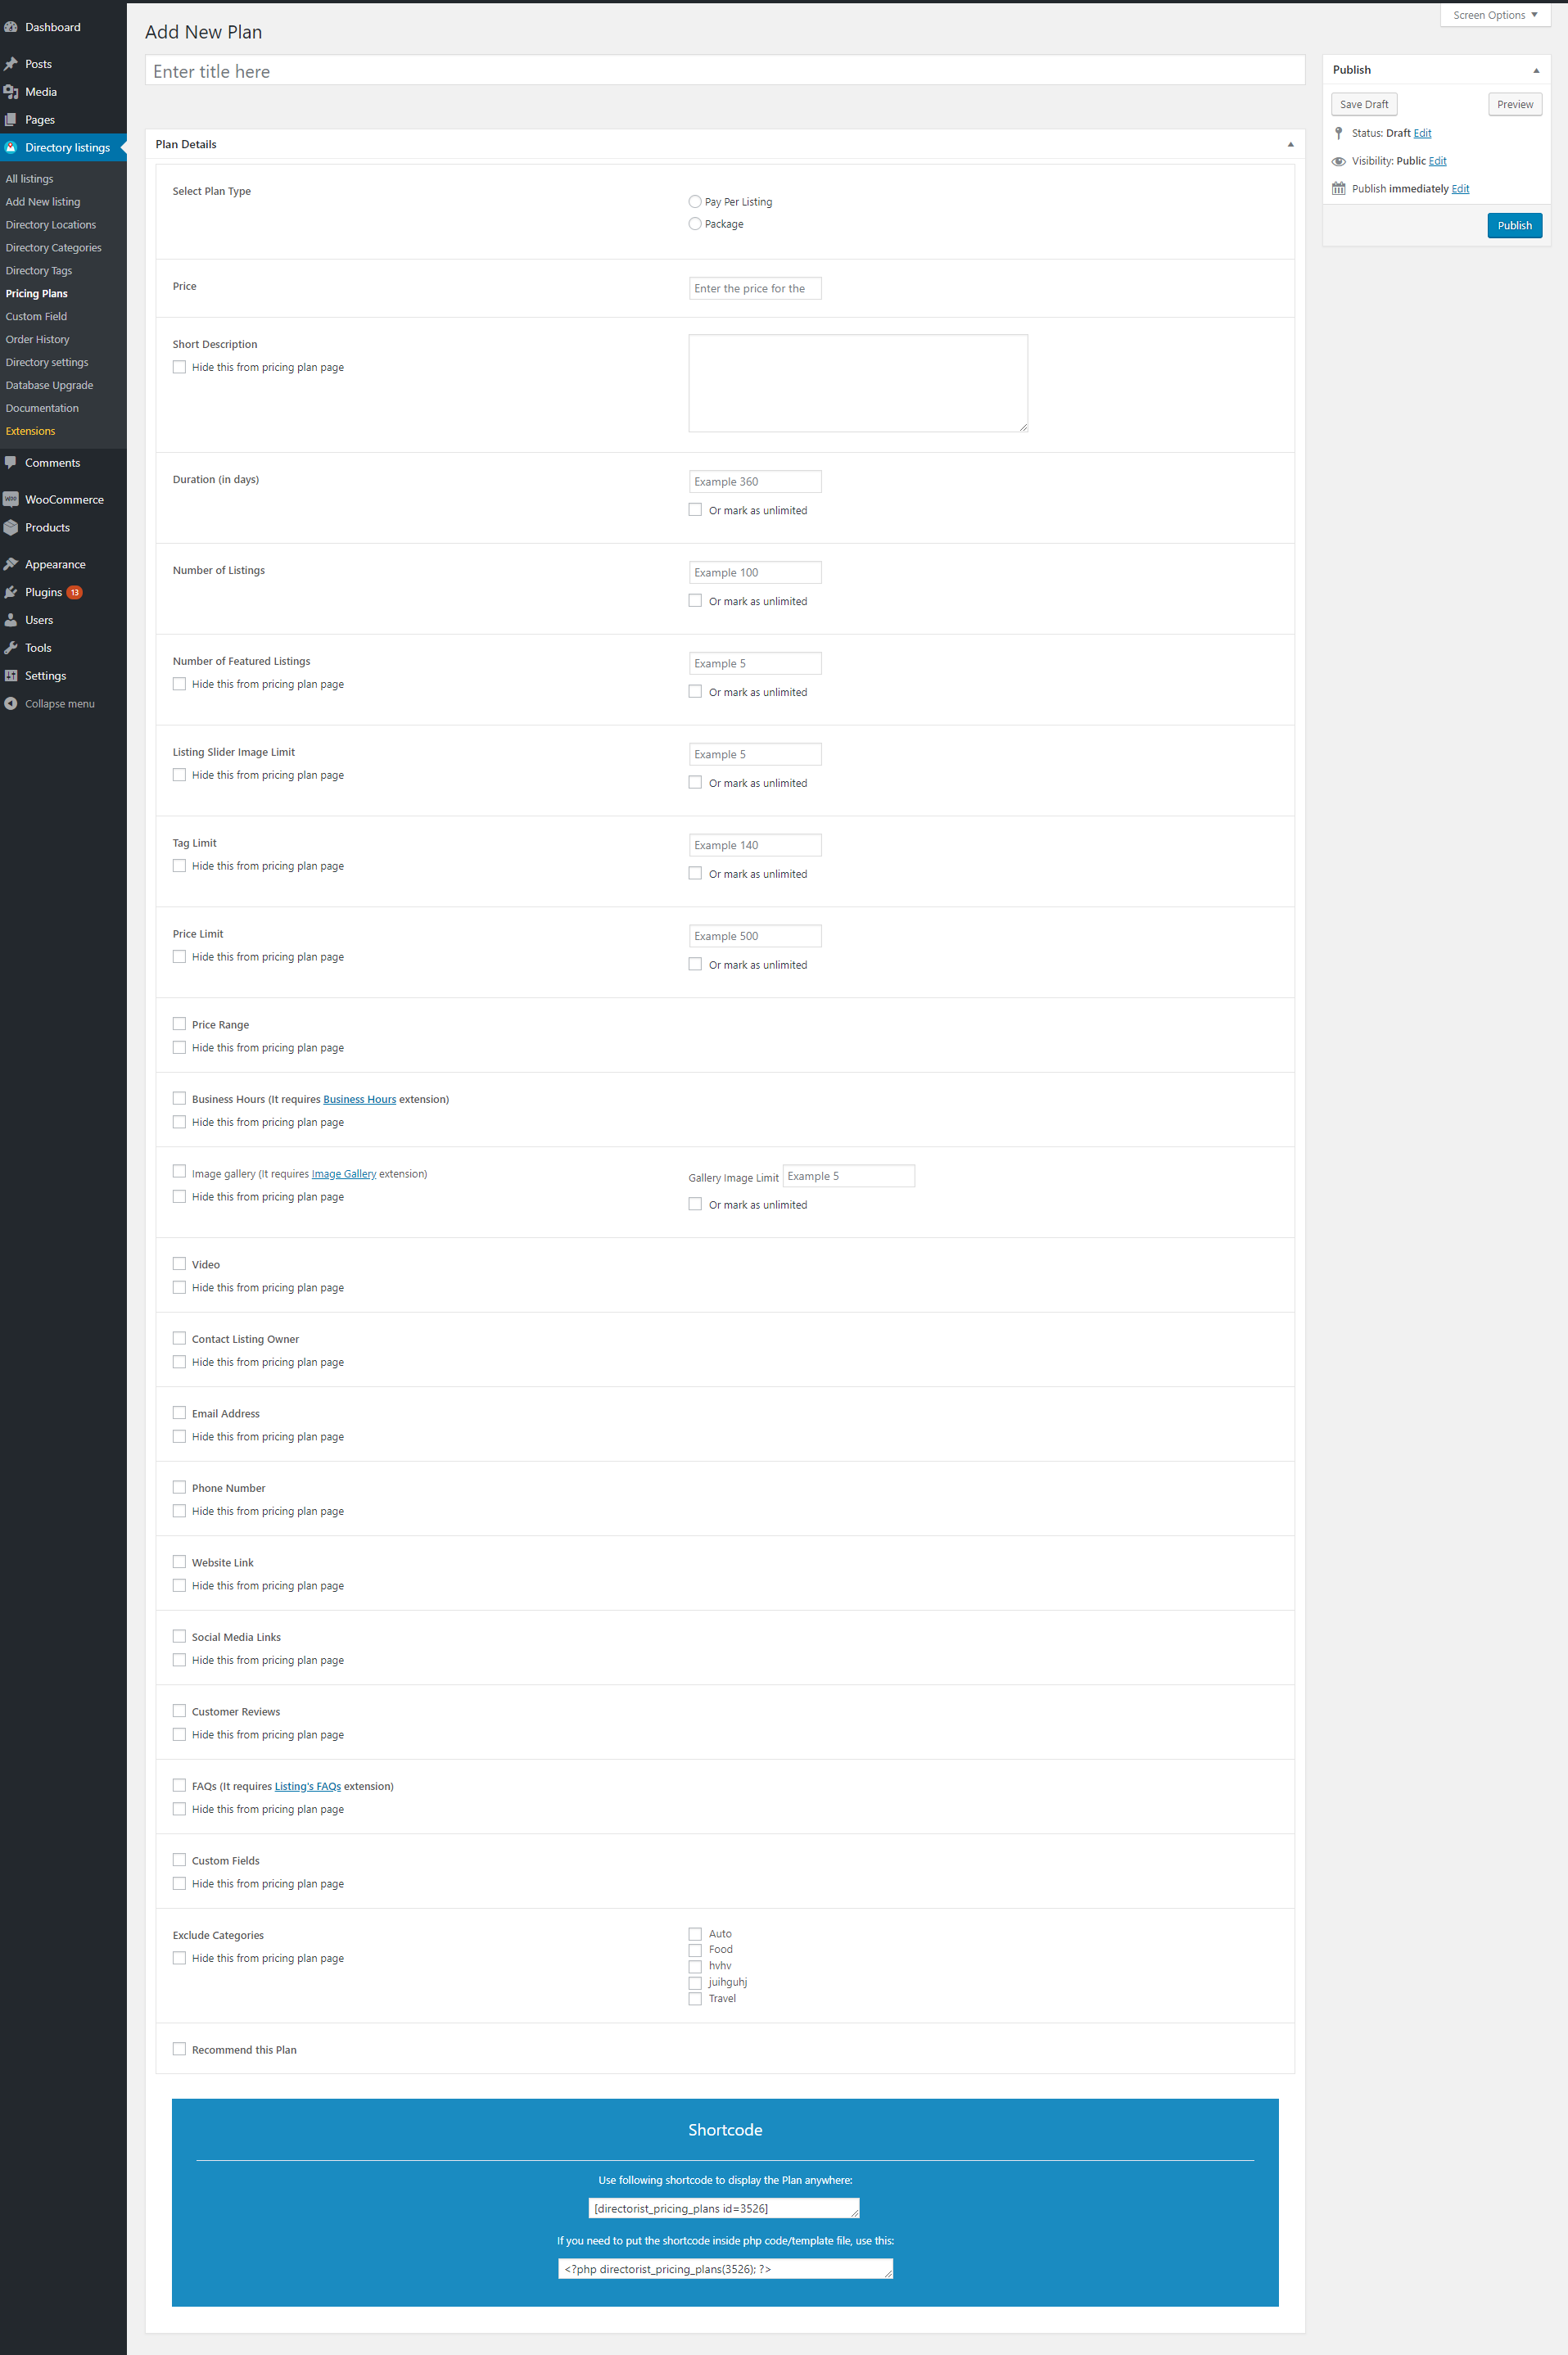
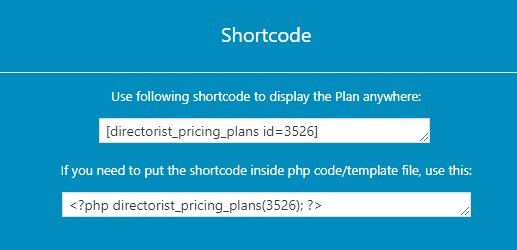
Displaying the plans
You can display all plans using the following shortcodes on any page. Shortcode:[directorist_pricing_plans]
You can also display a particular pricing plan on any page using the shortcode found at the bottom of the pricing plan edit page. It will look somewhat like below. The id may be different for your plan.
[directorist_pricing_plans] or a single plan shortcode should be assigned to the Directory Settings> Pages, Links & views >
Setting up Directorist WooCommerce Pricing Plans
Once you have installed it, you will see a new product type called "Listing Pricing Plan" appears in the product type select menu.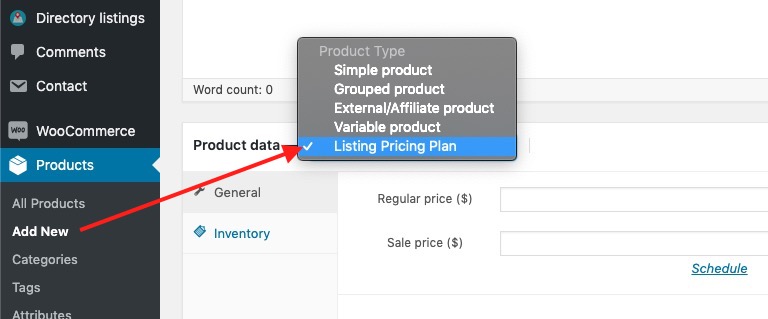
Adding Plans
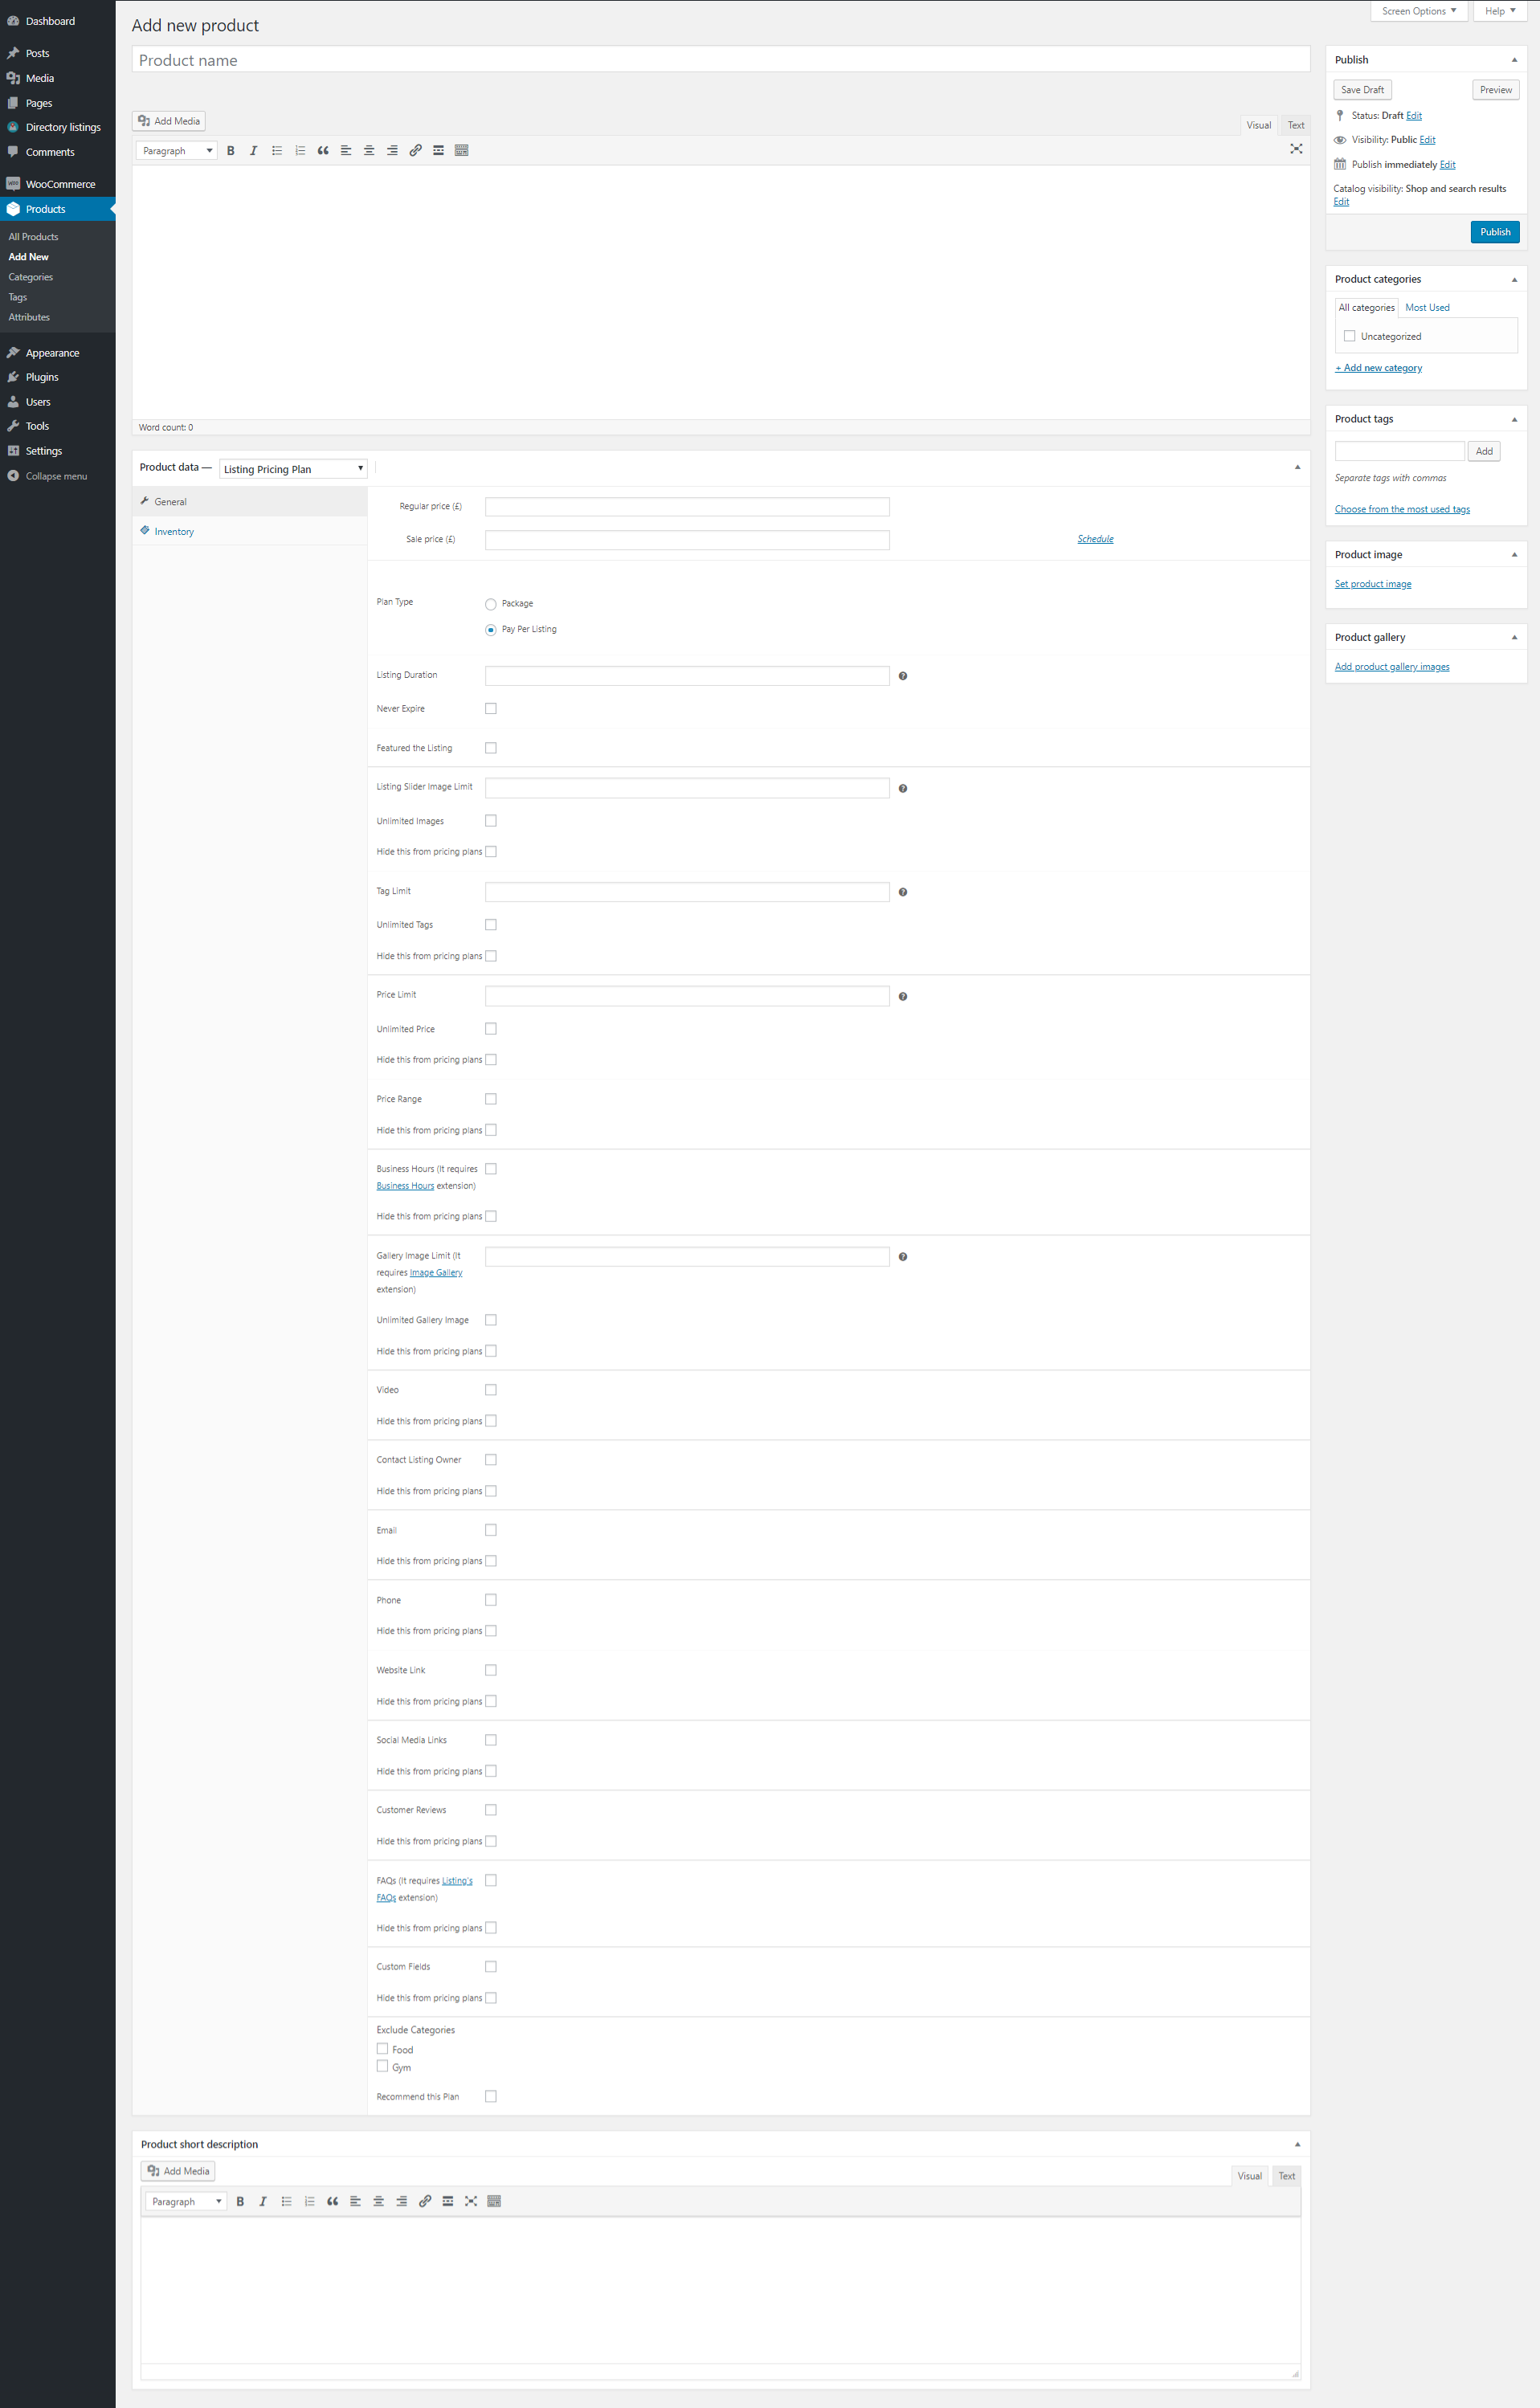
Adding a listing pricing plan using this add-on is very easy. Follow the steps below to add a pricing plan using WooCommerce and Directorist- Go to WordPress Dashboard > Products and click "Add New".
- Select Listing Pricing Plan from the Product Type select menu.
- Set a regular price (optionally a sale price) and check/set the features you want to offer for this plan and hit the publish button.
Displaying the plans
You can display all plans using the following shortcodes on any page. Shortcode:[directorist_pricing_plans]
Display of Claim Listing
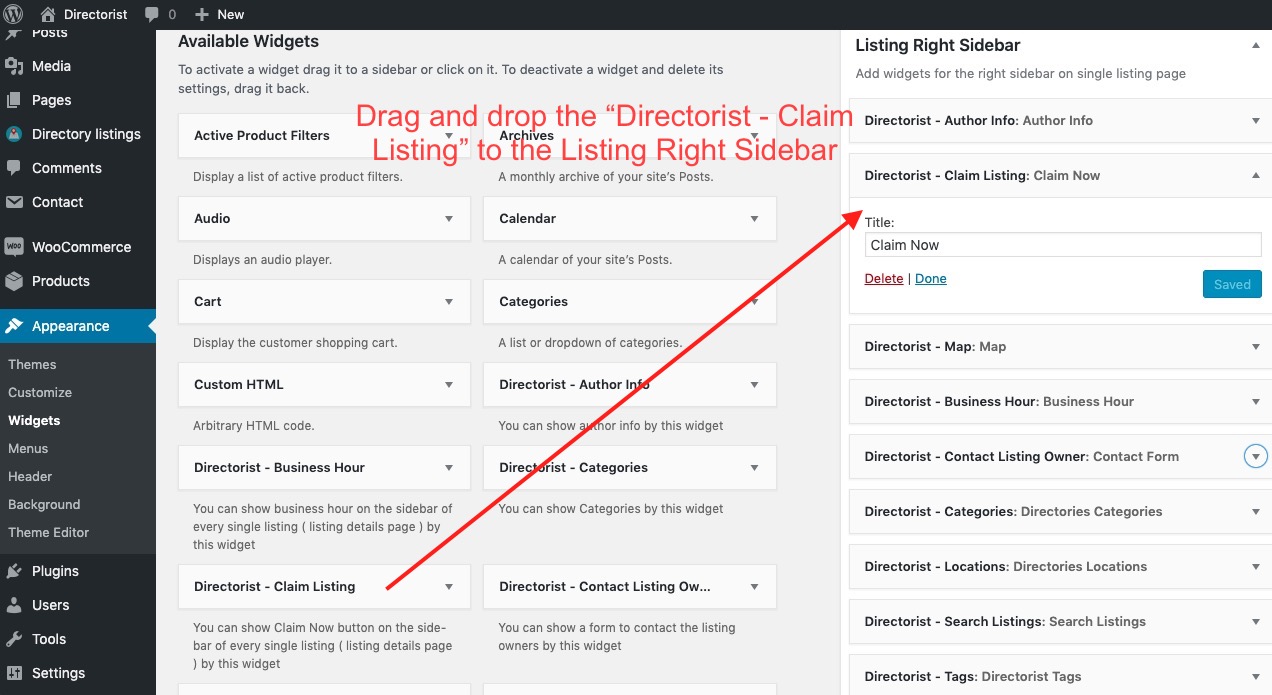
Directorist Claim Listing will create a widget called Directorist - Claim Listings for displaying information about claim listings. Follow the steps to display the claim listing.- Go to Appearance > Widgets.
- Drag and drop the Directorist - Claim Listing widget to the "Listing Right Sidebar" area.
- Visit a listing and you will see a claim listing widget has been
 Business Owner will be able to claim the ownership of a listing/business by clicking the 'claim now' button. A nice form will show in a pop-up modal when a user will click on the claim now button. Optionally, you can test the claim listing functionality by clicking the 'claim now' button.
 A user will be required to fill up all the fields in the claim form. if you have assigned a pricing plan as a method of charge for a claim for this listing then business owner will be able to choose a plan before claiming his business.
The next step is to moderate the claims received from a business owner.
A user will be required to fill up all the fields in the claim form. if you have assigned a pricing plan as a method of charge for a claim for this listing then business owner will be able to choose a plan before claiming his business.
The next step is to moderate the claims received from a business owner.
Moderating Claims
You can moderate claims very easily from a simple user interface. You will see all the claims received from different business owners in Directory Listings > Claim Listings page.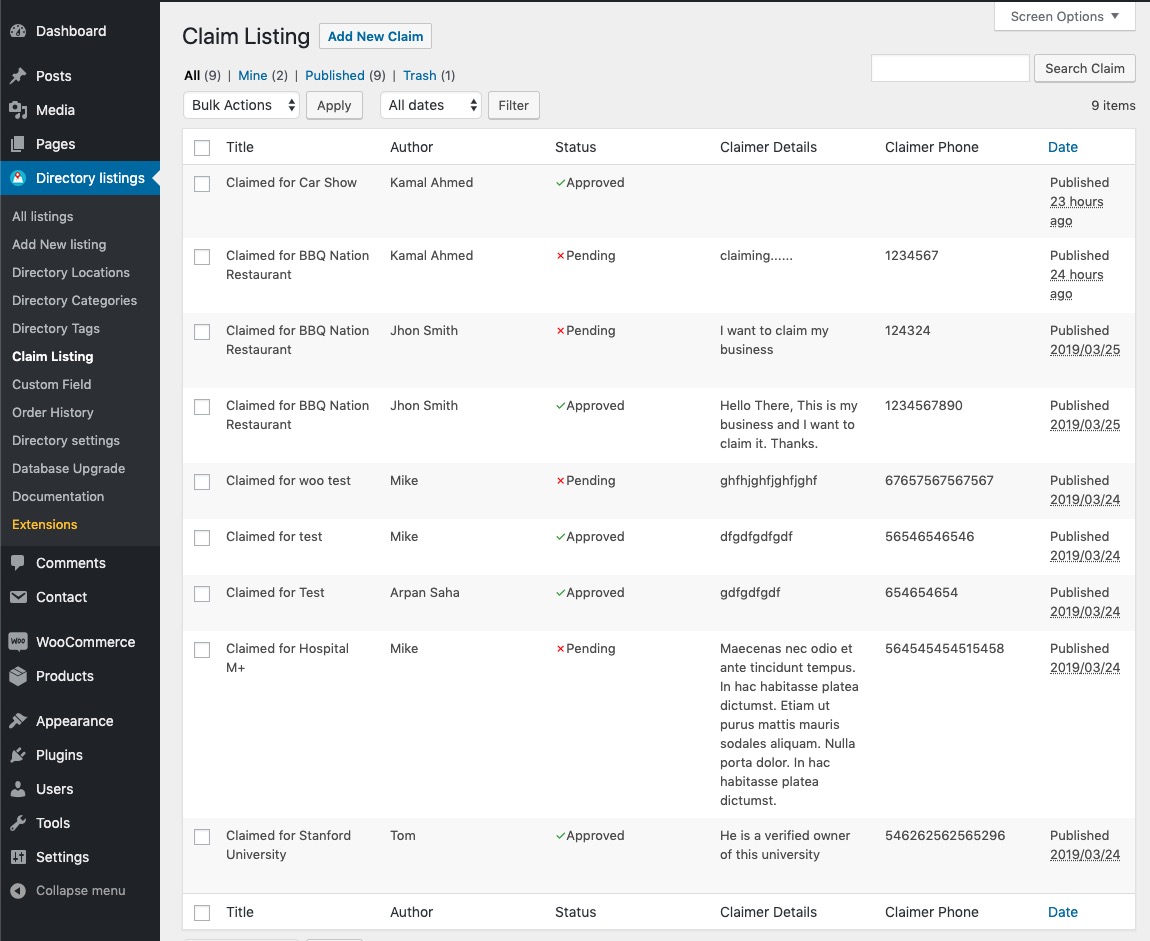
Claim Status:
There are three statuses in claim listings: 1. Approved, 2. Pending and 3. Declined.- Approved: When you have verified a user and received payments, you should set the claim status to approved. An approved claim will add a nice badge to the claimed listing/business. You can also modify the claimed badge text from the claim listing extension's settings page. Here is what happens when you approve a claim. A) Claimer of the listing will be the new owner of the listing. He will be able to modify the information of the listing. B) No one can claim this listing again once its claim from an owner is approved. Claim Listing widget for this listing will be hidden. C) A nice badge will be displayed beside the title of the claimed listing. The text of the badge is customizable. This will distinguish between claimed and unclaimed listings.
- Pending: When a new claim is made, it will have a pending status. It means the admin has not reviewed the claim yet.
- Declined: When an admin does not approve a claim, he/she will reject that claim and it will have a declined status.
Moderating a claim:
Go to Directory Listings > Claim Listings and hover on any claim and click on the edit link. You will see the edit claim page like below.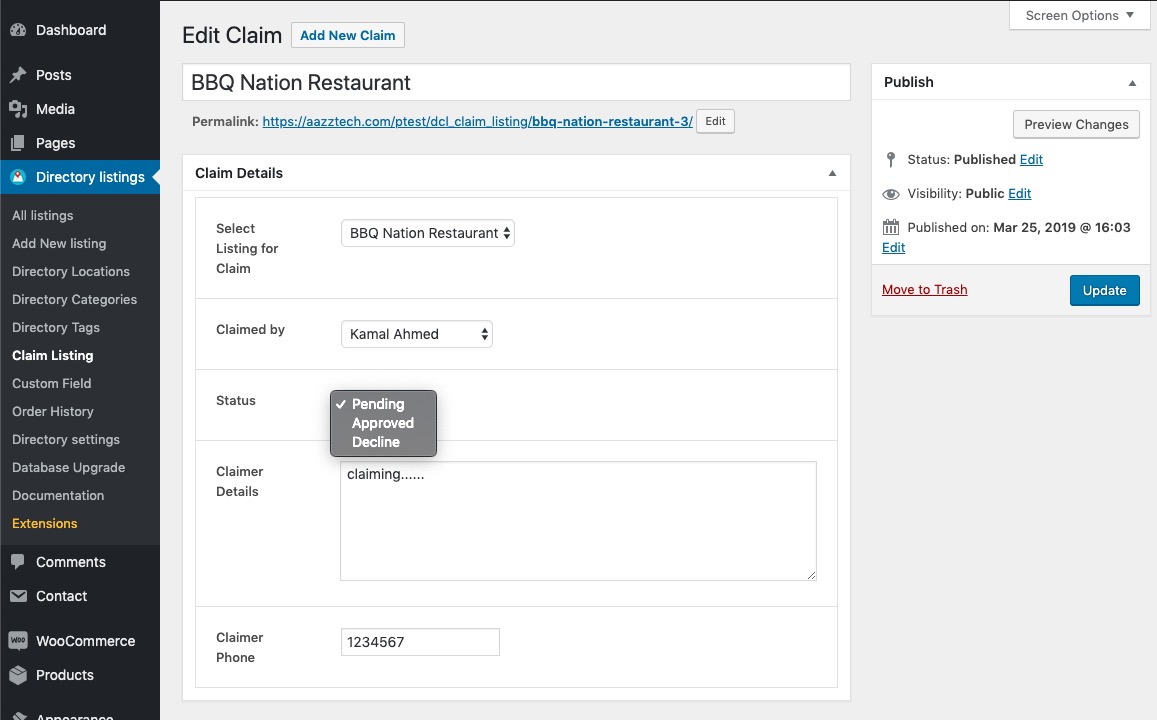
 After a claim is approved for the following listing.

Last Updated: June 1st, 2020