How to Create a Car Directory Website for Free
No one can deny how lucrative and evergrowing a directory website is. It’s not an exception when you are trying to create a car directory website or a car classified ads website. But creating such websites may be a daunting task if you don’t do it the right way with a proper tool.
Fortunately, where there is a problem there is a solution. If you are a WordPress user, it will be just a matter of a few minutes to kick off the car directory website that you are dreaming of! In today’s article, we will walk you through the detailed but precise process of how to create a car directory website with a free, versatile, and scalable WordPress tool called Directorist.
So, why wait? Let’s jump right in to know how to create a car directory website!
Create a Car Directory Website with These Easy Steps
We will only show you incorporating the important aspects. We will recommend you not to skip or swap the steps with one another to avoid any unwanted results along the way. We assume that you already have your WordPress website in place. Now let’s follow the steps one by one:
Step 1: Install & activate Directorist
For this tutorial, we will be using Directorist as it offers the most versatile features even in the free version. In addition, it has 10,000+ active installations with more than 4.7 ratings in WordPress.org.
Once your fresh WordPress website is up and running, you can go to WP Admin Dashboard > Plugins > Add New > Search for the keyword ‘directorist’ > Install the following plugin as indicated with an arrow.
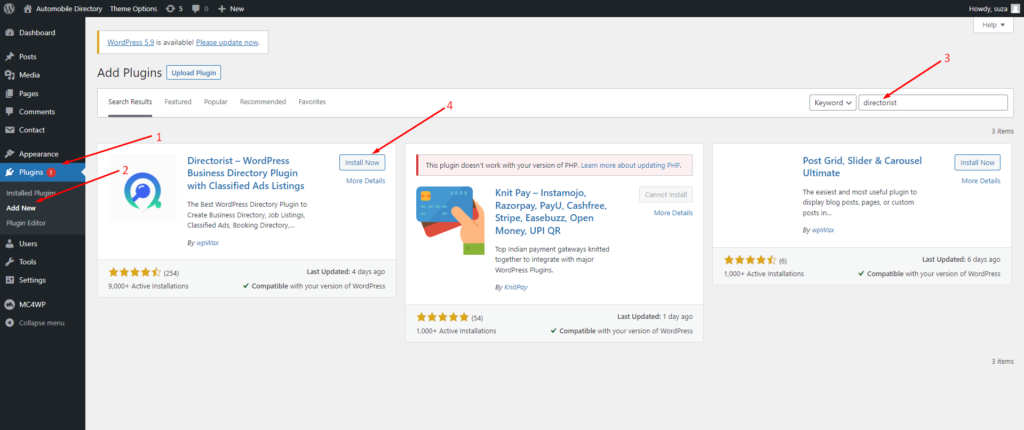
Next up, you need to activate and configure the setup wizard to get the ball rolling. We recommend you to visit our official documentation that will help you to do so with ease.
Step 2: Install a free directory theme
You can use any theme for your directory website but choosing a directory website optimized theme will add extra flavor to the appearance. Thus we will be using a free and Directorist optimized classified theme called ‘OneListing‘. You can get the theme for here. Directorist also has another free theme called Directoria which you can install if you want. But we will use the OneListing theme for this tutorial.
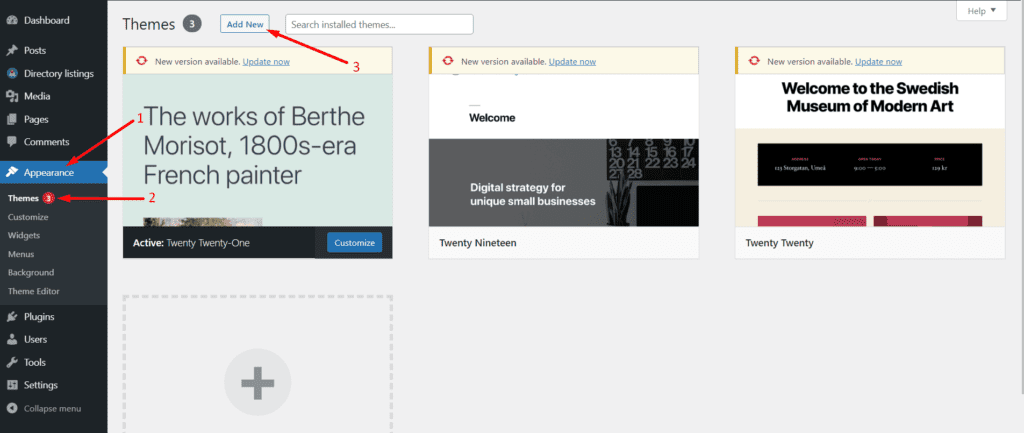
Once you get the theme, navigate to the WP Admin Dashboard > Appearance > Themes > Add New.
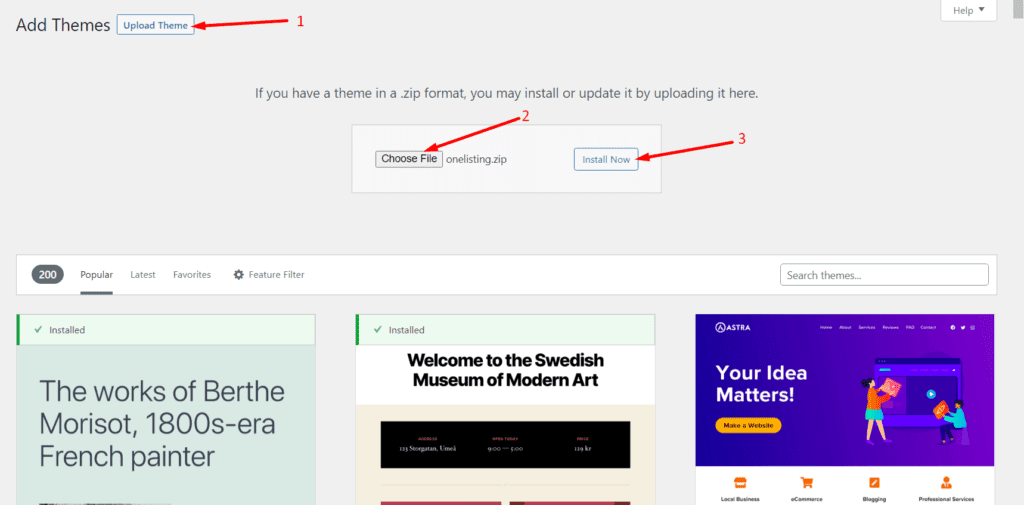
Then click on Upload Theme > Choose File and select the ‘onelisting.zip’ > Install Now.
Now, activate the theme to take an effect:

While installing the theme, make sure you have installed all the suggested extensions so that the theme works perfectly. For example, you must install & activate the Elementor, Contact Form 7, MailChimp, and a Theme ToolKit. So, we recommend you hit the “Begin Installing Plugins” option to install them all at once.

And that’s it!
You can also use the premium version of the theme to get a more advanced appearance and features. But if you want to step up the game we will suggest you use the premium niche-based dCar theme instead of buying the pro version of OneListing. This is simply because dCar theme is specifically developed for creating a car directory website.
Categories are really important for visitors to find their desired car listing faster. Without adding a category, it will be much harder for a listing owner to make his ads actually classified. With Directorist, you can not only give a name to a certain category but also assign it to a parent category, give a description, add an image, and assign a category icon & color to it.
Creating categories and tags for the listings or the cars will make it easier for the visitors to find their desired items. So, make sure you create several categories:
To do so, navigate to the Directory Listings > Categories > Fill out the fields and make sure to hit the “Add New Category” button.
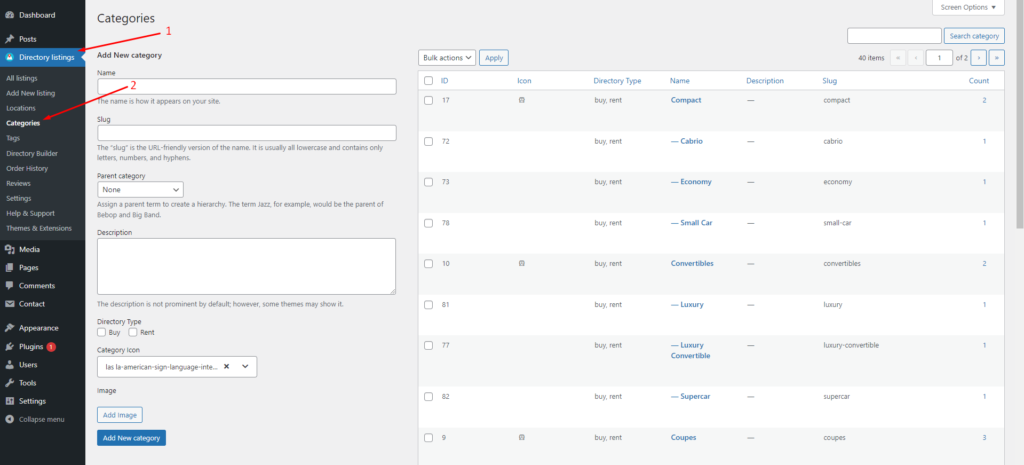
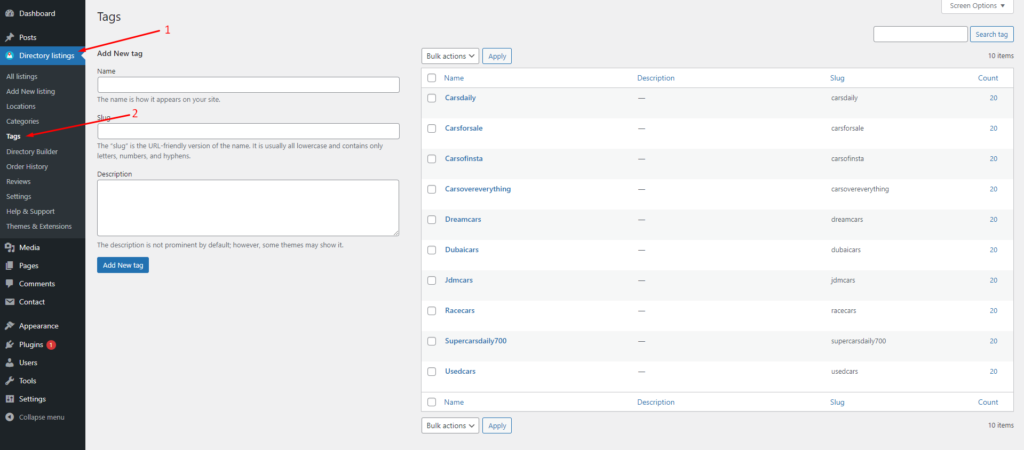
Similarly, you can add tags so that the visitors can find their desired item as fast as possible. You can do it from Directory Listings > Tags > Enter Credentials > Add New Tag.
Step 4: How to add new locations
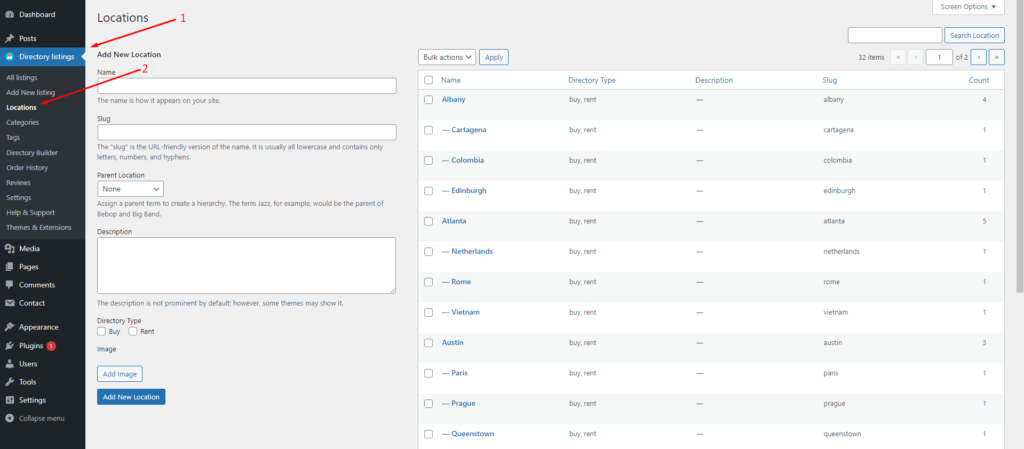
Just like adding categories or tags adding locations helps the users find the desired automotive listing from a car classified ads website. To add locations, you have to go to the Directory Listing > Locations > Enter credentials > Add New Locations.
Step 5: Listing Submission by Users
Now, it’s time to upload some listings on your car classified ads website. To upload car listings the users will need to navigate to the “Add Listing” button on your website. Next up, the user will find the following form:
After you have a series of listings on your automobile classified ads website, the all listings page will look something like this:
So, you are already done with creating a basic automotive directory website. Now, let’s add some advanced features so that you can start earning from your website.
Adding Advanced feature: Monetizing your automotive directory website
Here comes the optional yet most important part, we know. With Directorist, you can monetize your website in a number of ways. Here are a few notable ways:
- Charge for listings
- Featured listings
- Sell premium listings
- Allow businesses to claim listings
- Charge for viewing private listings
- Allow private/sponsored advertising
- Charge for membership
- Sell business leads
- Promote affiliate products
- Allow sponsored articles/guest posting
- Bookings & appointment
- Access control
- Ranked featured lists
- Paid ad placement
Want to learn these ways in detail? Give a read to this article, “How to Monetize a Directory Listing Website” now!
Bonus Tips
- Free Elementor Support: You can add the filtered Search Bar from the Directorist Elementor widgets. If you are using the OneListing theme follow this short video to insert the search bar from the Theme Elements section:
You can also style or customize the search bar from the Elementor editor panel like any other widget.
Just like the Theme Elements, you can effortlessly edit the Directorist Elementor widgets too.
- Free Gutenberg Support: You can also create your car directory website pages using Gutenberg blocks. You will just need to click a Directorist Gutenberg block to generate pages in the blink of an eye just like the Elementor widgets. For example, here we have created the all listings page using the Directorist Gutenberg blocks:
At the End of the Road
Creating a car directory website is that easy with Directorist. We hope this guide will be helpful enough to do it all by yourself. However, if you still think you are stuck with any one of these steps, shoot us your comment below. In case you have already set up a car directory website, don’t hesitate to share your thoughts below.



Leave a Reply
You must be logged in to post a comment.