

How to Create a Car Directory Website in 2026
-

- Directorist Tutorials
- 9 mins read
No one can deny how lucrative and evergrowing a directory website is. It’s not an exception when you are trying to create a car directory website or a car classified ads website. But creating such websites may be a daunting task if you don’t do it the right way with a proper tool.
Fortunately, where there is a problem there is a solution. If you are a WordPress user, it will be just a matter of a few minutes to kick off the car directory website that you are dreaming of! In today’s article, we will walk you through the detailed but precise process of how to create a car directory website with a free, versatile, and scalable WordPress tool called Directorist.
So, why wait? Let’s jump right in to know how to create a car directory website!
Common Types of Car Directory Websites
Before creating your car directory, let’s get some idea about the common types of car directory websites. These types will help to broaden your business idea. You can primarily start with a single type and extend with multiple types through multi directory model. However, the type is, the core objective remains the same . To help users buy, while others focus on and sell vehicles, rentals, dealerships, or services. And, as a directory owner, you earn money by helping these two groups. Here are some common types of car directory websites:
- New Car Buy and Sell Directory: This type of directory lists only brand-new vehicles from dealers or authorized sellers. It lets buyers compare new car models, prices, features, and special offers in one place.
- Used Car Directory: This directory features pre-owned vehicles. Sellers and dealers can post listings with details like model, year, mileage, condition, and price.
- Dealer Directory: This directory lists car dealerships by brand, location, or specialty. It helps users find trusted dealers, see available cars, and contact the right seller easily.
- Car Rental Directory: This type is for businesses offering cars for short or long-term rental. Users can browse available vehicles, compare rental companies, and check prices and booking options.
- EV Directory: This directory focuses on electric vehicles, including listings for electric cars, dealers, charging stations, and rental options. This area is growing as more people become interested in electric mobility.
- Auto Service Directory: This directory lists automotive service providers such as repair shops, car washes, detailing services, and mechanics. It is helpful for users looking for vehicle services instead of just car listings.
Create a Car Directory Website with These Easy Steps
We will only show you incorporating the important aspects. We will recommend you not to skip or swap the steps with one another to avoid any unwanted results along the way. We assume that you already have your WordPress website in place. If not, you can follow our ultimate guide to complete the process. Now let’s follow the steps one by one:
Step 1: Install & activate Directorist
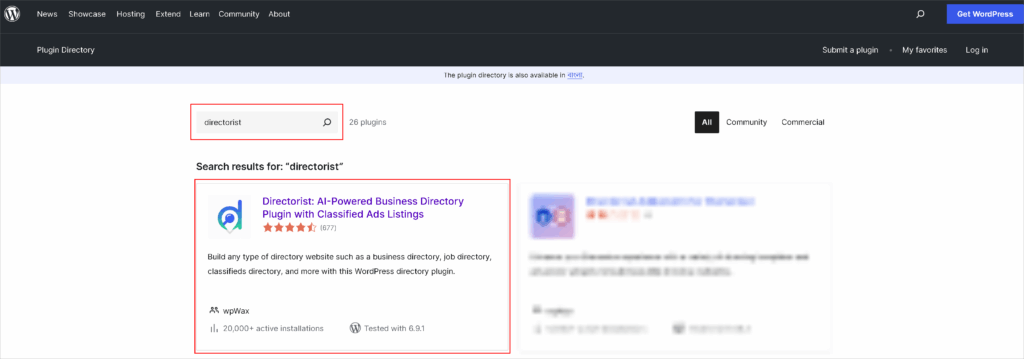
For this tutorial, we will be using Directorist as it offers the most versatile features even in the free version. In addition, it has 20,000+ active installations with more than 4.7 ratings in WordPress.org.
Once your fresh WordPress website is up and running, you can go to WP Admin Dashboard > Plugins > Add New > Search for the keyword ‘directorist’ > Install the following plugin
Next up, you need to activate and configure the setup wizard to get the ball rolling. We recommend you to visit our official documentation that will help you to do so with ease.
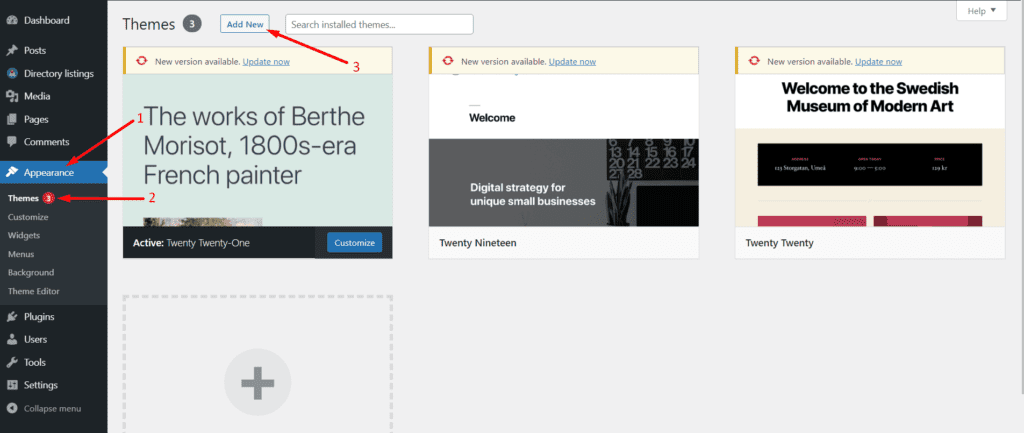
Step 2: Install a car directory theme
You can use any theme for your directory website but choosing a directory website optimized theme will add extra flavor to the appearance. Thus we will be using a niche specific and Directorist optimized classified theme called ‘dCar‘. You can get the theme for here. If you’ve tight budget, Directorist also has another free theme called OneListing. This free theme will not offer premium extensions and require a bit more customization as this is build for all directory entrepreneur who have a budget limitation. We have a full guide on this how to create a directory website for free.
So now, once you get the theme from your dashboard, navigate to the WP Admin Dashboard > Appearance > Themes > Add New.
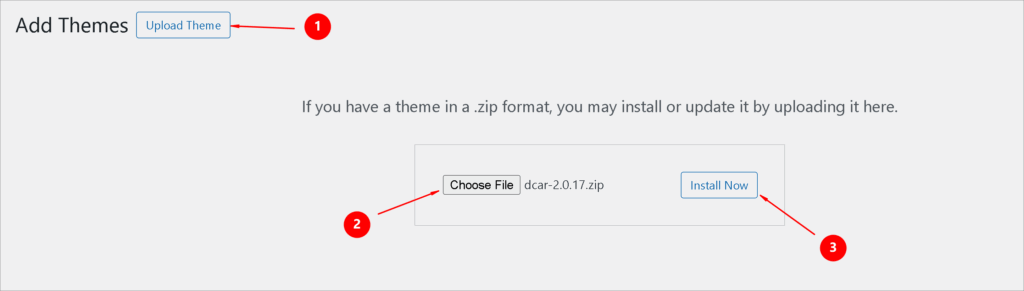
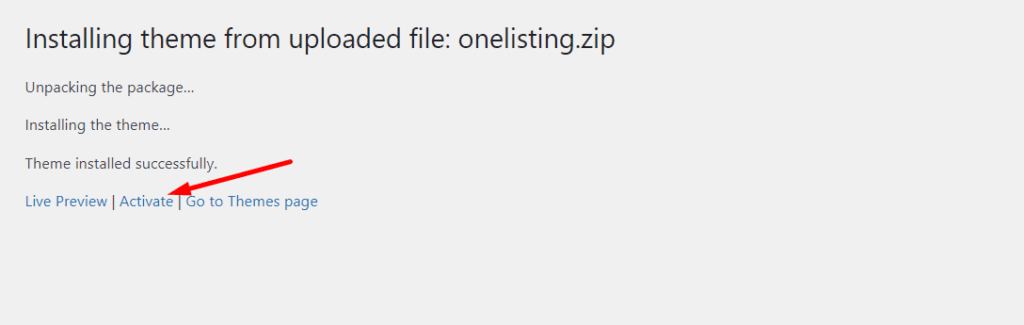
Then click on Upload Theme > Choose File and select the ‘onelisting.zip’ > Install Now.
Now, activate the theme to take an effect:
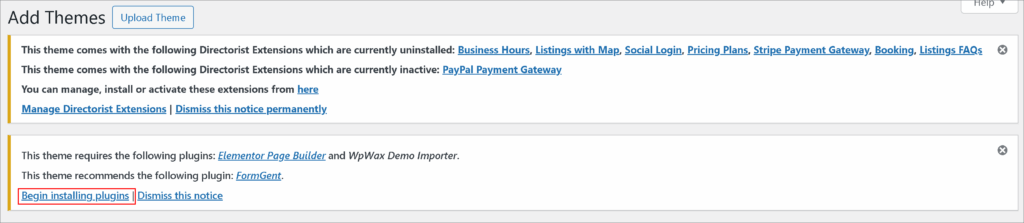
While installing the theme, make sure you have installed all the suggested extensions so that the theme works perfectly. So, we recommend you hit the “Begin Installing Plugins” option to install them all at once.
And that’s it! You have successfully installed dCar theme is specifically developed for creating a car directory website. Here is first look after installing your dCar theme. To know how to customize it aligning with your brand with advanced theme options, follow this section from our ultimate guide.
Categories are really important for visitors to find their desired car listing faster. Without adding a category, it will be much harder for a listing owner to make his ads actually classified. With Directorist, you can not only give a name to a certain category but also assign it to a parent category, give a description, add an image, and assign a category icon & color to it.
Creating categories and tags for the listings or the cars will make it easier for the visitors to find their desired items. So, make sure you create several categories:
To do so, navigate to the Directorist > Categories > Fill out the fields and make sure to hit the “Add New Category” button.
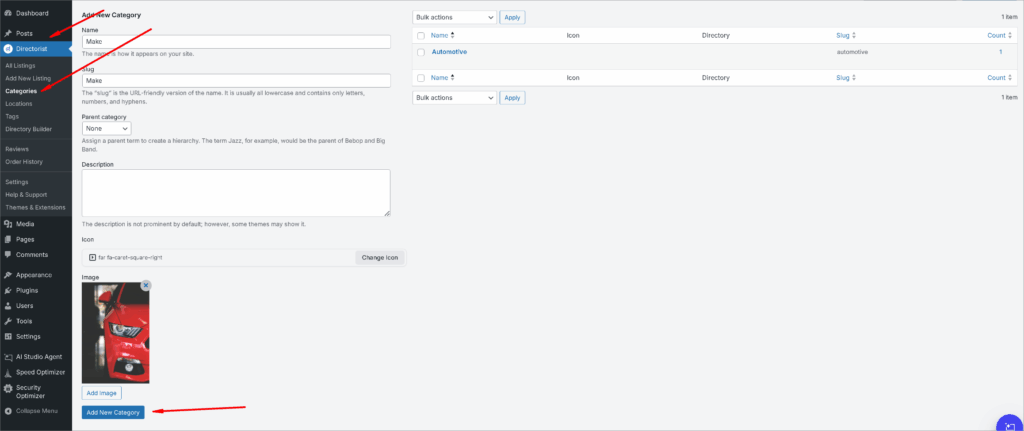

by this way, you can add your all the required categories like Make, model, year, body type, condition, fuel type, price, mileage or seller type.
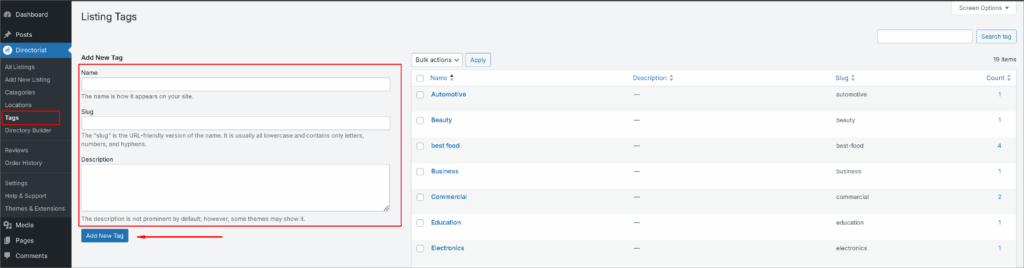
Similarly, you can add tags so that the visitors can find their desired item as fast as possible. You can do it from Directorist > Tags > Enter Credentials > Add New Tag.
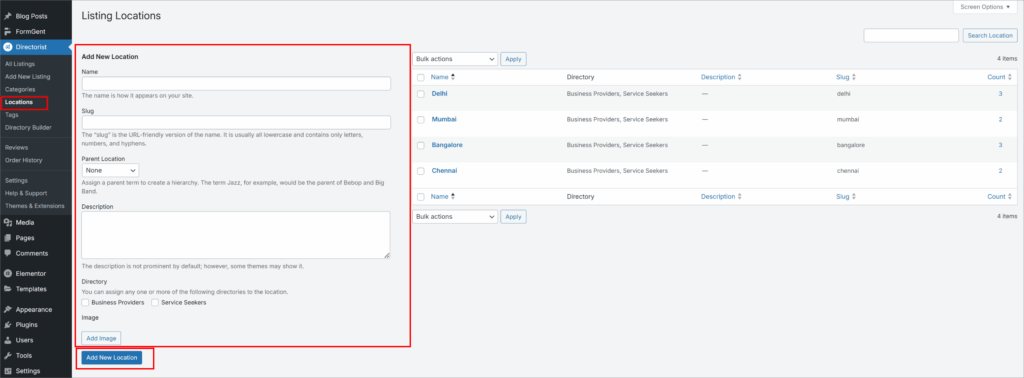
Step 4: How to add new locations
Just like adding categories or tags adding locations helps the users find the desired automotive listing from a car classified ads website. To add locations, you have to go to the Directorist> Locations > Enter credentials > Add New Locations.
Step 5: Create a Listing Submission Form
Now, it’s time to upload some listings on your car classified ads website. To upload car listings the users will need to navigate to the “Submit Your Cars” button on your website. If you want users, dealers, or private sellers to add listings, you need a clean and easy submission form. This form should collect all the important information without making the process feel overwhelming. You can personalized your “Add Listing Form” using “Form Fields” & “Custom Fields”.
WP Dashboard > Directorist > Directory Builder > Add Listing Form > Update

Next up, the user will find the following form:
For adding more listing, you can add listing manually, upload permitted business data through CSV.
After you have a series of listings on your automobile classified ads website, the all listings page will look something like this:
Step 6: Add Key Pages
Before launch, your site should include all the key pages users expect to see. These pages make the website feel complete, improve trust, and support both usability and compliance.
Important pages to add include:
- Home
- About
- Contact
- Pricing
- Submit Listing
- Privacy Policy
- Terms and Conditions
Your Home page should clearly explain what the directory offers. The About page can share your mission and audience focus. The Pricing page is important if you plan to charge for listings. Privacy Policy and Terms pages also help build trust and are especially important if you collect user data or process payments.
Step 7: Test and Launch
Before you officially launch, test everything carefully. Check how the site looks and works on mobile devices, since many users will browse on phones. Test your forms to make sure listings can be submitted without errors. If you are charging for listings, run payment tests to confirm everything works properly.
You should also check site speed, because slow-loading pages can hurt both conversions and SEO. Review your main navigation, search filters, images, and listing pages to make sure everything feels smooth. Finally, scan for broken links, missing pages, or formatting issues.
Once these checks are done, your car directory website is ready to launch. From there, you can focus on adding more listings, improving SEO, promoting the site, and growing your directory into a real online business. Also don’t forget to check out by cross checking – Mistakes to Avoid While Building Your Online Directory
So, you are already done with creating a basic automotive directory website. Now, let’s add some advanced features so that you can start earning from your website.
Monetizing Your Automotive Directory Website
Here comes the optional yet most important part, we know. With Directorist, you can monetize your website in a number of ways. Here are a few notable ways:
- Charge for listings
- Featured listings
- Sell premium listings
- Allow businesses to claim listings
- Charge for viewing private listings
- Allow private/sponsored advertising
- Charge for membership
- Sell business leads
- Promote affiliate products
- Allow sponsored articles/guest posting
- Bookings & appointment
- Access control
- Ranked featured lists
- Paid ad placement
Want to learn these ways in detail? Give a read to this article, “How to Monetize a Directory Listing Website” now!
Adding Advanced Features On Your Car Directory Website
To power up your car directory website, Directorist + dCar is plays like unbeatable. dCar comes with some premium extensions that help you to lunch a perfect car directory. The extensions are as follows. You can find all the set up process from the dedicated organized documentation section.
| Extension Name | How It Works | How To Set Up |
| Business Hours | Adds structured opening/closing hours to each listing so visitors can immediately see if a business is currently open. | Documentation |
| Listings With Map | Displays directory listings on an interactive map view so visitors can browse businesses geographically. | Documentation |
| Social Login | Allows users to register and log in with Facebook or other social accounts, reducing friction at signup. | Documentation |
| Pricing Plans | Built-in (non-WooCommerce) monetization system that lets you define free, featured, or premium listing tiers with custom durations and permissions. | Documentation |
| PayPal Payment Gateway (Free) | Adds PayPal as a checkout option for listing submission fees and pricing plans. | Documentation |
| Stripe Payment Gateway | Enables Stripe-based payments across 135+ currencies, providing a secure and globally accepted payment method for listing plans. | Documentation |
| Booking | Enables listings to accept bookings, appointments, or reservations with scheduling features, suitable for hotels, salons, and service providers. | Documentation |
| Listings FAQs | Adds a collapsible FAQ section to each listing page, helping business owners answer common customer questions proactively. | Documentation |
Along with these extensions, Directorist offers couple of extension that can help you to extend features of your car directory. Browse all the extensions from the extension page.
Bonus Tips
- Free Elementor Support: You can add the filtered Search Bar from the Directorist Elementor widgets. If you are using the OneListing theme follow this short video to insert the search bar from the Theme Elements section:
You can also style or customize the search bar from the Elementor editor panel like any other widget.
Just like the Theme Elements, you can effortlessly edit the Directorist Elementor widgets too.
- Free Gutenberg Support: You can also create your car directory website pages using Gutenberg blocks. You will just need to click a Directorist Gutenberg block to generate pages in the blink of an eye just like the Elementor widgets. For example, here we have created the all listings page using the Directorist Gutenberg blocks:
At the End of the Road
Creating a car directory website is that easy with Directorist. We hope this guide will be helpful enough to do it all by yourself. However, if you still think you are stuck with any one of these steps, shoot us your comment below. In case you have already set up a car directory website, don’t hesitate to share your thoughts below.

Editorial Staff
Directorist Editorial Staff is a team of WordPress geeks that provides quality content for WordPress users. Primarily the team works for all the ingredients needed for establishing a directory listing website in WordPress. Moreover, you will get numerous web content related to the WordPress blog, Digital marketing stuff, social post, text documentation, visual guides, and so on.


Leave a Reply
You must be logged in to post a comment.