


Table of Contents
- 1 Why Banner Ads Work So Well on Directory Websites
- 2 Setting the Foundation Before You Sell a Single Ad
- 3 Setting Up with the Ads Manager Extension
- 4 Ad Placement & Design: Making Ads Work Without Killing UX
- 5 Pricing Your Banner Ad Slots
- 6 Finding and Closing Your First Local Advertisers
- 7 The Ball Is In Your Court
Guide to Sell Banner Ads on Your Directory Website
-

- Tutorials Extensions Tips & Tricks
- 16 mins read
You’ve built your directory website. You’ve grown your traffic. Businesses are listed in your directory website — and that’s great. But if listing fees are your only income stream, you’re leaving serious money on the table.
Here’s the thing: the same traffic that makes your directory valuable to listed businesses also makes it attractive to local advertisers. Visitors come to your site with buying intent and they’re actively searching for a restaurant, a plumber or a gym. That’s exactly the kind of audience local businesses will pay to get in front of.
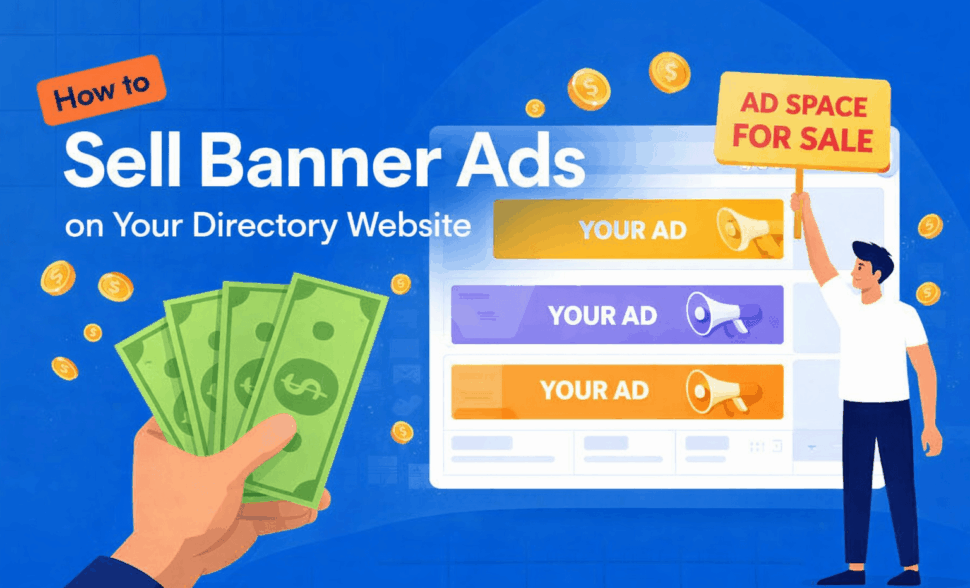
Sell Banner Ads on Your Directory Website are one of the simplest, lowest-friction ways to add a second revenue stream to your directory. You don’t need to rebuild your site, create new content, or hire a sales team. You already have the audience. You just need a system to monetize it.
That’s exactly what this guide covers. You’ll learn how to set up and manage banner ads using the Directorist Ads Manager extension, where to place ads for maximum value, how to price your slots, and how to land your first local advertisers without feeling like a pushy salesperson.
Whether you’re running a city guide, a niche business directory, or a local services platform, this guide will show you how to turn your existing traffic into predictable ad revenue.
Before setting up your Ads Manager, you need to activate your monetization feature and add a payment gateway to your directory. If you haven’t set up your monetization yet, follow this guide to activate monetization and add payment gateways to your directory website with WordPress: Add Payment Gateways to Your Directory Website with WordPress.
Why Banner Ads Work So Well on Directory Websites

Most website owners struggle to sell ads because their audience is too broad. A general blog about “lifestyle” or “tips and tricks” attracts all kinds of visitors with no clear intent. Advertisers aren’t much interested in that.
Your directory has a niche audience and that’s your biggest selling point to sell banner ads on directory website.
Your audience already has buying intent. When someone visits your directory, they’re not casually browsing. They’re looking for a specific business, service, or place. That’s a warm audience, ready-to-act traffic. A local restaurant, salon, or contractor advertising on your site isn’t interrupting someone’s intention — they’re showing up exactly when that person is already looking.
Local advertisers need hyper-targeted reach. A bakery in Austin doesn’t need to reach people in Seattle. Traditional advertising options are not working so good now and handling multiple ads separately can feel difficult. Your directory offers them something rare: a focused, local audience at an affordable price point. That’s a genuinely compelling pitch.
Banner ads and listing fees work together, not against each other. Some directory owners worry that selling ads will feel redundant — businesses already pay to be listed, so why would they pay again? The answer is visibility. A listing gets a business found. A banner ad gets a business noticed — by visitors who may not have searched for them specifically. These are two different outcomes, and smart local business owners understand the difference.
The revenue potential is real. Even with modest traffic, banner ads can add meaningful income. A directory with 20,000 monthly pageviews charging $150/month for three ad slots generates $450/month — over $5,000 a year — from advertisers alone. Scale that with more traffic or premium placements, and the numbers grow quickly.
Setting the Foundation Before You Sell a Single Ad

Before you start selling a single ad space to a local business, you need to get your own house in order. Advertisers will check potentiality or ask some common questions before they place an ad on your site. Being prepared with these clear purposes builds instant credibility and makes closing a deal much easier.
- Know Your Traffic Numbers
The first thing any advertiser will want to know is: “How many people will actually see my ad?”
Pull these three numbers from Google Analytics before you start any outreach:
- Monthly Pageviews — the total number of pages viewed across your site each month
- Unique Visitors — how many individual people visited
- Average Session Duration — how long visitors stick around, which signals engagement
You don’t need massive random traffic to sell banner ads on directory website. A directory with 10,000 monthly visitors who are highly local and intent-driven is far more attractive to a local business than a general blog with 100,000 passive readers. Lead with quality, not just quantity.
- Define Your Ad Inventory
Not every spot on your website is worth selling. Before you start, decide exactly what you’re offering.
Think through the following:
- How many slots will you sell? Too many ads hurt user experience and dilute the value of each placement. Start with 3–5 well-chosen spots.
- Which pages carry the most value? Your homepage and high-traffic category pages are your premium spaces for ad. Single listing pages and search results pages are solid mid-tier options.
- What ad sizes will you support? Standardizing on common IAB sizes (more on this in Section “Ad Placement & Design” ) makes it easier for advertisers to provide creatives without back-and-forth.
Treat your ad slots like limited inventory. Scarcity increases perceived value — if you tell an advertiser only two homepage banner spots are available, they’re more motivated to act.
Setting Up with the Ads Manager Extension

The Directorist Ads Manager lets you insert ads on specific directory pages — All Listings, Single Listings, All Locations, All Categories, and more — using multiple ad formats including Google AdSense, Facebook Ads, Static Image Ads, and custom HTML/JS.
Step-1: Install and Activate the Extension
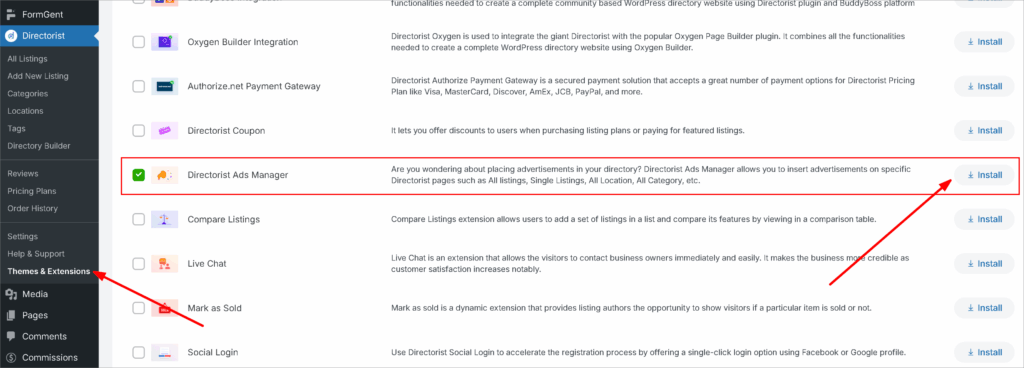
Navigate to Directorist > Themes & Extensions, Log In you user dashboard then find and install Directorist – Ads Manager and activate the plugin. Once activated, a new Ads menu item will appear under your Directorist dashboard.
Step-2: Create Your First Ad
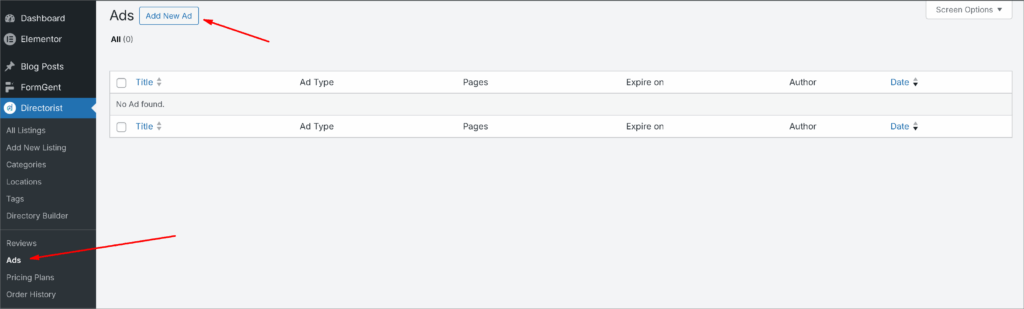
After successful installation, navigate to Directorist > Ads and click the Add New Ad button to begin creating your first advertisement. Think of each “Ad” as a single campaign slot you’re selling to one local business.
Give the Ad a Title Enter a clear internal title so you can identify it easily in your dashboard (e.g., “Joe’s Pizza – Homepage Banner – March 2026”). This is for your reference only and won’t be visible to visitors.
Step-3: Choose Your Ad Type
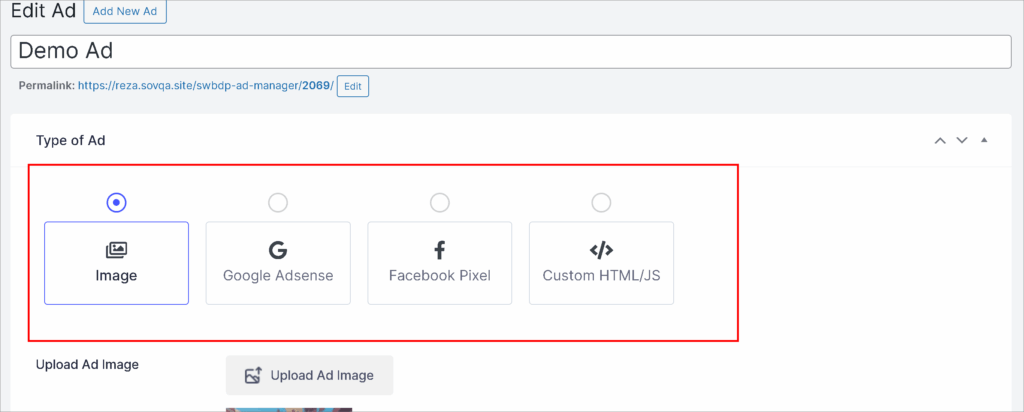
Choose Your Ad Type There are four ad type options available: Image, Google AdSense, Facebook Ads, and Custom HTML/JS.For selling banner ads directly to local businesses, Image is the most practical choice — the advertiser simply provides their banner graphic and you upload it. If you want to supplement with programmatic ads, Google AdSense slots can fill unsold inventory automatically.
- Image → Upload the advertiser’s banner and fill in the destination URL with other requirements.
- Google AdSense → Paste your AdSense code into the provided field. You can find the code by following this tutorial.
- Facebook Ads → Same process; paste the relevant ad code. To know how to set up the pixel, follow this official guideline from Facebook.
Watch this video for a clear overview about the Ad Manager.
Step- 4: Select Pages & Placement
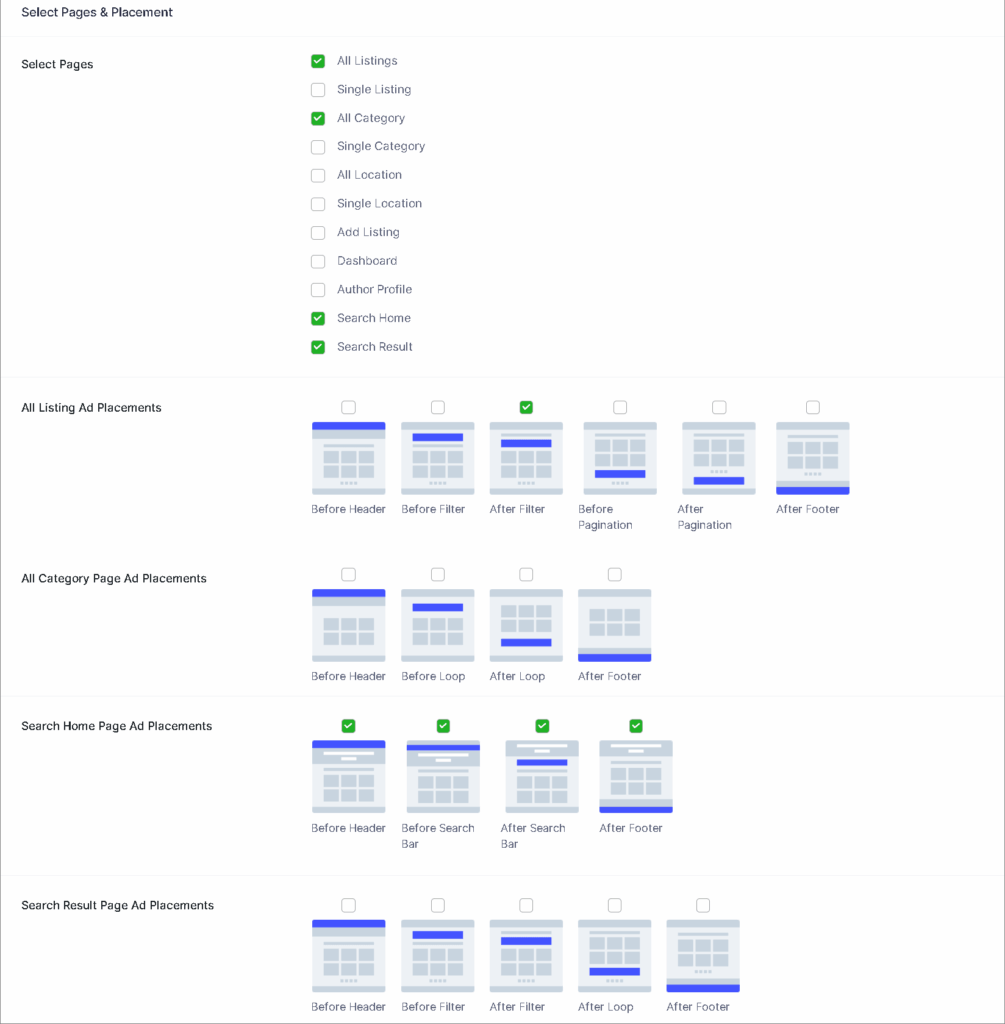
Select which pages you want the ad to appear on and choose the placement position accordingly. This is where your ad inventory strategy comes into play — homepage placements command premium prices, while category-specific pages are ideal for niche local advertisers (e.g., a plumber advertising only on the “Home Services” category page).
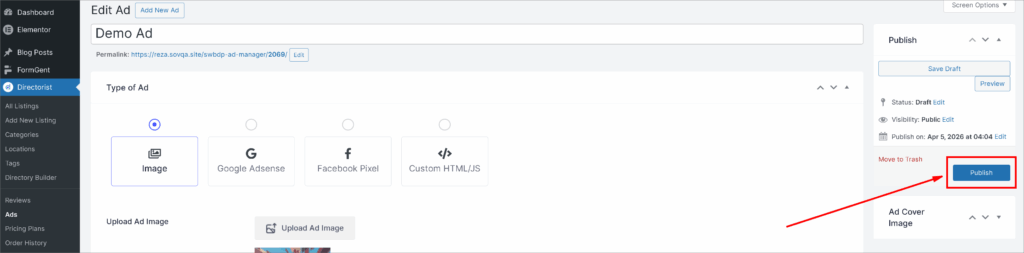
Step- 5: Configure Additional Settings & Publish
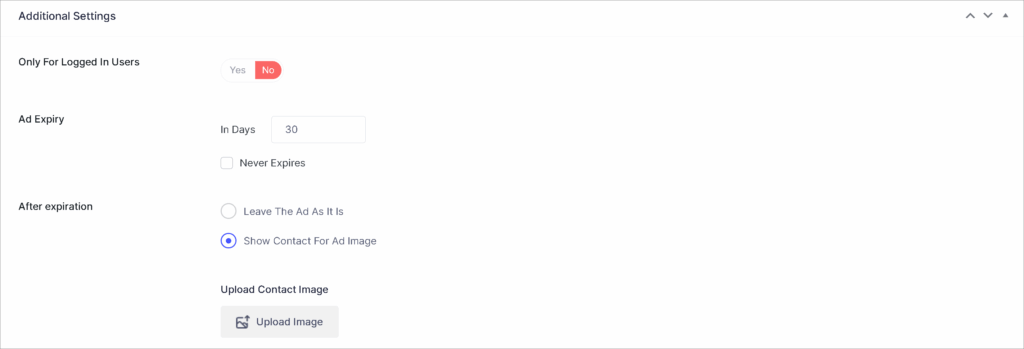
Set the ad width and height, define an expiry date for the ad, and configure any additional available options. Always set an expiry date that aligns with the advertiser’s paid period — this automates ad removal and keeps your inventory clean without manual intervention. After all setting done, Hit the Publish button to make live the Ad you just created!
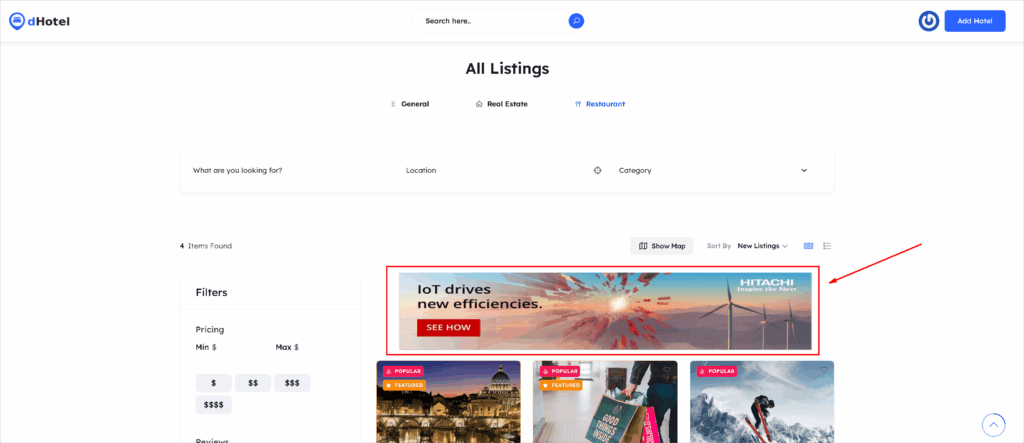
Here is a sample preview of Ads.
📌Display Ads Anywhere with Shortcodes

A shortcode is automatically generated for each ad, which you can use inside any page or PHP code to display the ad anywhere on your site. This is especially useful if you want to place an advertiser’s banner inside a blog post, a custom landing page, or a widget area that sits outside the standard directory pages.
Pro tip: Copy the shortcode and save it in the advertiser’s record (even a simple spreadsheet works). When they renew, you can quickly reference which shortcode powers their placement.
PRO-Tip: Managing Multiple Advertisers Over Time
Once you have more than one advertiser, staying organized is key. Here’s a simple system to follow using the Ads Manager:
- Name ads consistently — use a format like “[Business Name] – [Placement] – [Month/Year]”
- Use expiry dates religiously — let the extension handle deactivation automatically
- Duplicate and edit for renewals — when an advertiser renews, duplicate the existing ad and update the dates and creative rather than rebuilding from scratch
- Check your Ads dashboard regularly — the list view shows all active, expired, and pending ads at a glance so nothing slips through
Ad Placement & Design: Making Ads Work Without Killing UX

Getting an advertiser to sign up is one thing. Making sure their ad actually performs — and that your directory stays pleasant to use — is what keeps them coming back month after month. Smart placement and basic design standards are what separate a directory that retains advertisers from one that struggles to get renewals.
1. The Best Banner Positions on a Directory Website
Not all ad spots are created equal. Here’s how to think about placement value on a directory site:
Homepage Banner (Premium) — The leaderboard banner sitting above or just below your main navigation is your highest-value slot. Every visitor sees it regardless of what they’re searching for. Price it accordingly and limit it to one or two advertisers maximum to preserve its exclusivity.
Category Page Sidebar (Mid-Tier) — This is arguably the most strategically valuable placement for local advertisers. A dentist advertising on your “Health & Wellness” category page is reaching visitors who are already browsing that niche. Relevance drives clicks, and clicks make advertisers happy enough to renew.
In-Listing Placements (Mid-Tier) — Ads placed within or between individual listing pages have a native, editorial feel. Visitors are in browsing mode here, which makes them more receptive to a well-placed ad from a related business.
Footer Banners (Entry-Level) — Footer placements get less visibility but are a great entry point for smaller advertisers with tighter budgets. Offer these as your most affordable slot to bring in businesses that are hesitant to commit to a premium placement right away.
2. Standard Ad Sizes You Should Always Support
Sticking to IAB standard ad sizes means advertisers can often provide creatives they’ve already used elsewhere — removing a major barrier to getting campaigns live quickly. Build your inventory around these four core sizes:
- Leaderboard — 728×90px — Sits at the top of the page, ideal for homepage and category page headers
- Medium Rectangle — 300×250px — The most versatile size on the web; works in sidebars and in-content placements
- Wide Skyscraper — 160×600px — Tall sidebar format that stays visible as users scroll
- Mobile Banner — 320×50px — Essential for mobile visitors; don’t overlook this if your directory gets significant mobile traffic
When setting up slots in the Ads Manager, configure your ad dimensions to match these sizes exactly so advertiser creatives drop in without resizing or distortion.
Most local business owners are not designers. Left to their own devices, they’ll send you a blurry logo on a white background and call it a banner. Set clear expectations upfront by sharing a simple one-page creative brief with every new advertiser. Include the following:
- File formats accepted: JPEG, PNG, or GIF (for animated ads)
- Maximum file size: Keep it under 150KB to avoid slowing down your page load
- Required elements: Business name, a clear offer or message, and a call to action (e.g., “Book a Free Consultation,” “Visit Us Today”)
- What to avoid: Cluttered text, low-resolution images, or generic stock photos that don’t represent their brand
If an advertiser doesn’t have a banner ready, point them toward easy tools like Canva — it’s free, has pre-sized banner templates, and most business owners can put together something decent in under 30 minutes. Removing this friction means fewer deals fall through over something trivial.
4. Balancing Ad Density with User Experience
More ads means more potential revenue — but only up to a point. Push too far and you’ll degrade the experience that makes your directory valuable in the first place. A site cluttered with ads loses visitor trust, increases bounce rates, and ironically makes each individual ad less effective.
A practical rule of thumb: no more than two to three ads visible on screen at any one time. Keep your primary content — the listings — clearly dominant on every page. Ads should feel like a natural part of the page, not a roadblock visitors have to navigate around.
If you have more advertisers than available slots, use rotation to cycle multiple advertisers through the same placement. This lets you grow your advertiser base without compromising the user experience your visitors expect.
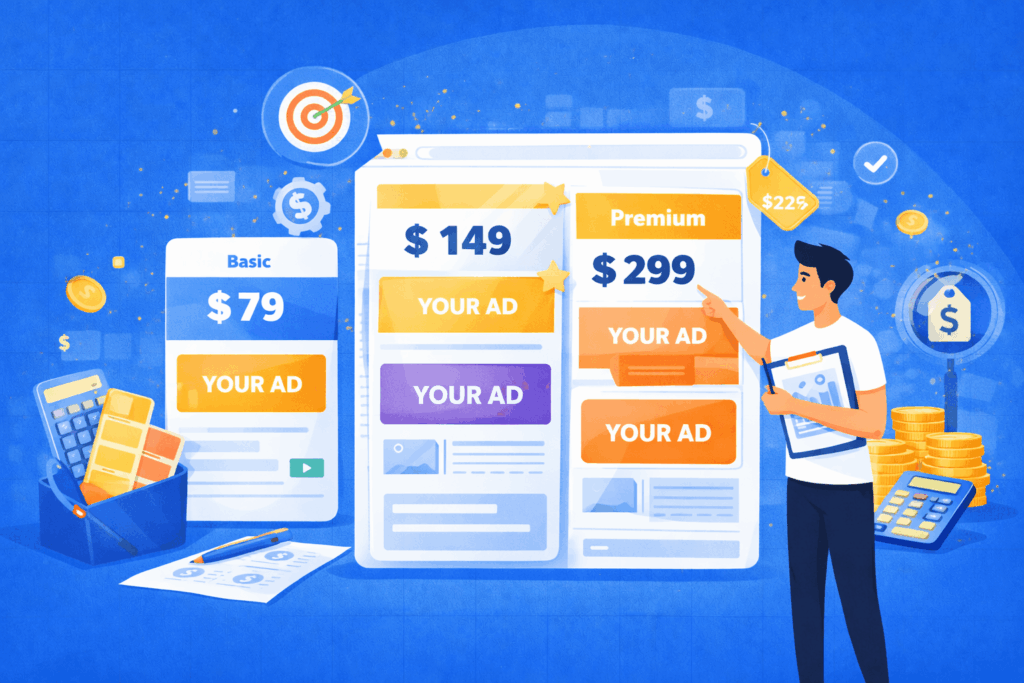
Pricing Your Banner Ad Slots
One of the most common questions directory owners ask is: “How much should I charge?” Price too high and you’ll struggle to close deals. Price too low and you’ll undervalue your audience and leave money on the table. The good news is that local business advertising doesn’t require a sophisticated pricing model — a simple, transparent structure is actually what most small business owners prefer.
1. Common Pricing Models
There are two primary ways to price banner ad slots on a directory website:
Flat-Rate Monthly Fee This is the simplest and most recommended model for local directory advertising. The advertiser pays a fixed amount per month for their slot — no complicated metrics, no fluctuating invoices. They know exactly what they’re paying, and you know exactly what you’re earning. This works especially well with local businesses that don’t have dedicated marketing teams and want predictable, easy-to-budget advertising costs.
CPM-Based Pricing (Cost Per Thousand Impressions) With CPM pricing, advertisers pay based on how many times their ad is displayed. This model rewards you as your traffic grows and feels familiar to advertisers who have run digital campaigns before. The downside is that it requires more reporting and explanation — local business owners may not immediately understand what a CPM means or why their invoice changes month to month.
Which model should you use? If your monthly traffic is under 50,000 pageviews, stick with flat-rate pricing. It’s easier to sell, manage, and easier for local advertisers to say yes to. Once your traffic scales significantly, you can introduce CPM tiers for premium placements while keeping flat-rate options available for smaller advertisers.
2. Sample Pricing Tiers
Use this as a starting framework and adjust based on your niche, location, and traffic volume:
Entry-Level — Footer or Lower Sidebar Ideal for small businesses testing the waters. Price range: $50–$100/month. Low commitment, easy yes, great for building your initial advertiser roster.
Mid-Tier — Category Page Sidebar or In-Listing Placement Niche-targeted and high-relevance for the right advertiser. Price range: $100–$200/month. Pitch this to businesses whose category directly matches the page placement.
Premium — Homepage Leaderboard or Above-the-Fold Banner Your highest-visibility, highest-value slot. Price range: $200–$400/month depending on traffic. Limit availability to one or two advertisers to maintain exclusivity and justify the price.
Bundled Package — Ad Slot + Featured Listing Combine a banner ad with a featured or sponsored listing for a discounted bundle rate. This is a powerful upsell for businesses already paying for a listing — and it increases their overall investment in your platform. Price range: $250–$500/month depending on what’s included.
3. A Few Pricing Principles to Keep in Mind
Start lower than you think you should. Your first few advertisers are also your proof of concept. Landing three advertisers at $100/month is more valuable than holding out for $300/month and closing nobody. Once you have results and testimonials, raising rates on new advertisers becomes a much easier conversation.
Offer quarterly and annual discounts. A 10–15% discount for a 3-month or 12-month commitment improves your cash flow predictability and reduces churn. Most local businesses appreciate the savings and many will take the longer commitment.
Review and adjust pricing every six months. As your traffic grows and your advertiser results improve, your rates should reflect that. Build in a regular review cycle so your pricing stays aligned with the actual value you’re delivering.
Finding and Closing Your First Local Advertisers

Setting up your ad slots is the easy part. Actually getting local businesses to pay for them is where most directory owners get stuck. The good news is that you’re not starting from zero — you already have a warm audience of potential advertisers sitting right inside your own directory.
1. Start With Your Existing Listings
Your first advertiser outreach should never go to a cold stranger. Before you do anything else, look at the businesses already listed on your directory. They’ve already demonstrated that they value visibility on your platform — that’s your strongest possible signal of buying intent.
Prioritize businesses that:
- Have claimed and fully filled out their listing (they’re engaged and active)
- Are in competitive categories where standing out matters (restaurants, lawyers, dentists, contractors)
- Have been listed for several months (they’re getting value and are unlikely to churn)
These are warm leads. They know your platform, they trust it to some degree, and they’re already spending time or money on their presence there. Pitching a banner ad to them is a natural next step, not a cold ask.
2. A Simple Outreach Script That Works
You don’t need a formal sales process to close local advertisers. A short, direct, personally written message works far better than a polished marketing email. Here’s a framework you can adapt:
Hi [Name], I run [Directory Name] — you’ve had a listing with us for a while now and I wanted to reach out personally. We’re opening up a small number of banner ad spots to businesses already on the directory, and given how competitive the [Category] space is on our site, I thought of you first. It’s a simple flat monthly fee, and I’d love to show you what’s available. Would a quick 10-minute call this week work?
Keep it short. Lead with familiarity. Make it feel exclusive. And always end with a specific, low-friction call to action — a 10-minute call is far easier to say yes to than “let me know if you’re interested.”
3. Build a Simple Media Kit
When an advertiser asks “tell me more,” you need something to send them. A one-page media kit removes friction from the decision and positions you as a credible, professional publisher. It doesn’t need to be fancy — a clean PDF with the following information is more than enough:
- Your site name and a one-line description of your directory and audience
- Key traffic stats — monthly pageviews, unique visitors, and primary geographic reach
- Available ad placements with a simple visual showing where each slot sits on the page
- Ad sizes and formats accepted
- Pricing tiers for each placement
- Contact information and how to get started
Tools like Canva have free media kit templates that take under an hour to put together. Having this ready before you start outreach makes you look prepared and makes it easier for a business owner to say yes on the spot.
4. Handling Common Objections
Even warm leads will push back. Here’s how to handle the most common ones without losing the deal:
“We don’t have a banner design.” This is the most common blocker and the easiest to solve. Point them to tools like Canva, offer to connect them with a local designer, or if you want to go the extra mile, offer a simple design service as a paid add-on. Never let a missing creative kill a deal.
“Our budget is really tight right now.” Offer your entry-level footer slot at your lowest price point and frame it as a trial. A $50–$75/month starting point is within reach for almost any local business, and once they see results, upselling to a premium slot becomes a natural conversation.
“We’re not sure it will work for us.” Offer a short trial period — 30 or 60 days — at a slight discount. This lowers the perceived risk dramatically. If their ad performs well, renewal is almost automatic. If it underperforms, use the data from the Ads Manager to suggest a better placement or creative approach rather than simply losing the advertiser.
“We already advertise with Google/Facebook.” Don’t compete with those platforms — complement them. Your directory reaches people who are actively searching locally, which is a different and often higher-intent touchpoint than social media or search ads. Position your offering as a local presence play, not a replacement for what they’re already doing.
The Ball Is In Your Court

With a good traffic, your directory website is more than a listing platform — it’s a local media asset. And like any media asset, it has the power to generate revenue beyond just the people who pay to be listed on it.
Sell banner ads on directory websites is not a complex or intimidating addition to your business model. With the right setup, the right placements, and a clear pitch to the right local businesses, it can become a reliable, recurring income stream that runs quietly in the background while you focus on growing your directory with more monetization methods that we covered in this topic – How to Monetize a Directory Listing Website.
To recap what we’ve covered:
- Your directory audience is uniquely valuable to local advertisers because of their buying intent
- Before selling, know your traffic numbers and define your ad inventory clearly
- The Directorist Ads Manager makes the technical setup straightforward — create your ad, choose your placement, set an expiry date, and you’re live
- Smart placement and basic design standards protect your user experience while maximizing ad performance
- Simple flat-rate pricing beats complicated models for local advertisers every time
- Your warmest leads are already on your site — start with your existing listings before going anywhere else
The best time to start is before it’s too late. Start with two or three well-placed slots, reach out to five businesses already listed on your directory, and let the results build your confidence and your rates from there.
If you’re running your directory on Directorist, the Ads Manager extension gives you everything you need to get started today — no developer, or no complicated setup required.
Your audience is already there. It’s time to put it to work. Install Directorist Ads Manager Now!
If you have any difficulties setting up, feel free to contact our support team or check our documentation. We also invited you to join your community to meet similar folks who are already doing great in the directory business. Also, don’t forget to follow us on Facebook, Twitter, and LinkedIn!

Rezaul Karim
Rezaul Karim is a Digital Marketer and Technical Writer dedicated to scaling online businesses. With 6+ years of experience in SEO-driven content and WordPress plugin architecture, he provides data-backed insights on building high-authority marketplaces. From optimizing search visibility to streamlining directory user experiences, Rezaul focuses on practical solutions that drive impressions and conversions. When he isn’t auditing site performance or exploring the latest AI-integrated marketing tools, he is an avid reader and advocate for sustainable digital growth.


Leave a Reply
You must be logged in to post a comment.