How to Create a Staff Directory Website?
Finding the right person to contact in a large company can be hard and time-consuming. Without a clear directory, employees often struggle to get the help they need. Imagine needing urgent help but having no idea who to reach out to. You might spend valuable time searching through emails or asking around, leading to delays and unnecessary stress.
A staff directory website makes it easy for everyone to find the right contact in seconds. In this article, we will show you how to create a staff directory website that saves time, reduces frustration, and improves communication across your organization.
So, without further ado, let’s dig deeper.
Requirements
To build a staff directory website with WordPress, you just need two things –
- A WordPress website and
- A WordPress directory plugin, Directorist.
Why Choose Directorist?

Directorist is a popular directory website builder plugin that has more than 10,000 users from around the world with a 4.7 customer rating out of 5. It comes with the following benefits:
Features include:
- Compatible with all themes including popular ones such as Avada, Divi, Astra, and OceanWP.
- CSV Import/Export (listing, category, location, tag, media, etc.).
- Highly optimized and rocket-fast performance to ensure scalability.
- 25+ Elementor Page Builder widgets.
- Gutenberg support and 16 Gutenberg blocks.
- Advanced search filters with custom filter.
- Front-end and Back-end listing submission.
- Front-end user dashboard to manage listings.
- Open Street Map and Google Map Integration.
- Unlimited custom fields on the listing form.
- 100% responsive and modern-day design.
- WooCommerce multi-vendor plugin compatible [Exclusive].
- Built-in SEO optimization system as well as Yoast SEO compatibility.
- Personalize the directory using a wide range of shortcodes.
- GDPR compliant.
- Ajax-powered listing and review submission.
- Listing owner contact form.
- Bulk or individual user announcement
- Listing image slider.
- Listing and Review submission without login (Guest Submission).
- Listing reviews and ratings.
- Google reCAPTCHA
- Custom sidebar for single listing page.
- Custom user Registration and Login.
- New, Popular, Featured, and Open/Close badges.
- Create an Unlimited listing based on location and category.
- List and grid view for categories, locations, and listings pages.
- Translate to any language effortlessly using the Loco Translate plugin.
- Sustainable for long-term use.
- Updated regularly for flawless operation.
- And many more!
Premium features include:
- comes with a flutter-based native mobile app, compatible with both Android & iOS
- integration with GamiPress, Elementor Page Builder, Oxygen Builder, MailChimp, Google reCaptcha, BuddyBoss, BuddyPress, etc.
- integration with popular payment gateways such as Stripe, PayPal, Authorize.net
- niche-based themes (dPlace, dClassified, dHotels, dRestaurant, dLawyers, OneListing Pro, dDoctors, dRealEstate, dCar, dList, dService, etc.)
- monetization with regular subscription plans
- monetization with WooCommerce Pricing Plans
- monetization with Rank Featured Listing
- Coupon creation
- and many more
See all the premium features from this link.
If you want to pick the best directory website builder to create a staff directory site, Directorist is unparalleled. We believe this directory builder tool will be the perfect one to know how to start a directory website for staff.
How to Build a Staff Directory Website with Less Effort
Assuming your WordPress website is already set up and operational, you only need to follow these steps to create a staff directory.
Step 1: Install & activate Directorist
Navigate to the WP Admin Dashboard > Plugins > Add New > Search for the keyword ‘directorist’ > Hit the “Install Now” button (as indicated with arrows).

Next up, you need to activate and configure the setup wizard to make a fresh start. We recommend you to visit the official documentation so that you can configure it perfectly or the way you want.
Step 2: Install a free directory theme
Directorist is compatible with all WordPress themes, so you can choose any theme you like. However, selecting a directory-specific theme can significantly enhance your website’s overall appearance and functionality.
To do this, you can install the BestListing theme, which is free.
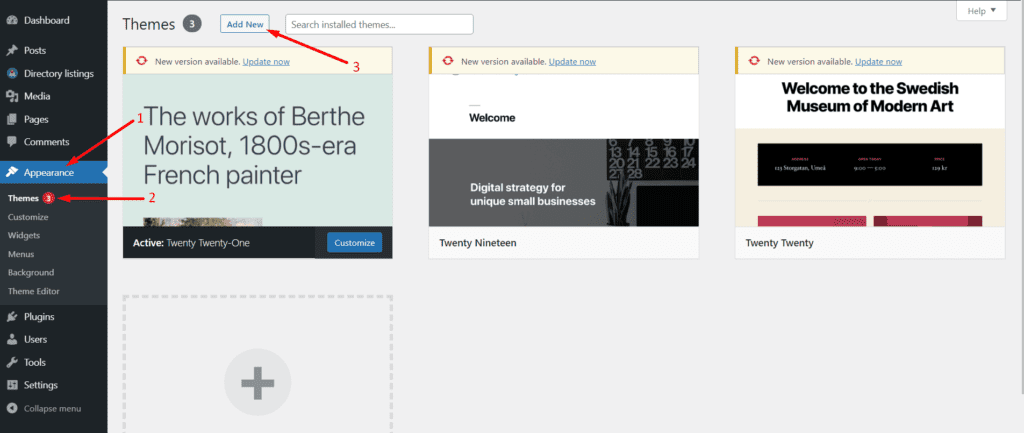
Once you get the theme, navigate to the WP Admin Dashboard > Appearance > Themes > Add New.

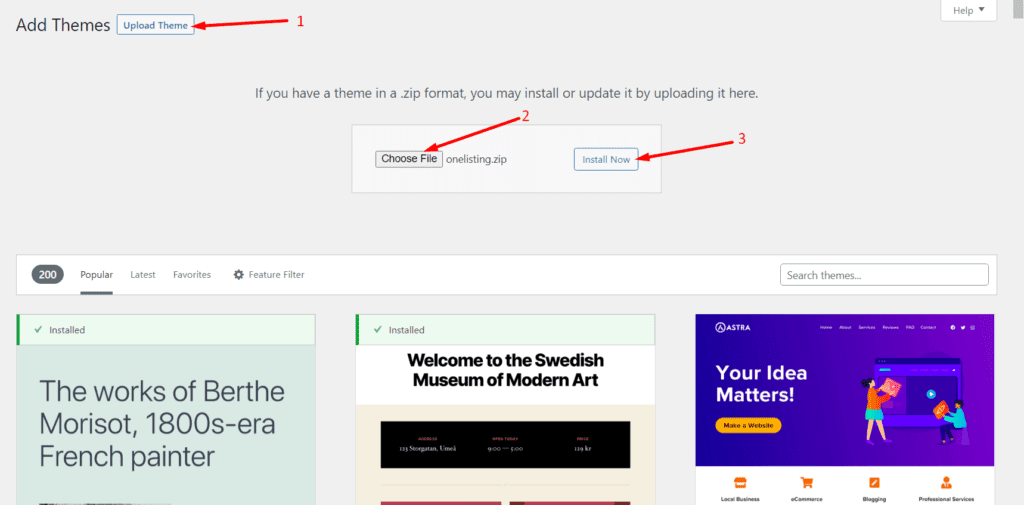
Then click on Upload Theme > Choose File and select the ‘bestlisting.zip’ > Install Now.

Now, activate the theme to take an effect:
Upon installing the theme, you will see some plugins and tools suggested to install. So, make sure you have installed all the suggested ones so that the theme works perfectly fine. For example, you must install & activate the Elementor, Contact Form 7, MailChimp, and a Theme ToolKit. So, we recommend you hit the “Begin Installing Plugins” option to install them all at once.

And that’s it!
A directory website must be user-friendly in a way that visitors can find their listing item in a flash of an eye. Upon creating relevant categories, Directorist can suggest related listings according to the visitors’ choice.
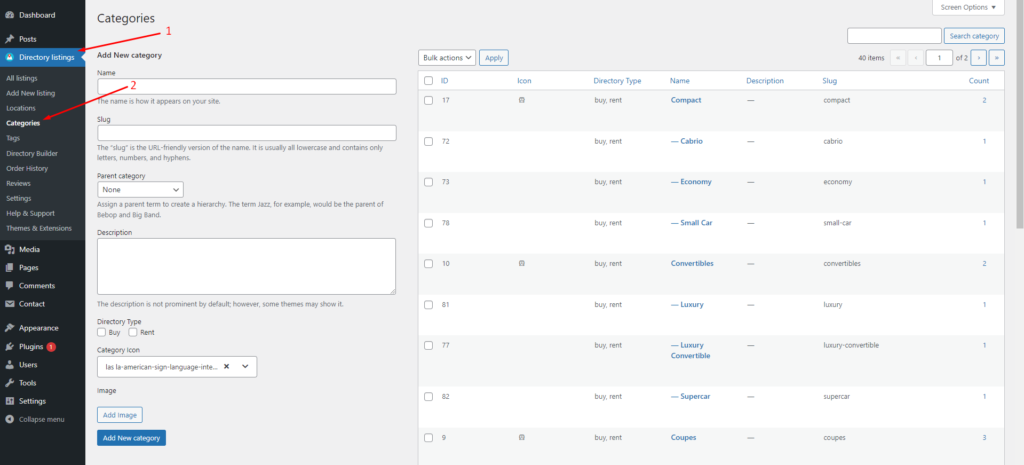
To this end, you need to create a set of relevant categories and tags. In the Directorist menu, you will find both of these items where (category) you can also add images, assign the category to a parent one, give a description, add icons & colors.
To do so, you just need to go to the Directory Listings > Categories > Fill out the fields > Hit the “Add New Category” button.

Similarly, you can add tags so that Directorist can show the relevant listing item to the visitors. You can do it from Directory Listings > Tags > Enter Credentials > Add New Tag.
Step 4: Staff listing submissions by company owners
To add listings to your staff directory website, navigate to the WP Admin Dashboard > Directory Listings > Add New Listing.
Most staff listings will be added or submitted by company owners. You can review these listings to ensure they adhere to your community standards. Additionally, you can charge a fee for each staff listing submission.
To add staff, company owners need to have a registration with your site. After the registration, they can freely add more staff from the “Add Listings” option. You can check the progress whether the submission is okay or not.
Step 5: Adding advanced features: Monetizing your staff directory website
Monetizing is what makes your directory website lucrative. With Directorist, you can monetize your staff directory website in many ways:
- Charge for listings (Free)
- Featured listings (Free)
- Allow businesses to claim listings (Premium)
- Charge for viewing private listings (Premium)
- Allow private/sponsored advertising (premium)
- Charge for membership (Premium)
- Sell business leads (Premium)
- Promote affiliate products (Premium)
- Allow sponsored articles/guest posting (Premium)
- Paid ad placement (Premium)
Step 6: Adding a free payment gateway
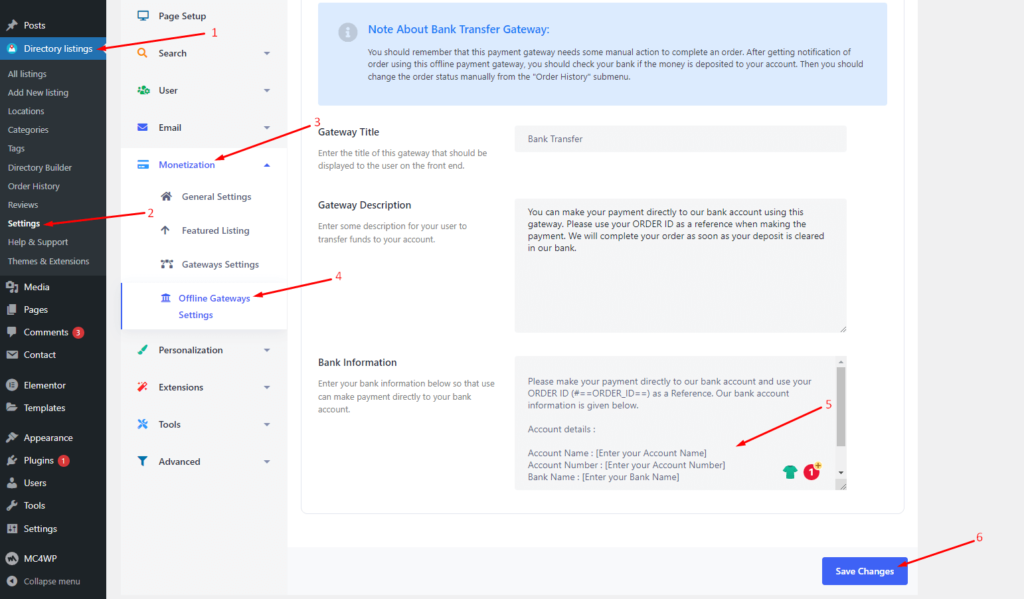
Directorist free version supports only the offline bank transfer method to receive payments. To add your bank account details, navigate to the WP Admin Dashboard > Directory Listings > Settings > Monetization > Offline Gateways Settings > Insert your details > Save changes.

Note about Bank Transfer Gateway:
- You should remember that this payment gateway needs some manual action to complete an order. After getting a notification of an order using this offline payment gateway, you should check your bank if the money is deposited into your account. Then you should change the order status manually from the “Order History” submenu.
- Apart from the offline Bank transfer method, Directorist also supports online payment gateways like Stripe, PayPal, and Authorize.net. However, they are available in the premium version only.
Related Post: How to Add Payment Gateways to Monetize Your Directory Website
Wrapping up
Creating a staff directory website can be straightforward, especially with tools like Directorist. Start by understanding what your team needs, and then use Directorist to set up a directory that’s easy to use and navigate. Its features make it simple to add search functions and filters, so everyone can quickly find the information they need. Keep the directory updated regularly to ensure accuracy. By following these steps and utilizing Directorist, you can build a directory that helps your team stay connected and informed.
If you liked our posts, don’t forget to subscribe to our blog so that we can notify you once any post is published. Directorist is now on Facebook, Twitter, and LinkedIn! You can also join the Directorist Community for sharing your thoughts and experiences relating to the directory niche. Come and join us to see what we’re up to.


Leave a Reply
You must be logged in to post a comment.