

Table of Contents
- 1 Business Model of Fresha - World's Most Popular Salon Directory
- 2 Translating Fresha’s Successful Model Into a Buildable Framework
- 3 Creating a Site like Fresha on WordPress - Step by Step Guide
- 4 Bonus Tips: How to Monetize a Salon Directory Website?
- 5 Final Thought on How to Create a Salon Directory Website
How to Create a Salon Directory Website Like Fresha – Step-by-Step Guide
-

- Directorist Tutorials WordPress
- 12 mins read
Ever wondered how a business like hairstyling and grooming – one that relies heavily on physical, in-person interaction could be streamlined online at scale?
Before Fresha, an online salon and grooming directory now used globally, most people didn’t imagine booking a haircut, facial, or beauty session as seamlessly as booking a ride or a hotel room. Today, that assumption no longer holds.
Every day, hundreds of thousands of people book hairstyling, grooming, and beauty services online to save time, avoid scheduling conflicts, and discover trusted, top-rated businesses nearby. Platforms like Fresha have fundamentally changed how service-based businesses are discovered and booked.
Here are a few quick statistics that highlight Fresha’s scale and market impact:
- Fresha is now available in 9 languages acrross 120 countries.
- Over 100,000 salons, spas, and barbershops use Fresha as active partner venues.
- The platform has processed over 1 Billion appointments to date, with a collective booking value of around $12 billion.
Source: Business Daily Media
This sounds like a highly profitable business model, doesn’t it?
At this point, one question naturally comes to mind: How did Fresha get here? What’s the secret behind such a staggering success?
The answer isn’t a single feature or a clever marketing trick. Fresha succeeded because it executed multiple things exceptionally well.
If you want to become successful like Fresha, you’ve to stick to this article further and I’m going to explain below how Fresha became so successful, what are the opportunities in this market and how to start your own profitable salon directory with minimal investment and succeed with strategies. Keep reading.
Business Model of Fresha – World’s Most Popular Salon Directory
When Fresha first entered the market, it chose a niche that seemed, on the surface, counterintuitive as beauty, grooming, and wellness servic businesses depend on physical, in-person interactions and where customers traditionally walked into a salon or spa without much pre-planning.
Fresha (originally launched as Shedul in 2015) saw beyond that surface assumption and identified deep, chronic pain points for both customers and service providers in this space. Before online salon directories existed at scale, customers struggled with:
- Unpredictable discovery: Finding reliable, quality salons or barbershops especially while traveling, relying on word of mouth or poorly indexed local listings.
- Scheduling friction: Calling or visiting venues for availability was time-consuming and often led to missed opportunities or scheduling conflicts.
- Lack of transparent pricing and fees: Customers often didn’t know exact service fees in advance, which contributed to frustration and distrust.
- Inconsistent reviews and trust signals: There was no centralized, trustworthy repository of feedback about individual salons or stylists.
Fresha recognized these customer pain points as systemic problems and sniffed business opportunities. Instead of treating booking as a simple calendar widget, it reimagined the entire service discovery and appointment experience as an online marketplace, similar to how OpenTable transformed restaurant reservations.
Solving Pain Points with a Unified Platform
To resolve those pain points, Fresha didn’t just build a booking website, it built a platform that combined:
- Global discovery and search engine for salons, spas, barbershops, and other beauty and wellness providers.
- Appointment scheduling and calendar management with availability syncing, reminders, and no-show protections.
- Integrated payments and transaction processing so customers could pay upfront or onsite without friction.
- Marketing, client engagement, and retention tools to help businesses stay connected with customers.
Essentially, Fresha offered a one-stop solution for providers to manage daily operations while connecting to millions of users looking for services easily, reliably, and transparently.
Measured Trust and Reputation
Fresha’s approach appears to have paid off in terms of customer satisfaction and trust, though perceptions vary depending on the review source. On Trustpilot, Fresha holds a strong overall rating with a TrustScore around 4.6 out of 5 from more than 4,000 users as the platform’s ease of use and support responsiveness remains the biggest highlight.
This significant footprint shows that Fresha’s model does create satisfaction and trust at scale by combining technology, marketplace dynamics, and operational tools. Fresha turned a traditionally offline-dependent niche into a thriving online booking ecosystem.
Translating Fresha’s Successful Model Into a Buildable Framework
Understanding why Fresha works is only half the equation. The more important question is whether this model is repeatable and if so, how?
At its core, Fresha is not just a booking tool. It is a directory-based marketplace where discovery comes first, trust is built through transparency, and booking acts as the final conversion layer. To build a platform like Fresha, you need to consider the below matters first:
- A structured directory or list of service providers
- Strong organic discovery and filtering mechanisms
- Built-in trust signals that convert (rich profiles, reviews, transparent pricings)
- A booking and communication layer that turns visitors into revenue
Many people trying to replicate Fresha start from the wrong end by not looking at Fresha’s business layers distinctively. They start with a booking system that’s complex, gives users a number of handy tools but fails to bring real customers and real service providers.
Solving Real Problems First while Building a Site like Fresha
Fresha didn’t succeed because it offered online booking. It succeeded because it solved a much bigger problem first: helping people find the right service at the right place, with confidence.
Before a customer ever cares about available time slots, they care about discovery.
- Can they find a trusted salon nearby?
- Does it offer the services they need?
- Is the pricing clear?
- Are the reviews credible?
If users can’t find what they’re looking for, the presence of an online booking button becomes irrelevant. Booking is a conversion layer, not the foundation.
This is why the real solution behind Fresha’s success is a robust, well-structured directory that brings together the most in-demand businesses, showcases a wide range of services, and enables comparison through reviews, ratings, and transparent information. The directory creates demand; booking simply captures it.
The Directory-First Approach Changes Everything
Many platforms attempt to start with booking features and then add discovery as an afterthought. However, the study of Fresha’s business case states otherwise. This is where a robust directory builder like Directorist fits in naturally.
Directorist is not just an add-on for listings – it’s a full-fledged directory framework that gives entrepreneurs everything they need to build the discovery layer that platforms like Fresha rely on:
- Structured business profiles
- Service listings with industry-specific custom fields
- Category and location-based discovery
- Reviews and ratings for trust building
On top of that core, Directorist supports online booking as an extension so that you can turn your full-fledged salon directory into a fully functional online booking and appointment scheduling platform.
Entrepreneurs can start by building directory, empowering businesses to list themselves for discovery and then layer booking, payments, and monetization once demand exists. In short, Directorist enables founders to replicate Fresha’s success, not just its surface features.
Creating a Site like Fresha on WordPress – Step by Step Guide
Creating a salon directory website on WordPress is nothing like fighting in a battle when you follow the right procedure. Sincerely speaking, the steps are very simple. No matter if you are a professional WordPress developer or have no knowledge of WordPress, you can easily understand the basics.
Let’s see the steps you need to follow to build a site like Fresha on WordPress.
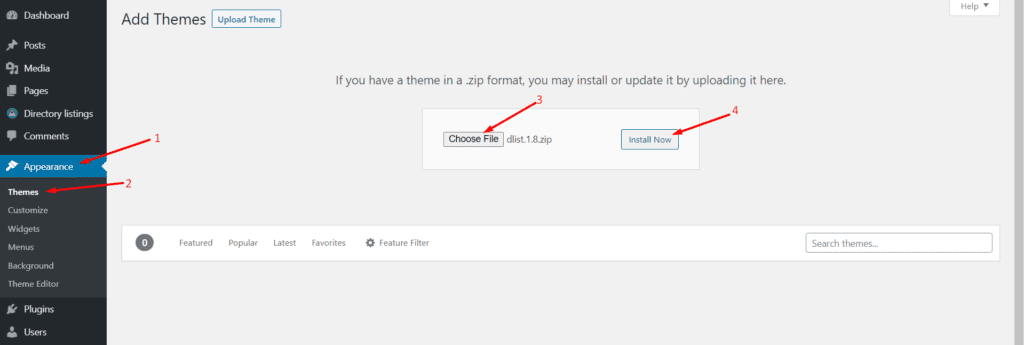
Step-1. Installing a Theme
You can use any theme to make your website look gorgeous. But, here we will use the dList theme that fits perfectly with Fresha’s interface, Salon listing aesthetics and works perfectly with Directorist’s listings and shortcodes.
In case you’re willing to try something free before buying this theme, you can also try the Free OneListing theme.
After purchasing the dList theme
- Download it from your Dashboard
- To install, navigate to the WP Admin dashboard>Appearance>Themes>Upload and then upload the ZIP file.
- Install and activate the theme.
You can have a closer look at the screenshot below just for a better understanding.
Step-2. Directorist plugin activation
The next step comes with the Directorist plugin installation. It’s a recommended plugin for your theme that comes along demo data so that you get sample listings on your directory after activating the theme.
To do so, navigate to the WP Admin Dashboard > Appearance > Themes > dList > Install Plugins > Bulk Action > Select All > Install.
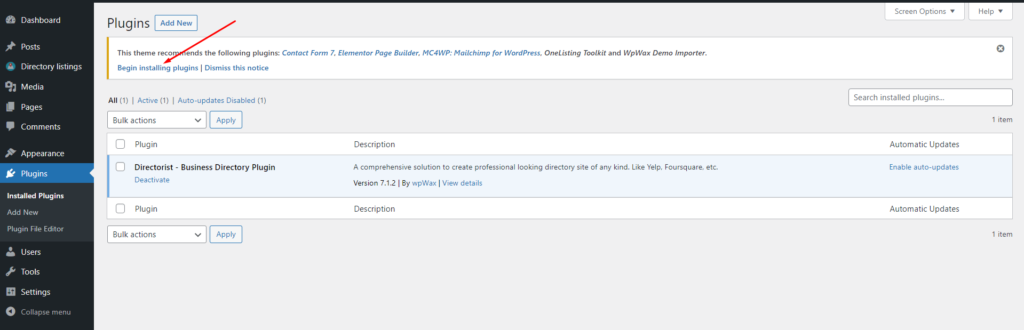
By following these steps, you’ll install and activate all recommended plugins. To import demo listings that comes with your theme, navigate to the WP Admin Dashboard > Tools > wpWax Demo Importer > Select the Demo You Want to Import > Import Demo.
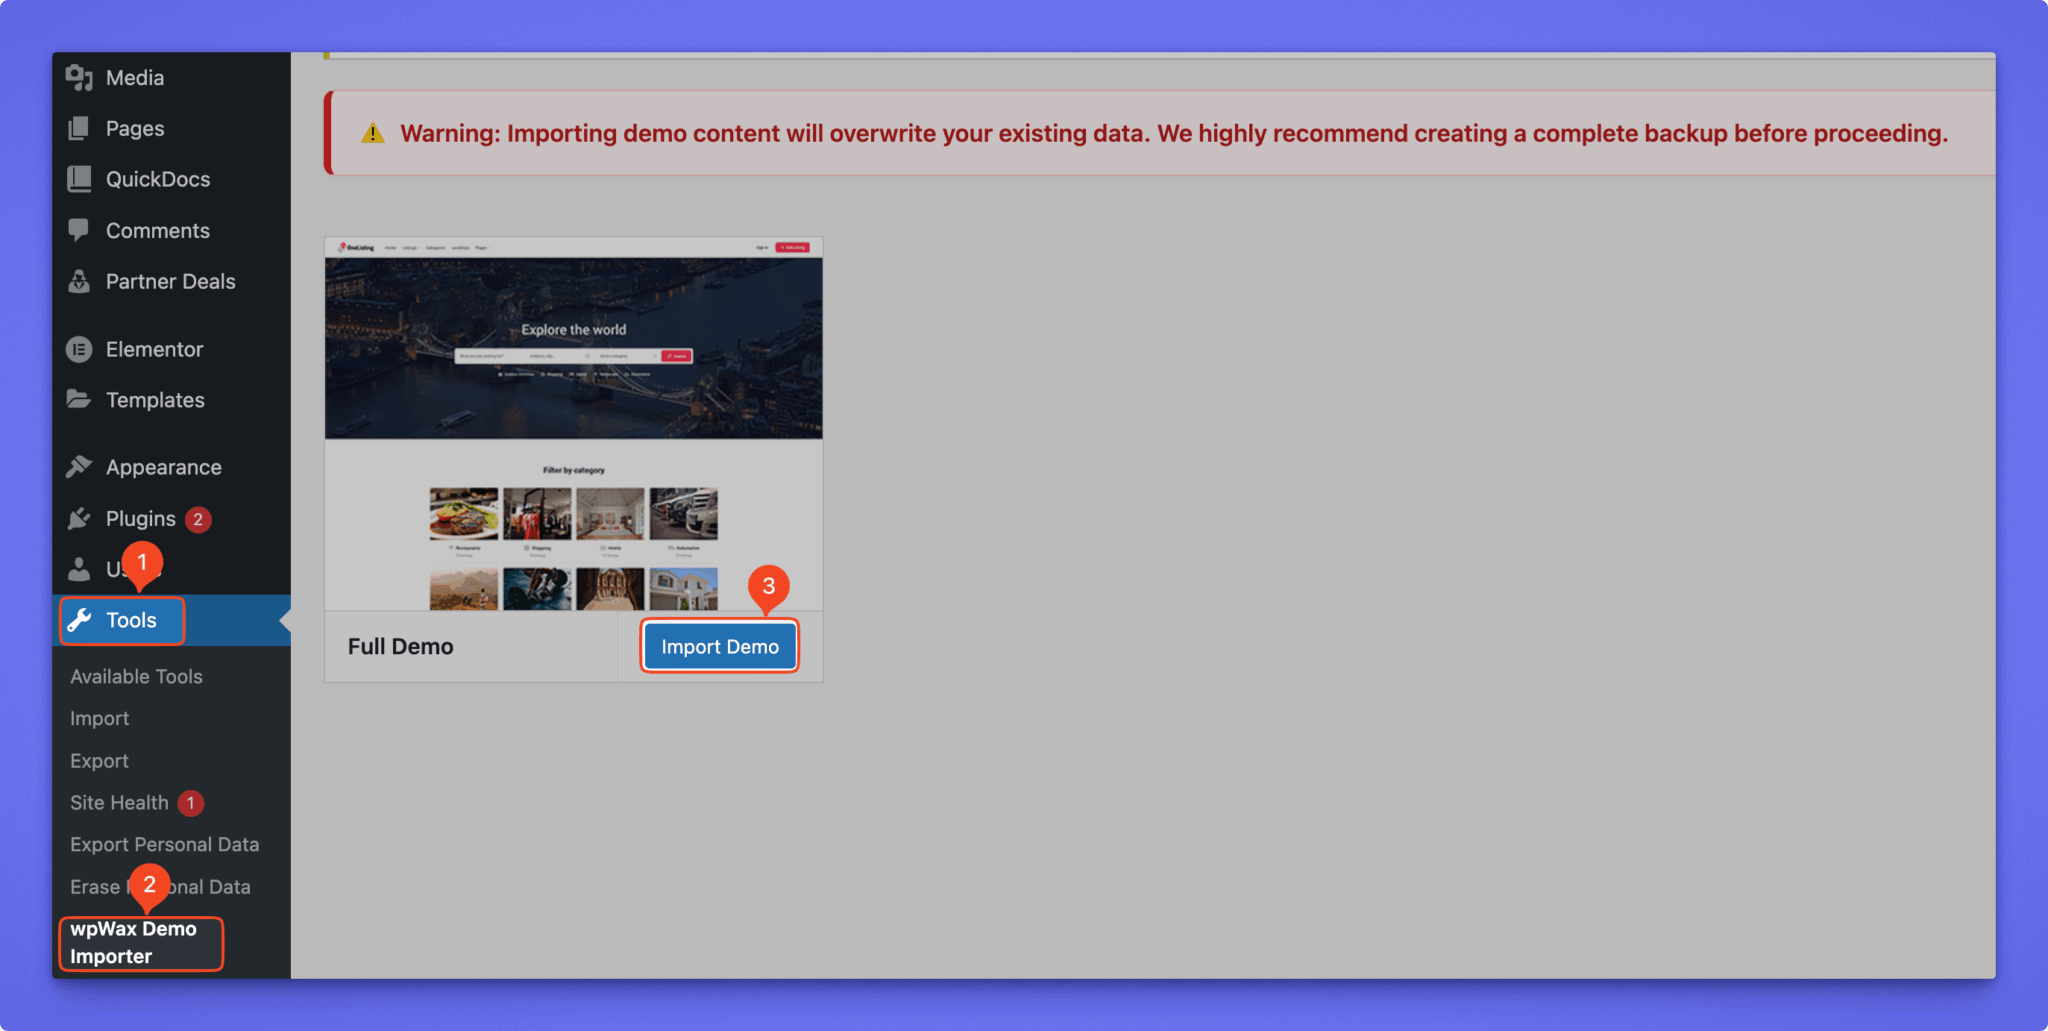
It will take some time to import data on your site. Once done, you’ll find a ready site with demo listings and pages.
Step-3. The Directorist wizard setup configuration (Optional)
After the activation of Directorist, you’ll find the following setup wizard to configure your directory website.
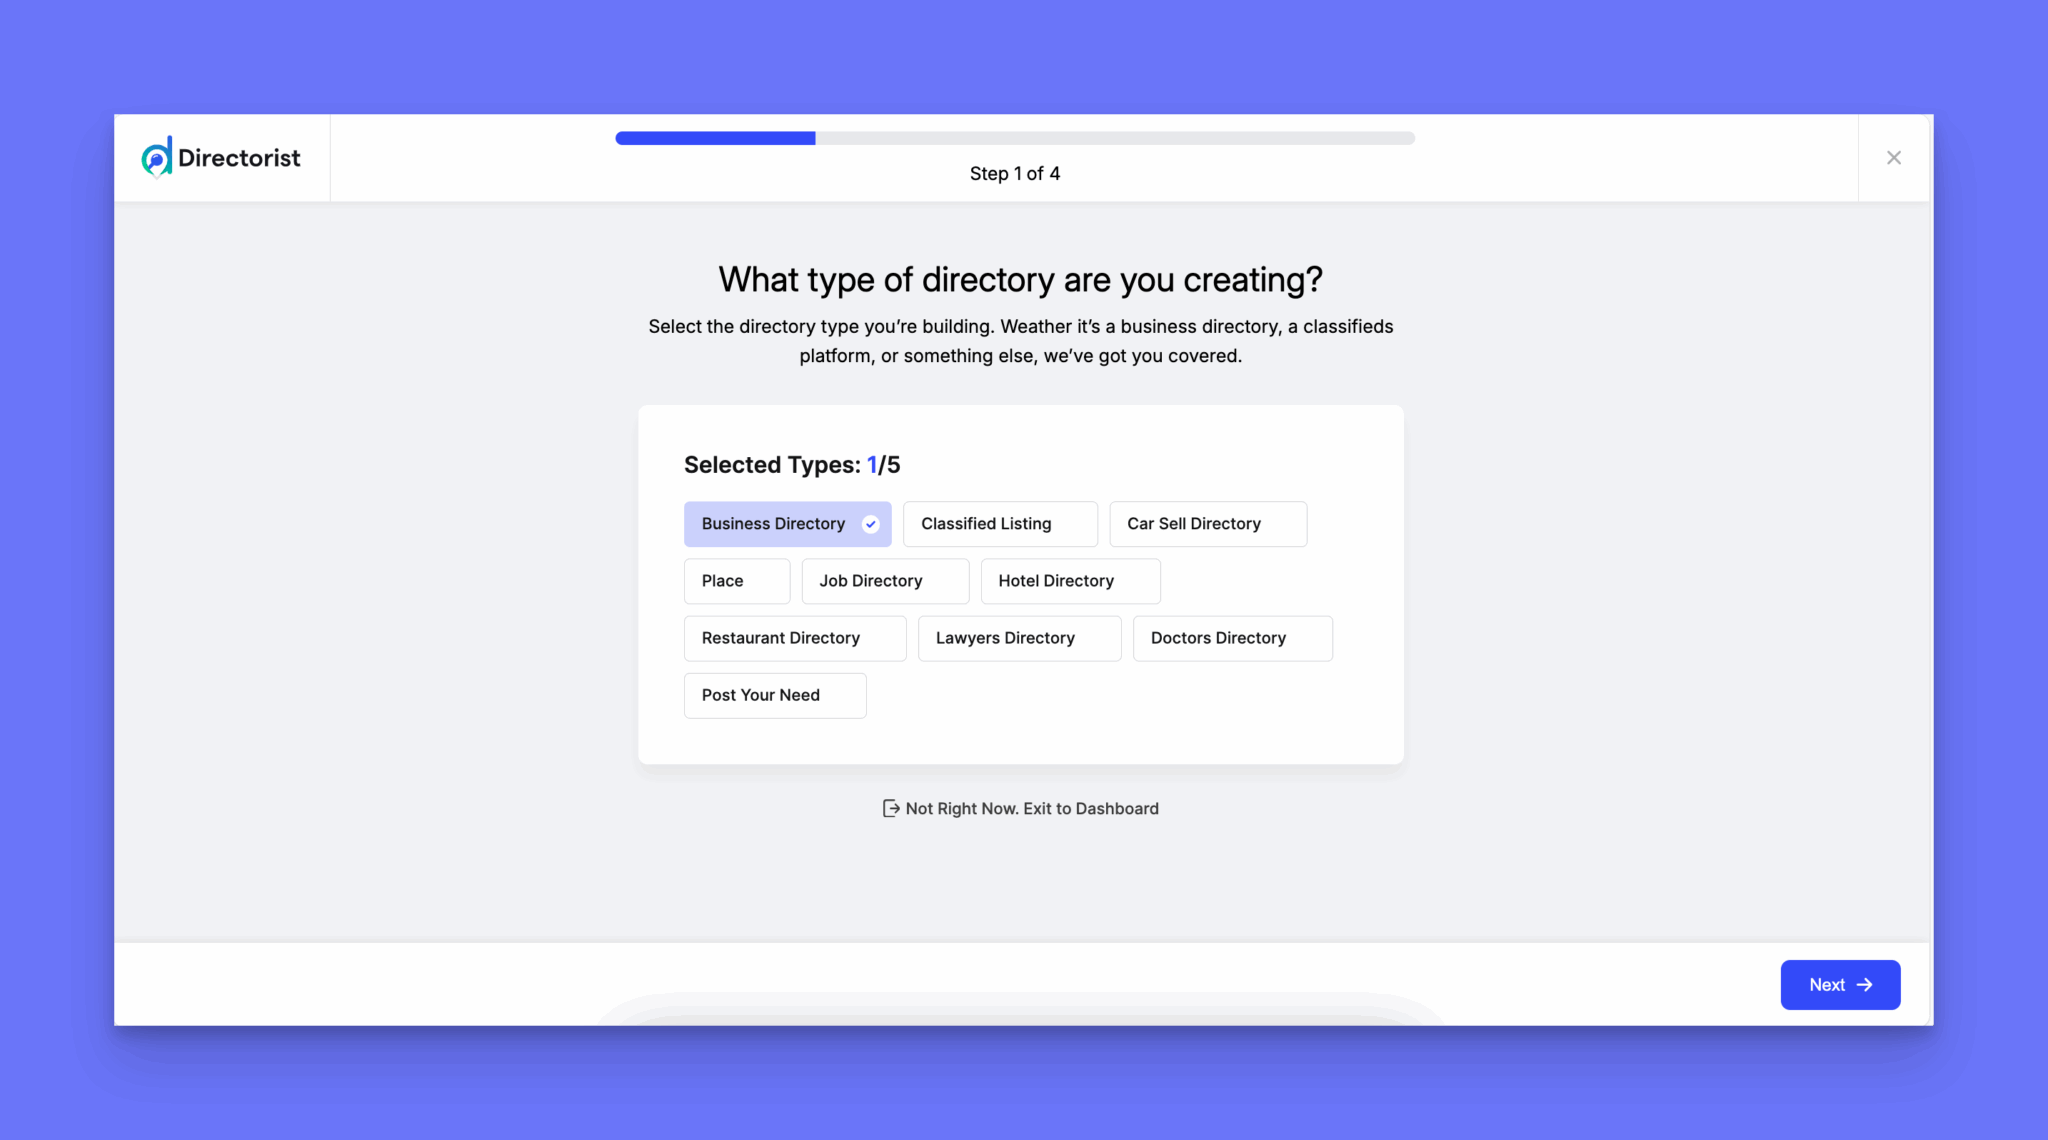
Choose the type of directory you want to build. As you’re building a salon directory which is not available in suggested options, choose other. Then type the directory name and proceed.
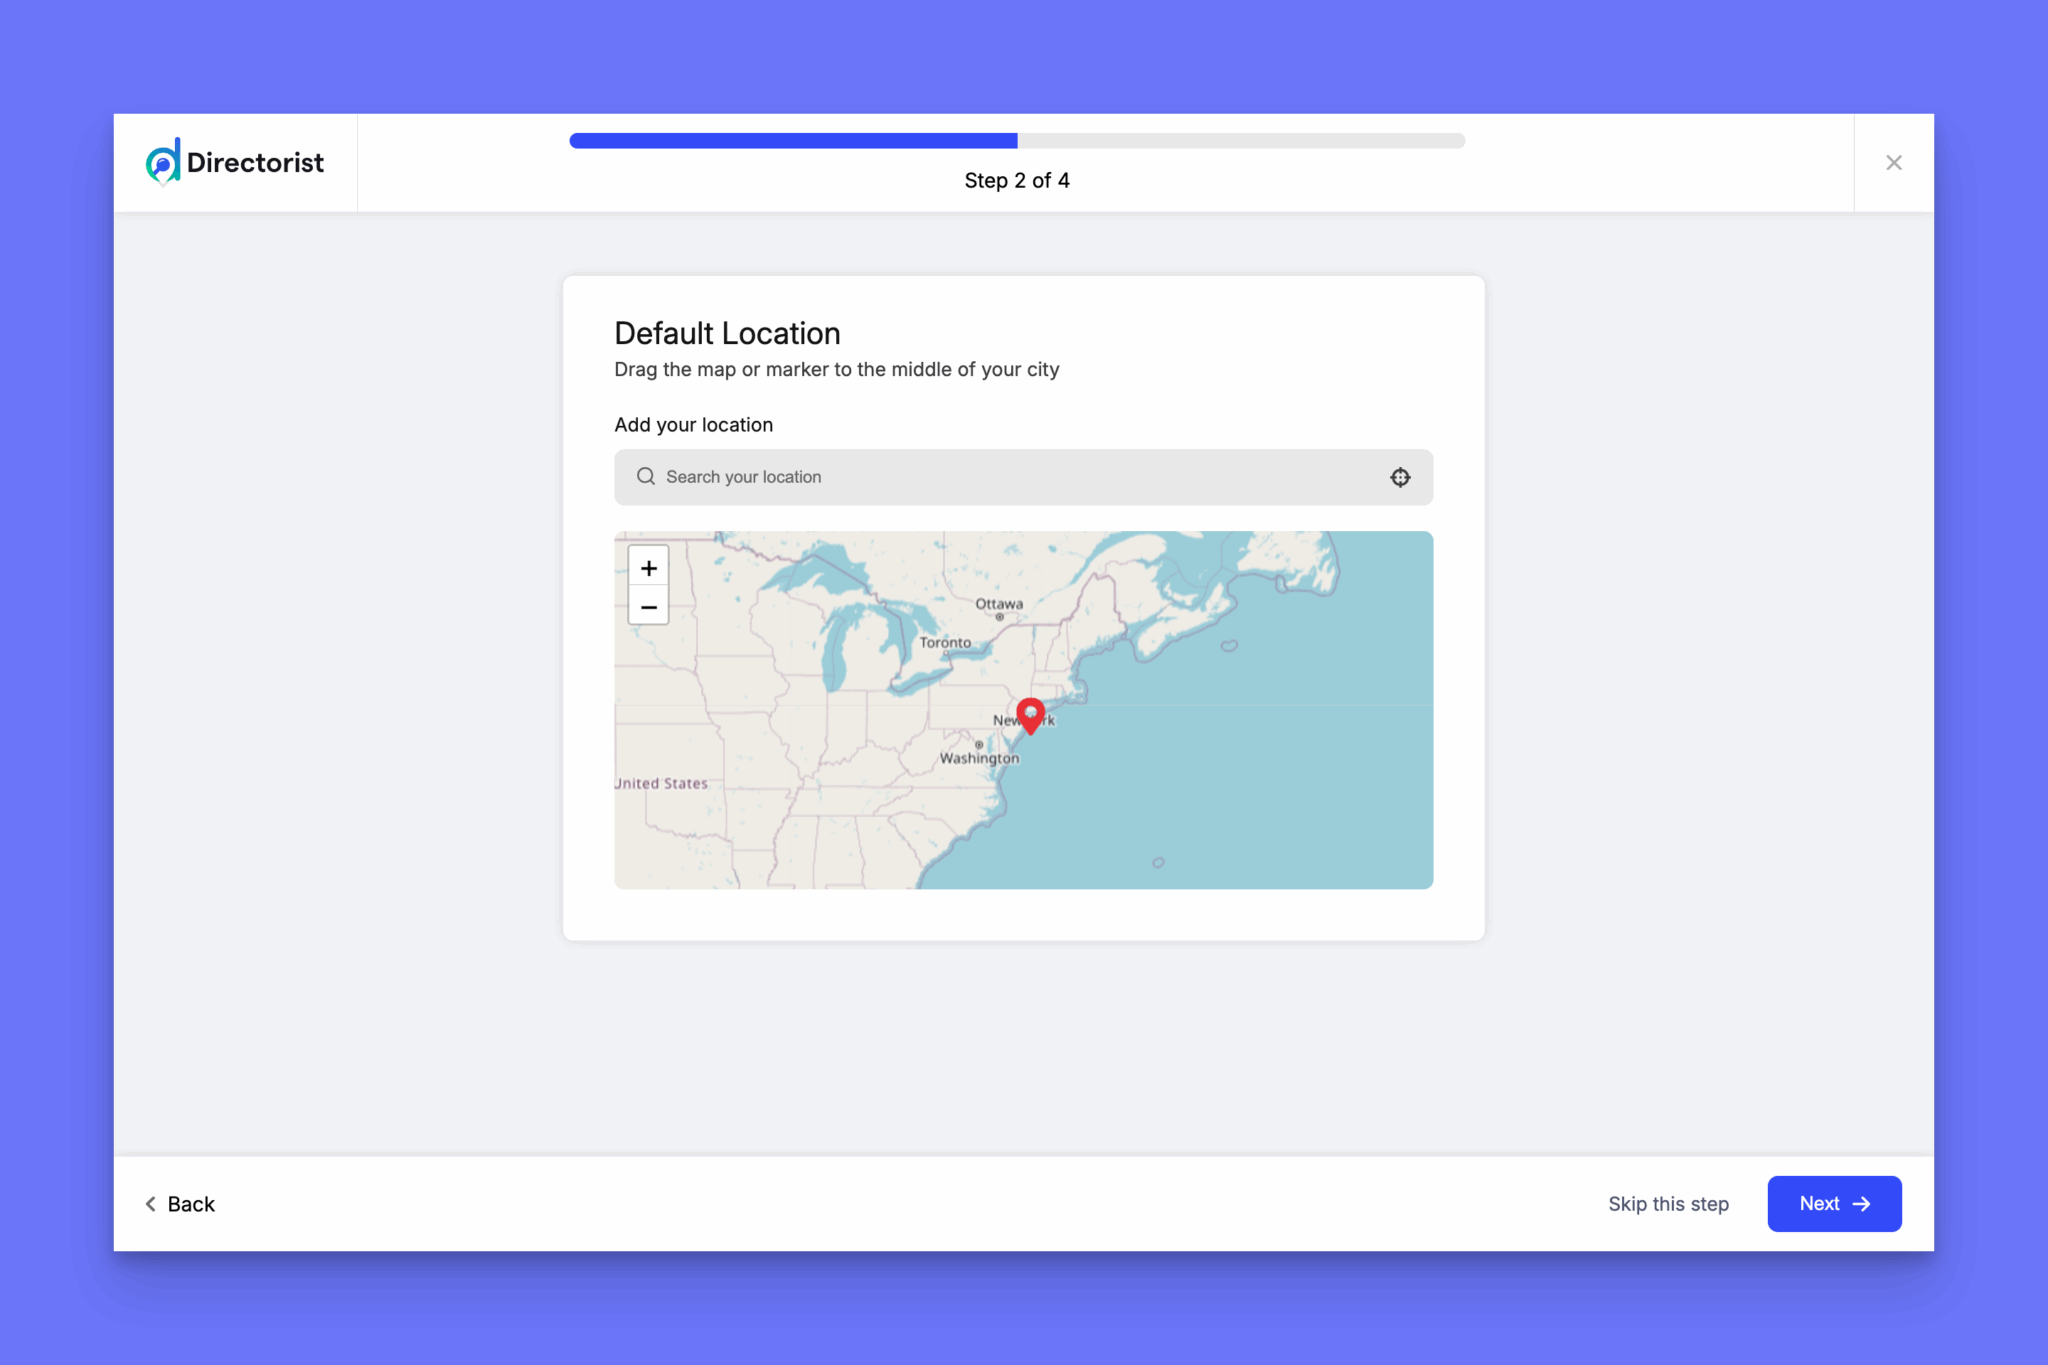
Once you have done it, move forward to the location and Maps, Monetization and demo content import part.
Here, you can see lots of recommended pages. You can either enable or disable them according to your needs. But, our tutorial keeps the settings of pages unchanged. And, hit the “Continue” icon again and see the following page.
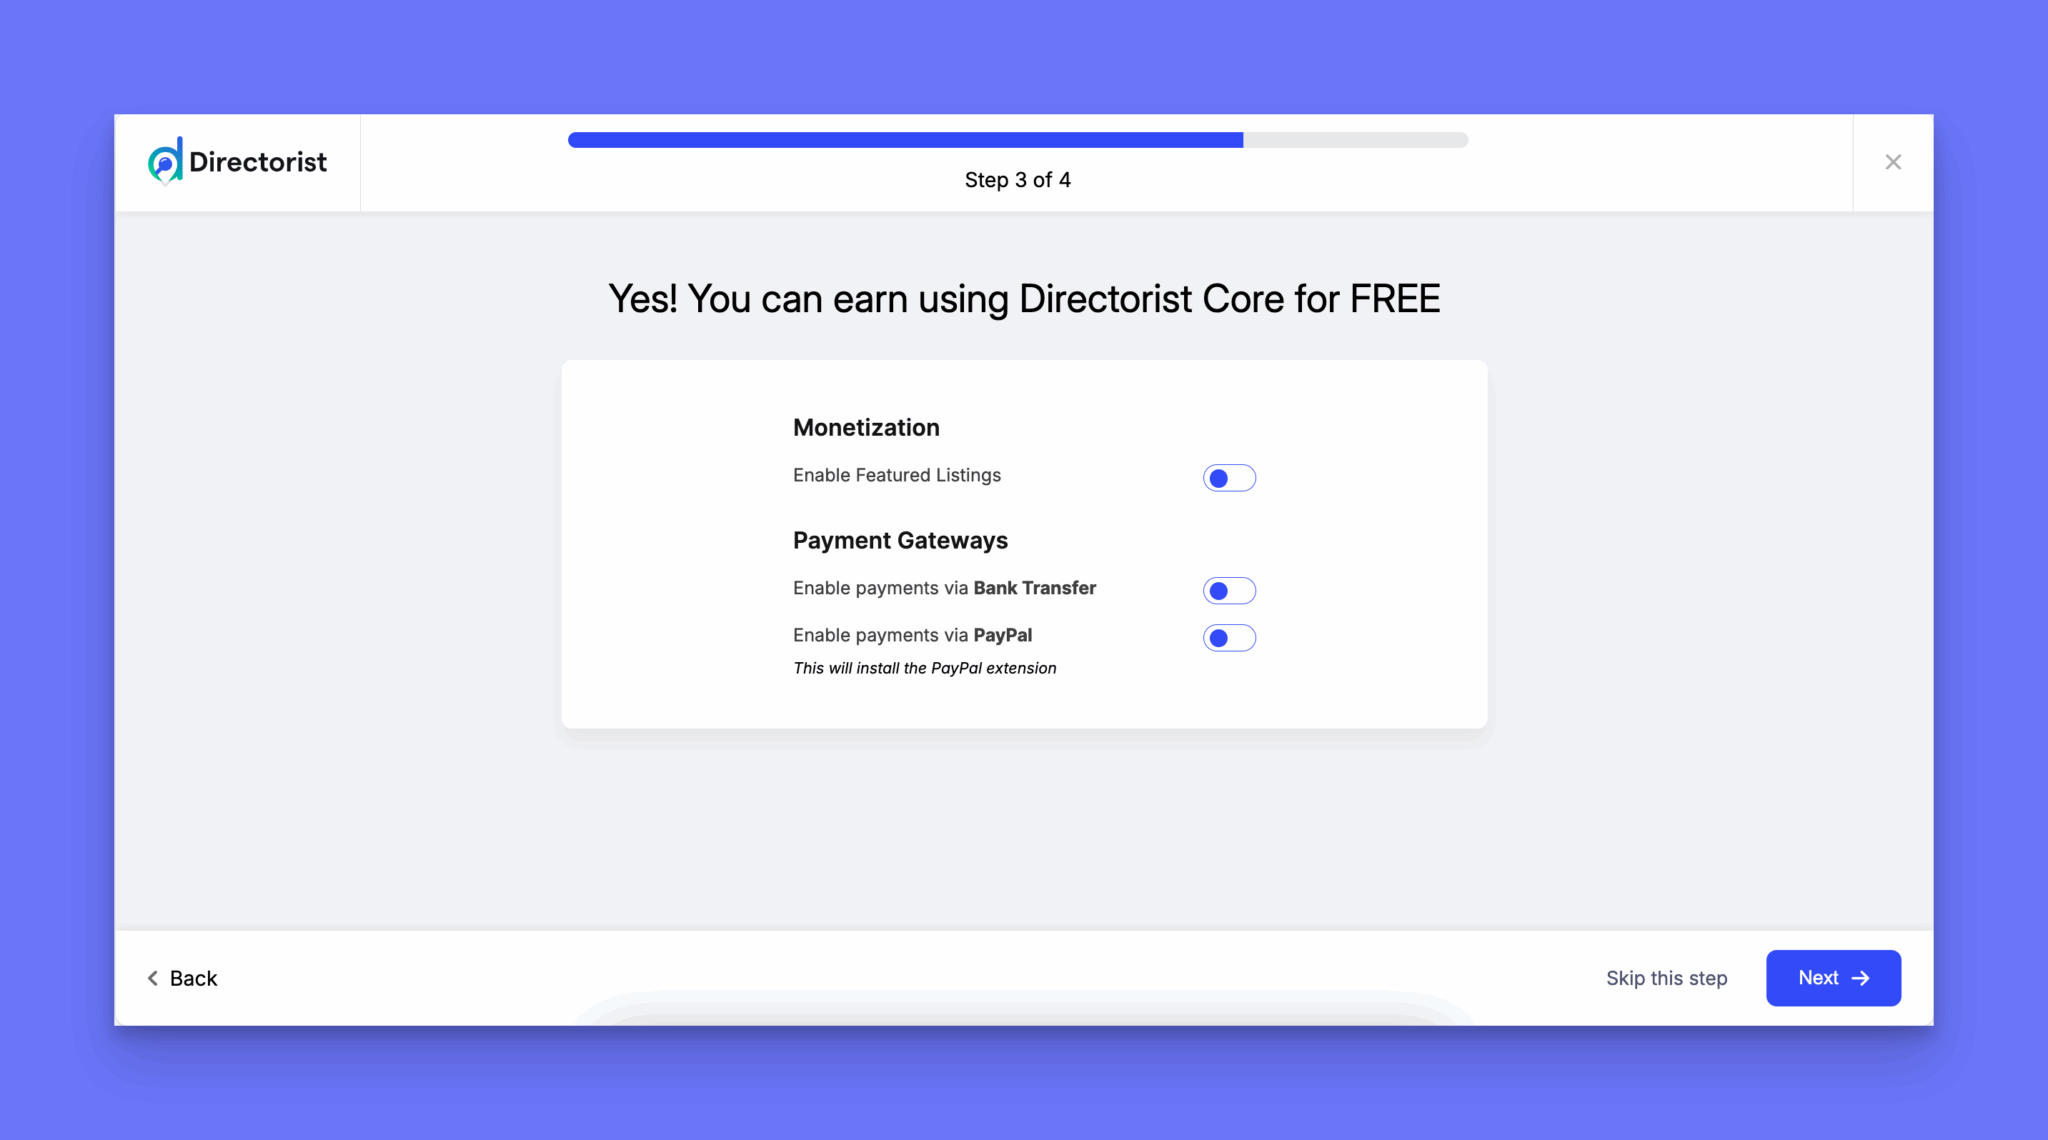
There you can see Openstreet and Google map options on the dropdown menu. You can select either of them. Also, you can enable the monetization feature and monetize by featured listing. Besides, select the price of the monetization feature listing. Finally, hit the “ Continue” icon and go to the next step.
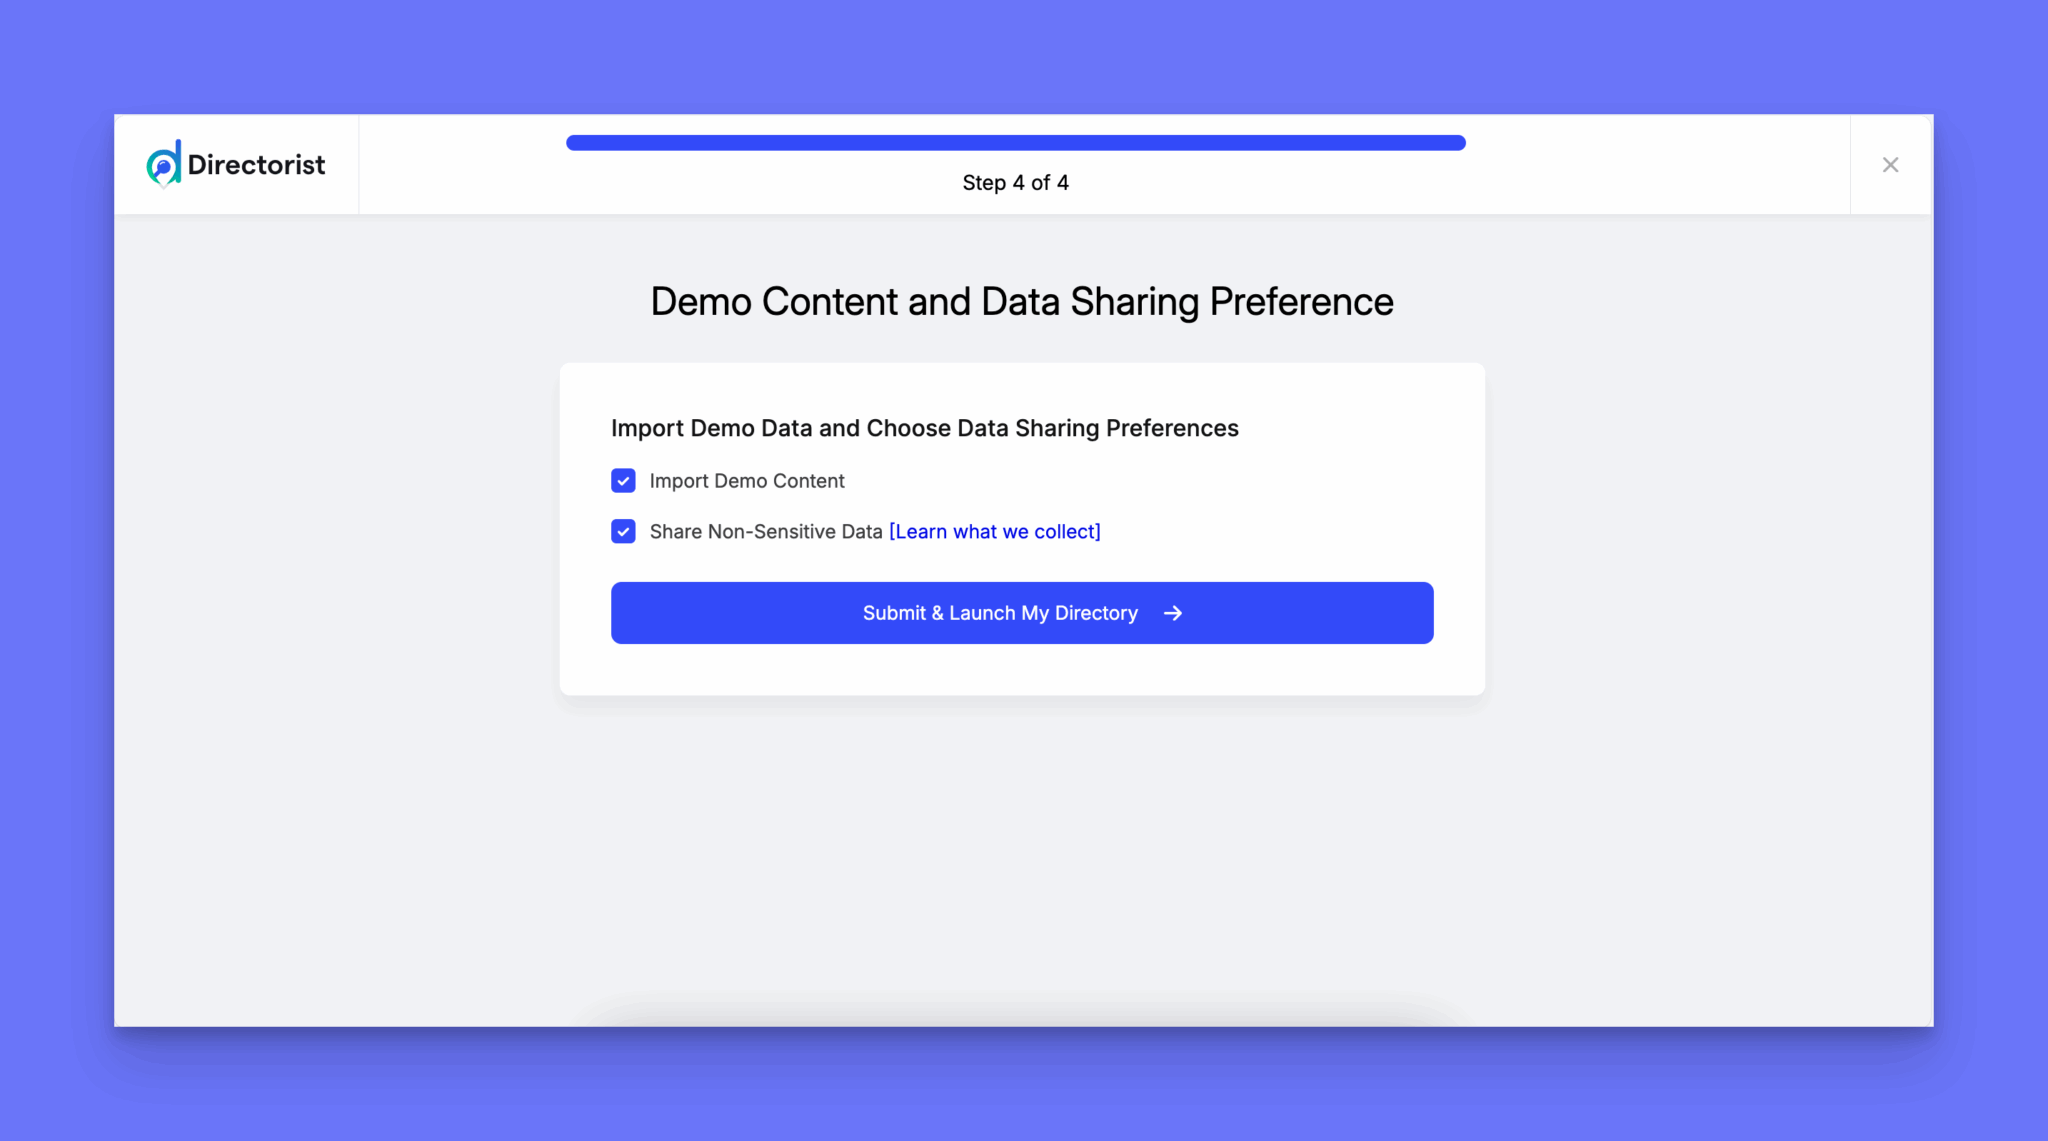
Now, import listings and images. However, this one is totally optional. Then, press the “ Continue” icon and it brings you to the following page.
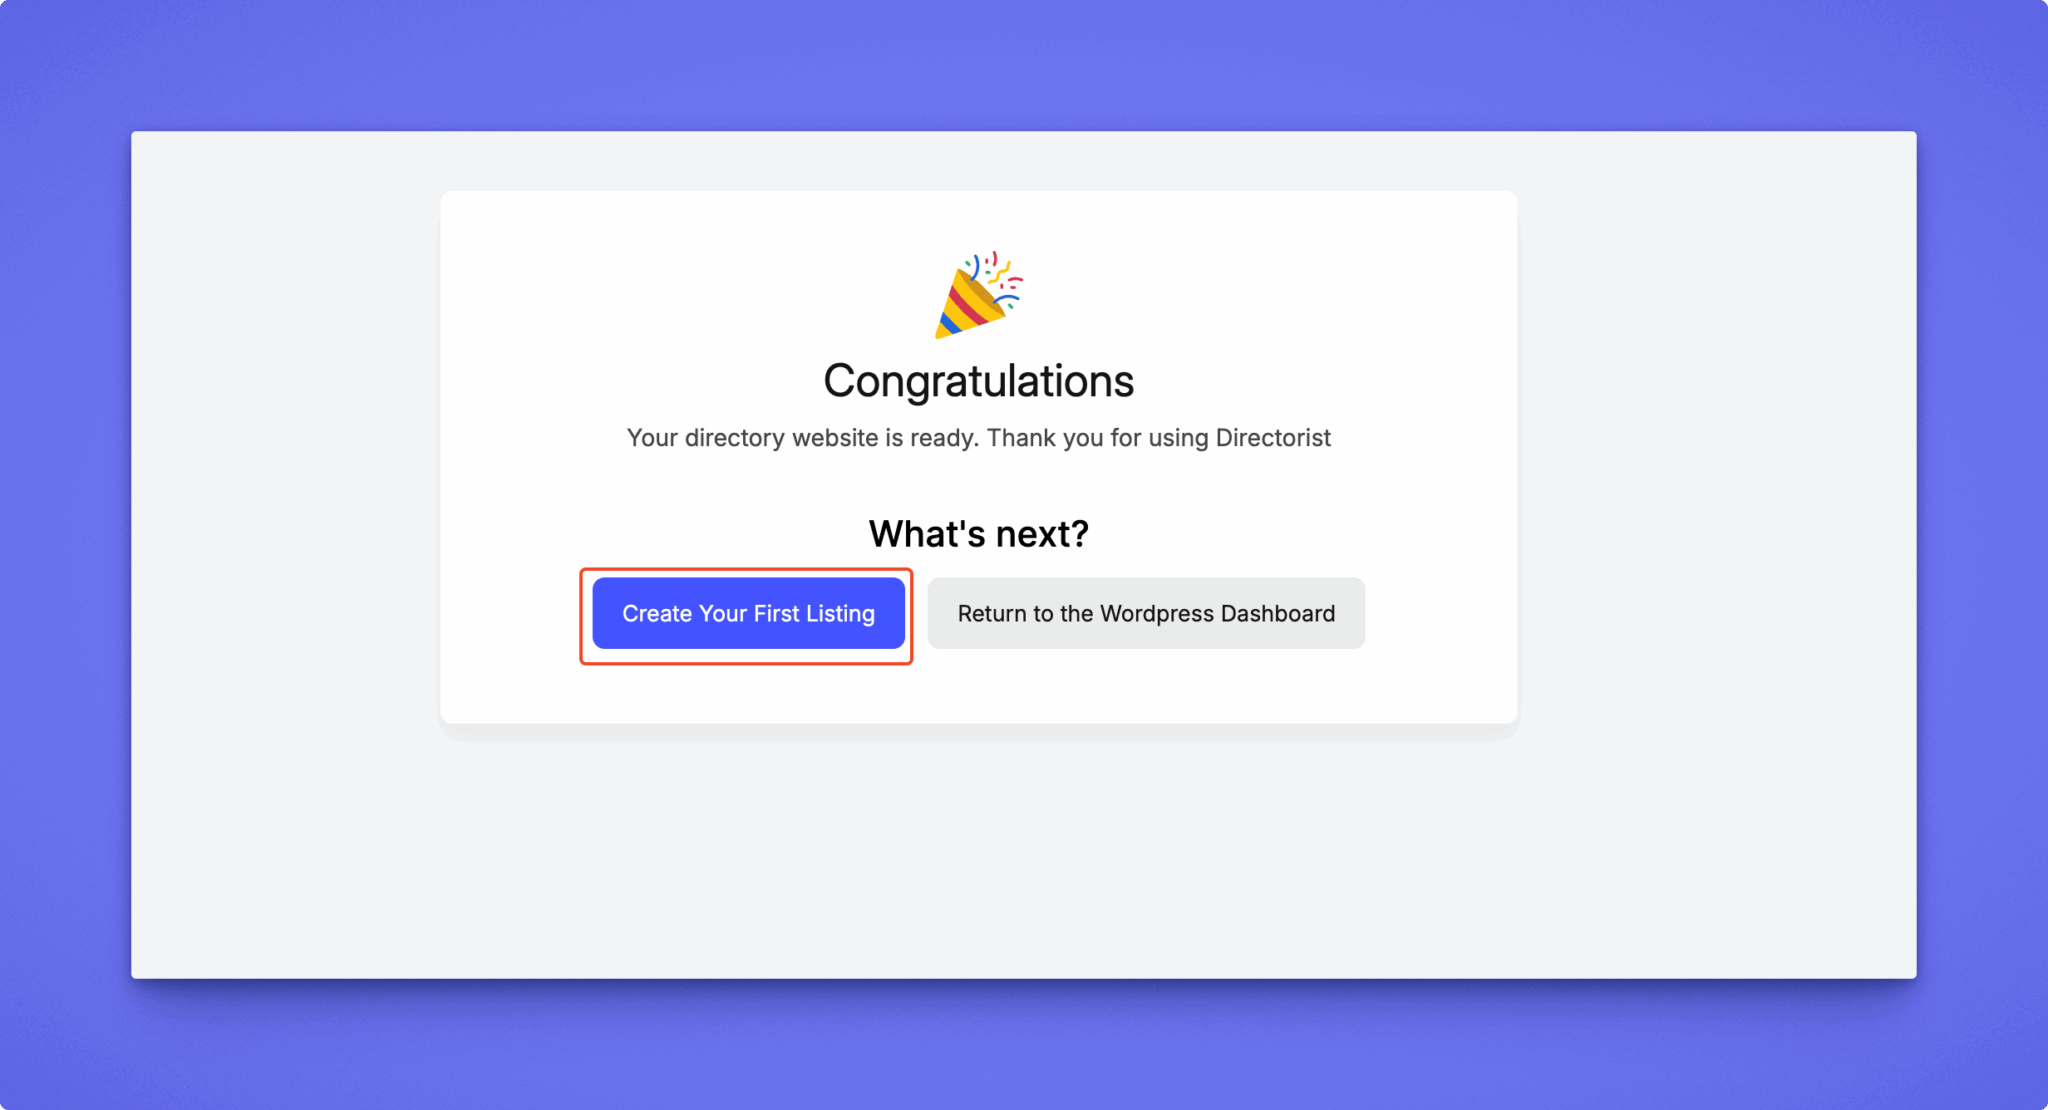
Your directory site is almost ready to go. You can go back to the WordPress dashboard if necessary.
Step-4. Customizing/configuring the salon directory
Navigate to the WP>Directory Listings -> Directory Builder ->Add custom fields
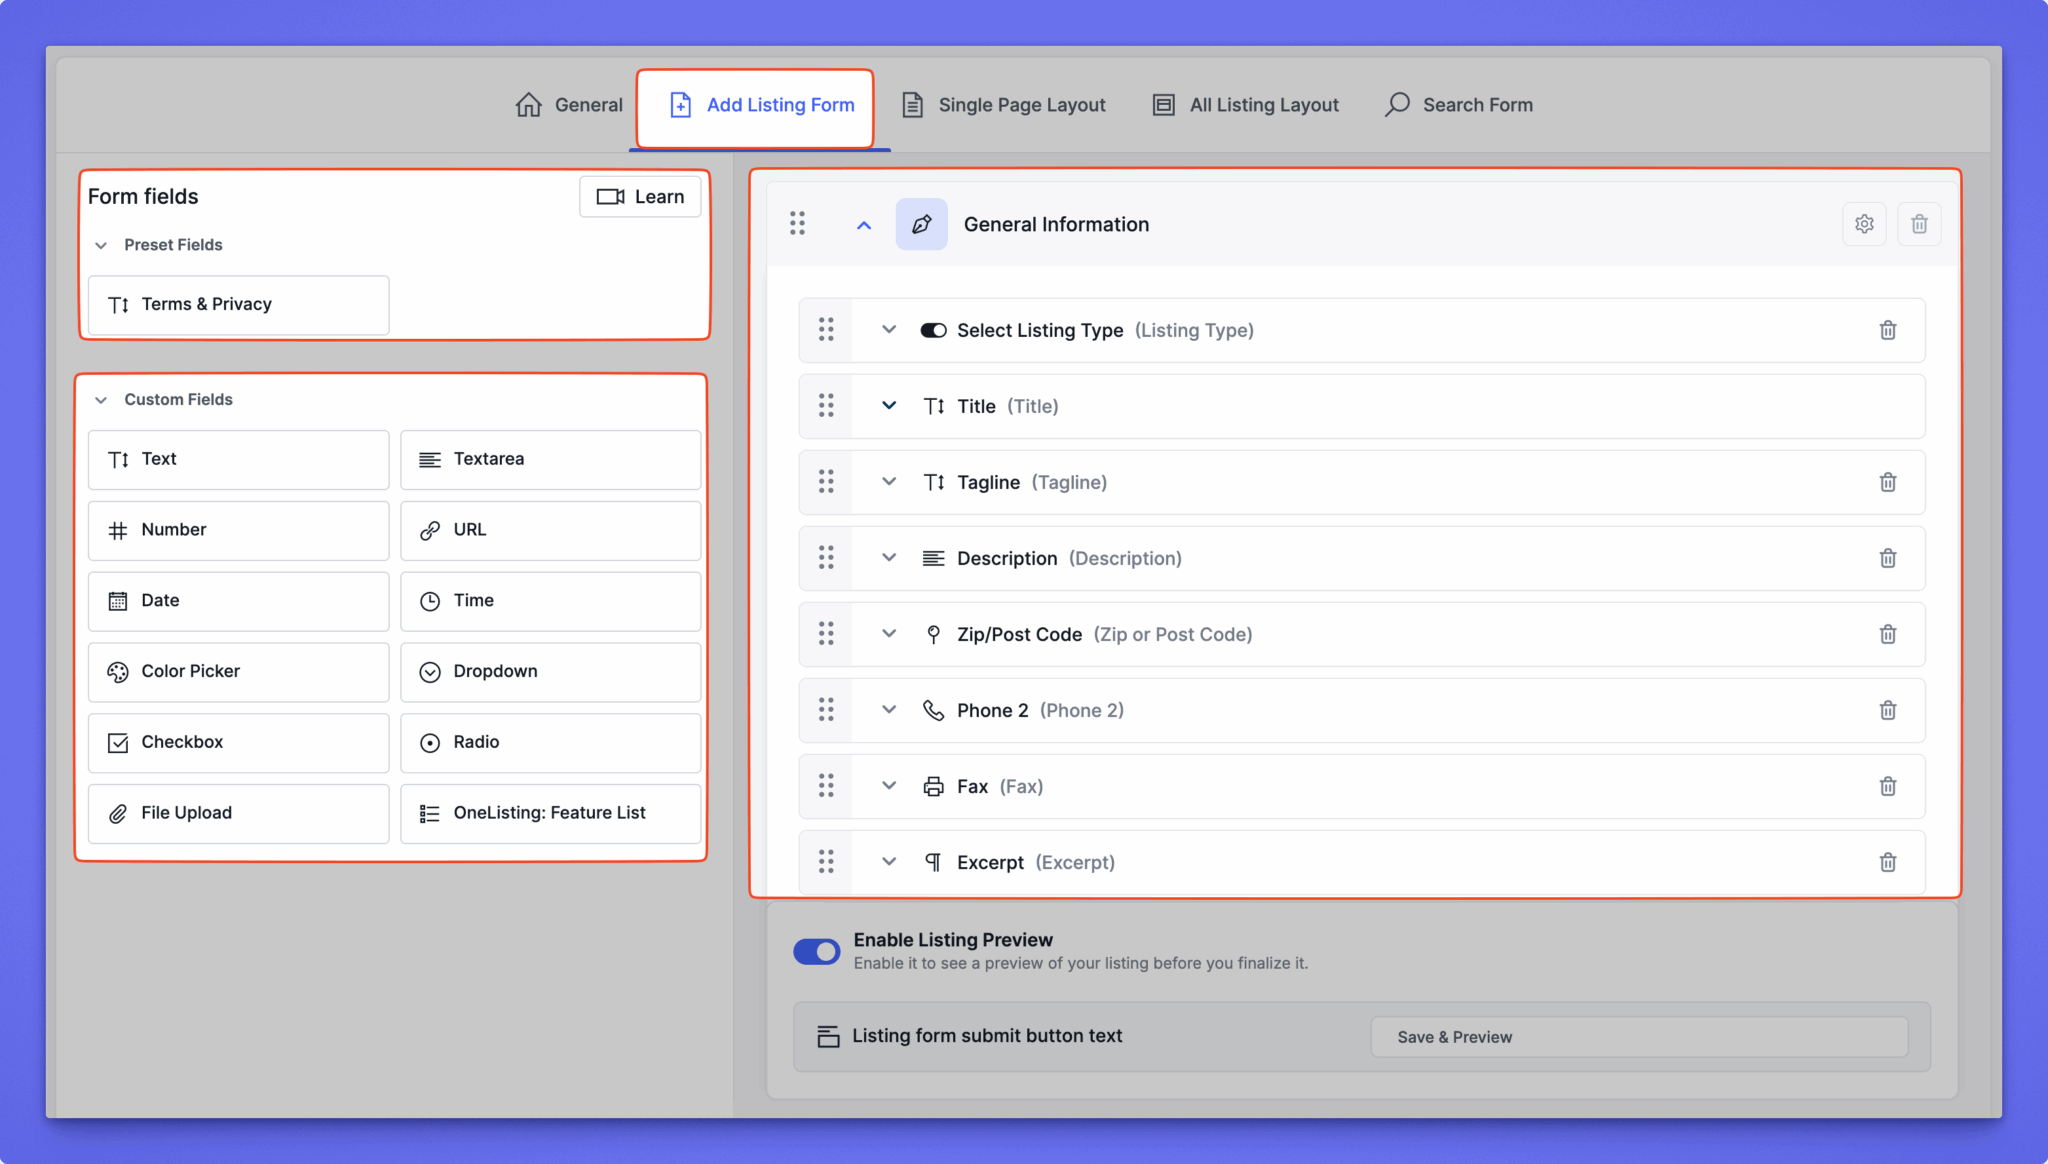
Configure all listing cards and single listing layout > Configure the search form. For more info, you can head over to the documentation.
Step-5. How to add categories
Different types of users search for different types of salon listings. As a salon directory owner, you should split your directory into different categories for the convenience of the users. For example, you want to add a “hair salon” & “nail salon” category to your directory.
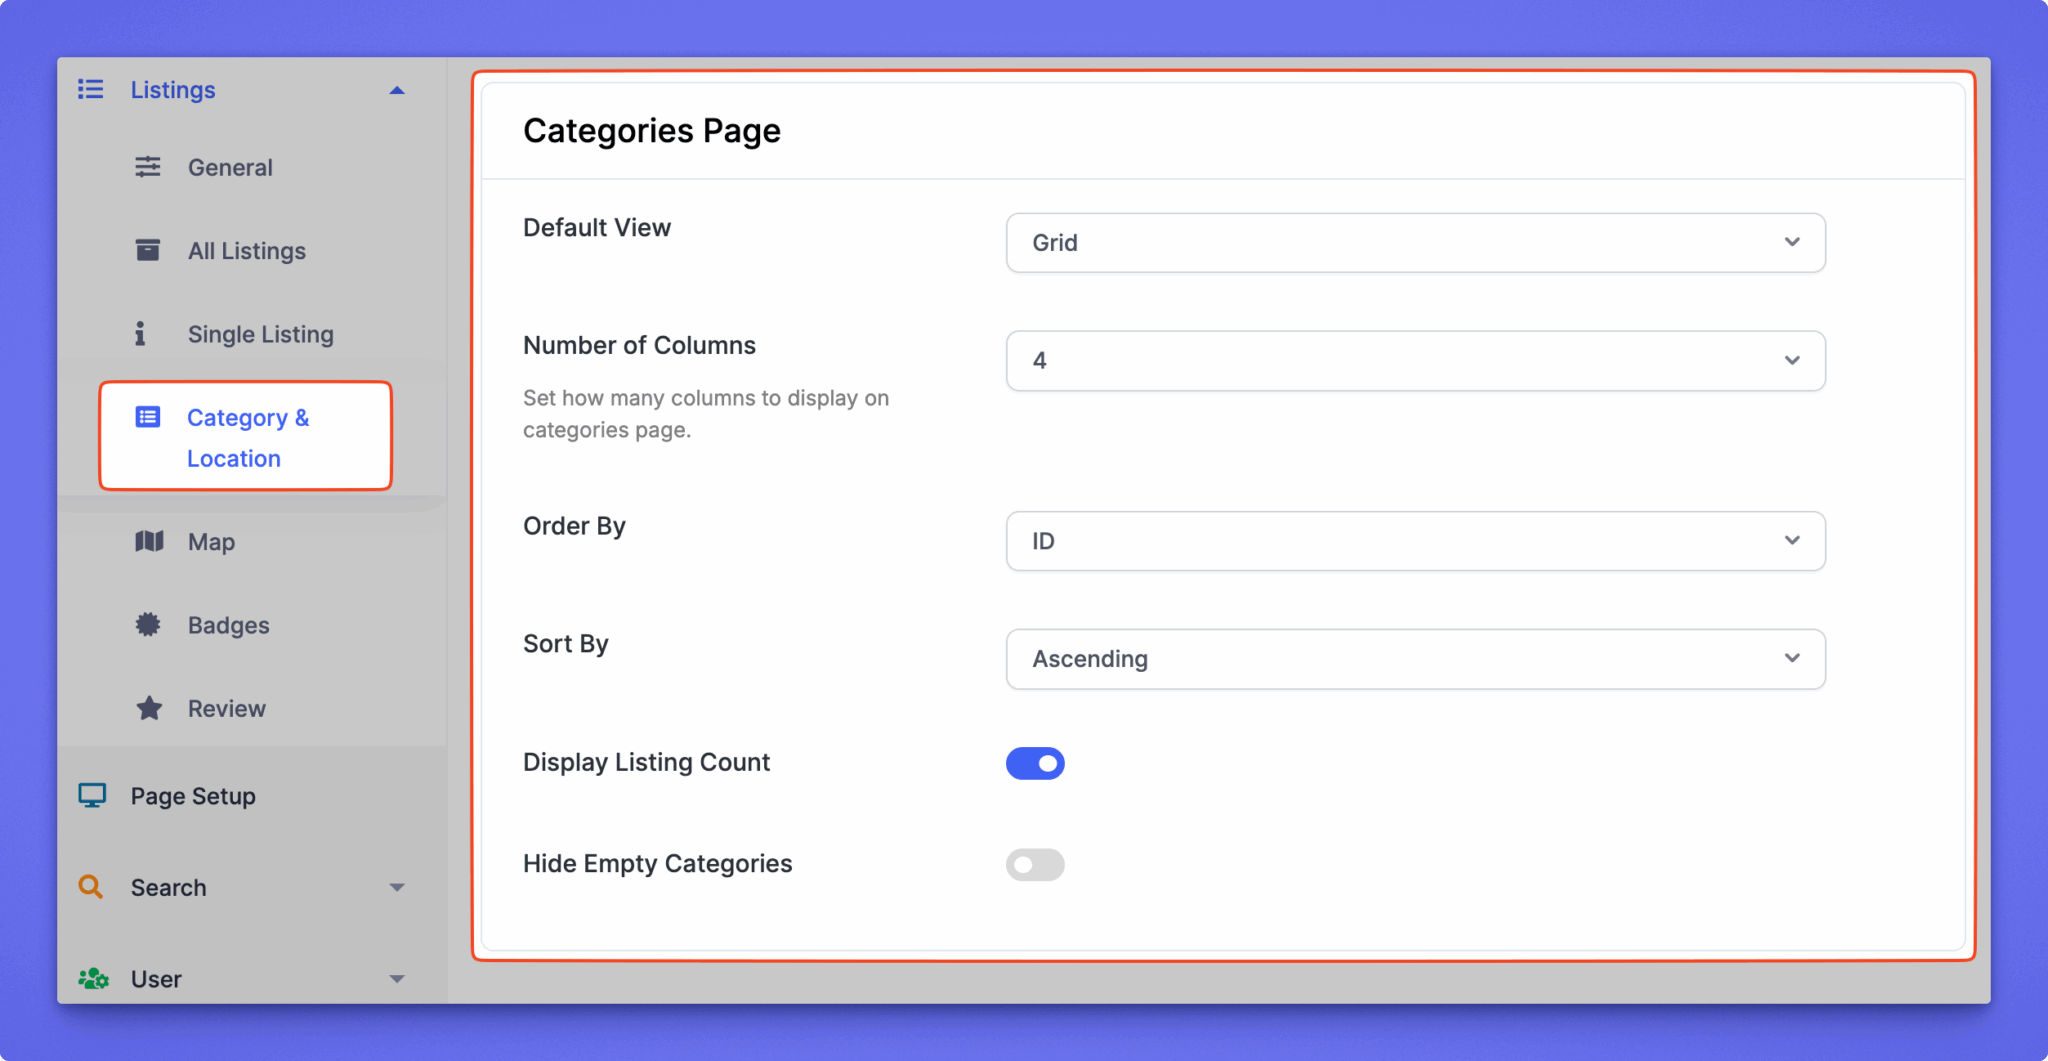
To do that, go to Listings > Categories. Then specify the name of the category and upload the category image. Finish the process by clicking the “Add Category” button and you can see the category on the front end. In the same way, you can add as many categories as you want.
Step-6. How to add location

Many users search salon listings based on location. So, adding location to your directory is another important thing to do. Let’s imagine you want to add “ Florida”. In order to do this, go to the listings > Locations and fill in the description field if necessary. You can add more locations to your salon directory following the above procedure.
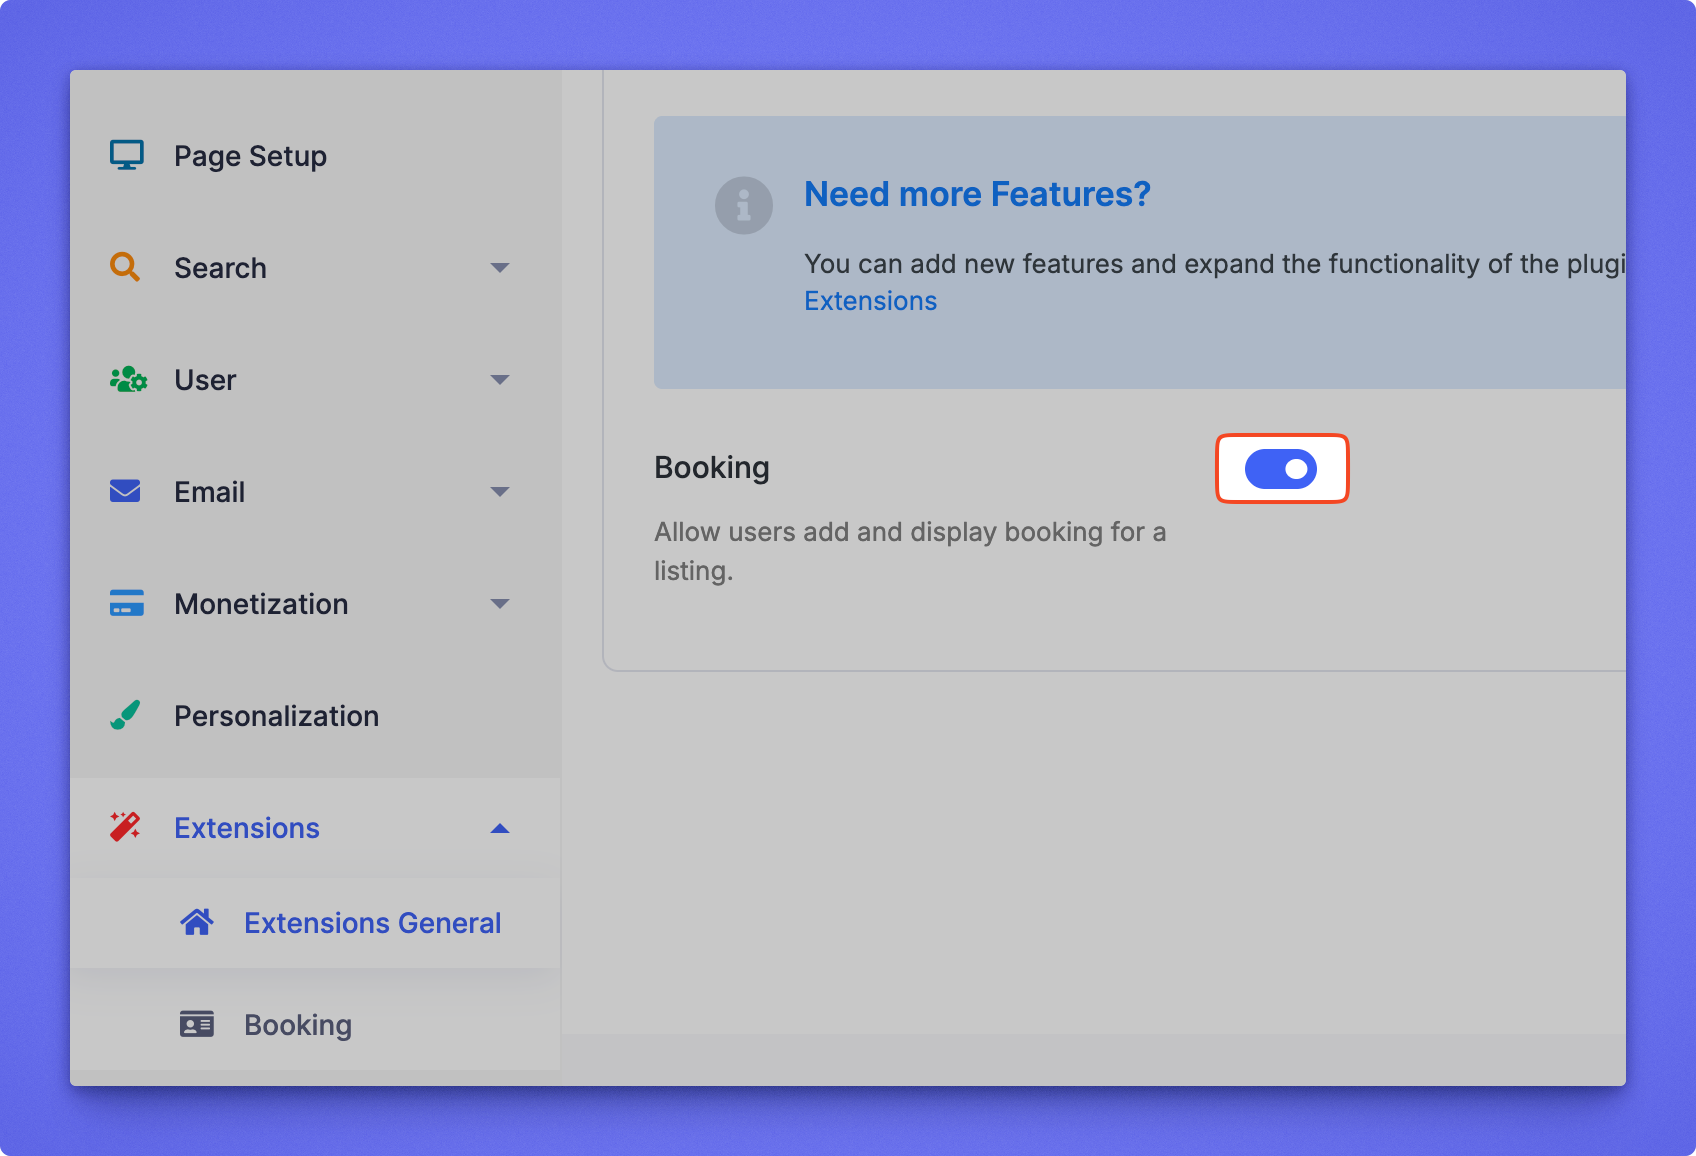
Step-7. How to extend functionalities
In the previous step, you have added the basic functionalities of a directory website. Now, it’s time to extend the functionalities using different extensions. Adding more features to your salon directory website will help you to get exposure to more audiences.
For example, you may add the booking/reservation feature to your salon directory using the booking extension. With the booking/reservation option, you can allow the listing owners to control and steer the flow of service-seekers all day long.
Another important feature of the salon directory website is the opening/business hour which allows the users to learn when the salons are available for patients. You can simply add this feature to your directory, using the business/opening hour extension.
One more important feature of the salon directory is the listing search with the maps. Patients can easily find their desired salons through maps. Adding this feature to your salon directory is easier with the listings with map extension.
You have already got several options to extend the functionality of your salon directory and make it more user-engaging. There are still many options left to improve your directory by adding more features which you can try using these extensions.
To add the extension, go to the WP-Admin Dashboard ➝ Plugins ➝ Add New ➝ Upload Plugin ➝ and upload the Extension ZIP file and Activate it.
Bonus Tips: How to Monetize a Salon Directory Website?
There are several ways to monetize a salon directory website. Here are some suggestions.
Advertising
Selling ad space on your website to local businesses that cater to your audience, such as salons, spas, beauty product companies, and cosmetic surgeons can be an amazing route to monetize your salon directory website.
There are various advertising models you can choose from, including CPC (cost per click), CPM (cost per thousand impressions), or flat fee arrangements. You can use advertising networks like Google AdSense or Mediavine to help you manage and optimize your ads.
Sponsored listings
You can offer salons and other beauty businesses the option to have their listing featured prominently on your website for a fee. This will give them greater visibility and prominence on your website, and potentially attract more clients.
You can charge a flat fee for a set amount of time or a recurring fee for ongoing visibility. You can also offer various tiers of sponsored listings at different price points, depending on the level of exposure and additional features included.
Affiliate marketing
Partner with beauty product companies and earn a commission on sales made through your website. You can sign up for affiliate programs from major retailers like Sephora or Ulta, or seek out smaller, independent brands that are relevant to your audience. You can write reviews or create curated lists of recommended products and include affiliate links that track clicks and sales.
Booking fees
Charging a booking fee for appointments made through your website can be another powerful way to make money from your salon directory website. This fee can be a percentage of the total booking amount or a fixed fee per appointment.
This strategy works best if you have a sophisticated booking system integrated into your website, which allows users to easily find and book appointments with salons or stylists in their area. You can use a third-party booking service like Vagaro or Mindbody, or develop your own custom booking platform.
Subscription model
You can offer salons and other beauty businesses the option to pay a monthly or annual subscription fee for a premium listing on your website. This could include additional features such as a dedicated landing page, enhanced search visibility, or priority customer support. You can also offer value-added services like email marketing or social media promotion to help businesses reach a wider audience.
E-commerce
Sell beauty products directly on your website and earn a commission on each sale. This can be a lucrative strategy if you have a large and engaged audience that is interested in purchasing beauty products online. You can source products from major distributors or wholesalers, or create your own branded products in partnership with manufacturers.
Events
Organize and promote beauty events in partnership with salons and other local businesses. Charge a fee for participation or ticket sales. This strategy can help you generate additional revenue and build relationships with local businesses and customers. You can host events like beauty workshops, product launches, or charity fundraisers.
Final Thought on How to Create a Salon Directory Website
Our tutorial on creating a salon directory website has been based on the free directory plugin and theme. Using a free plugin and theme will make your website workable but using a premium directory extension or the membership of Directorist and its themes will make your website even more scalable and productive.
If you have already used the premium theme and plugin, then please don’t hesitate to drop us a line sharing your experience. Finally, if you want us to add any feature to a salon directory website, then let us know. We will happily consider it to add to our tutorial.
If you liked our posts, don’t forget to subscribe to our blog so that we can notify you once any post is published. Directorist is now on Facebook, Twitter, and LinkedIn! You can also join the Directorist Community for sharing your thoughts and experiences relating to the directory niche. Come and join us to see what we’re up to.


Editorial Staff
Directorist Editorial Staff is a team of WordPress geeks that provides quality content for WordPress users. Primarily the team works for all the ingredients needed for establishing a directory listing website in WordPress. Moreover, you will get numerous web content related to the WordPress blog, Digital marketing stuff, social post, text documentation, visual guides, and so on.


Leave a Reply
You must be logged in to post a comment.