• Why Directorist
    • All Features
    • Solutions
    • Customer Showcase
    • Testimonials
  • Extensions
  • Themes
  • App
  • Resources
    • Documentations
    • Support Center
    • Contact Us
    • Roadmap
    • Beta
    • About Us
    • Team
  • Pricing
  • Blog
Sing In

Extensions

Installation

  • Installation
  • Activate/Renew License

Pricing Plans

  • Configuring Checkout Pages
  • Managing Orders
  • What are the differences between different listing plans?
  • Switching Plan
  • Submitting listings using a free package/plan
  • Listing Renew with Plan
  • Create a Plan
  • Display Plans
  • Directorist Pricing Plan Overview Video
  • Step By Step Guide

WooCommerce Pricing Plans

  • Creating Plans
  • Displaying Plans
  • Managing Orders
  • Video Walkthrough
  • Create WooCommerce Subscription
  • Step By Step Guide

Claim Listing

  • Overview
  • Initial Configuration
  • Permalinks & Default Pages
  • Monetization & Gateways
  • Setting up a price or plan
  • Display of Claim Listing
  • Moderating Claims
  • Notification Settings

PayPal Payment Gateway

  • PayPal Payment Gateway
  • Recurring Plan/Package

Stripe Payment Gateway

  • Stripe Payment Gateway

Business Hours

  • Overview
  • Key Features
  • Installation and Configuration
  • Builder Setup
  • Sidebar setup
  • How It Works

Listings Slider & Carousel Listing

  • Listings Slider & Carousel
  • Detailed Guideline

FAQs

  • Listing FAQs

Image Gallery

  • Overview
  • Installation & Configuration
  • Settings
  • Builder Setup

Google ReCAPTCHA

  • Google ReCAPTCHA

Social Login

  • Overview
  • Configure Google Client
  • Configure Facebook APP ID

Post Your Need

  • Overview
  • Shortcodes

Listings with Map

  • Overview
  • Configure

Directorist Booking

  • Installation
  • Configure
  • Service Booking
  • Rental System
  • Event Booking
  • Booking Payment Service (Coming Soon)
  • Split Payment System (Commission and Wallet)
  • Booking Refund

Directorist Live Chat

  • Install and Configure

Rank Featured Listings

  • How To Use Rank Feature Listing – A step by step guide

Compare Listing

  • Compare Listings Overview

Mark as Sold

  • Configuration
  • Installation and License Activation
  • Mark as Sold
  • Mark as Negotiating

Directorist Coupon

  • Installation and Activation
  • Create a Coupon
  • Publish a Coupon

Oxygen Builder

  • Getting Started
  • All Listings Page
  • Single Details
  • Single Taxonomy
  • All Taxonomies

BuddyBoss Integration

  • Overview
  • Installation and Configuration
  • Add Listings
  • Add Listings to Groups
  • How to use BB Message with Directorist

BuddyPress Integration

  • Overview
  • Installation and Configuration
  • Add Listings
  • Add Listings to Groups
  • How to use the BuddyPress Private Messaging in Directorist

Directorist - GamiPress Integration

  • How to earn points with GamiPress in Directorist
  • How to redeem points

Directorist WPML – Translation Guide

  • Directory Type Translation
  • Listings Translation
  • String Translation
  • Admin Text Translation
  • Directorist Pages Translation

Directorist Job Manager

  • Overview
  • Key Features
  • Installation
  • Builder Setup
  • Page Setup
  • Email template Setup

Directorist Marketplace

  • Directorist Marketplace

Directorist Ads Manager

  • Ads Manager Overview

Directorist Multi Directory Linking

  • Multi Directory Linking

Authorize.net Payment Gateway

  • Overview
  • Installation
  • Configuration
  • Settings

Directorist Helpgent Integration

  • Overview
  • Key Features
  • Installation
  • User Dashboard

Directorist Mailchimp Integration

  • Overview
  • Key Features
  • Installation
  • Configuration
  • Settings
Installation

Installing an extension of the Directorist - Business Directory Plugin is very easy. All Directorist extensions depend on the Directorist (Free Business Directory Plugin) base plugin. Therefore, before installing and activating an extension, please make sure you have installed and activated the Directorist plugin from WordPress.org for free.

Download the extensions from the "Themes & Extensions" 

First, you need to navigate to WordPress Admin Dashboard → Directory Listings → Themes & Extensions and connect your directorist.com account. You need to log in using your directorist.com account email and password to manage your extensions and themes.

Once you log in, you will see all the available themes and extensions of your purchased plan. 

Just click on the "Install" button to install the extensions. You can activate, uninstall, go to the settings right from this section.

Download from the purchase receipt: You can also download the purchased extension in a zip file from the purchase receipt sent to your mailbox after you purchased an item. And you can also download your purchased extension from your account page on directorist.com.

Download from your account page: Go to directorist.com and click on the "Sign In" button on the top right corner of the page and log in using your directorist account email/username and password.  

After logging in to your account click on the arrow down icon next to your name on the top right corner and click on "Downloads"

You will be then redirected to the Dashboard → Downloads page. Simply, clicking on the "Download" button will download the file in a zip format.

Download the extensions from the purchased receipt: Go to your mailbox eg. Gmail and open the Purchase Receipt. You will find the purchased item with its download link. You can click on the link to download the file in a zip format. Once you have downloaded the file, you are ready to install it. 

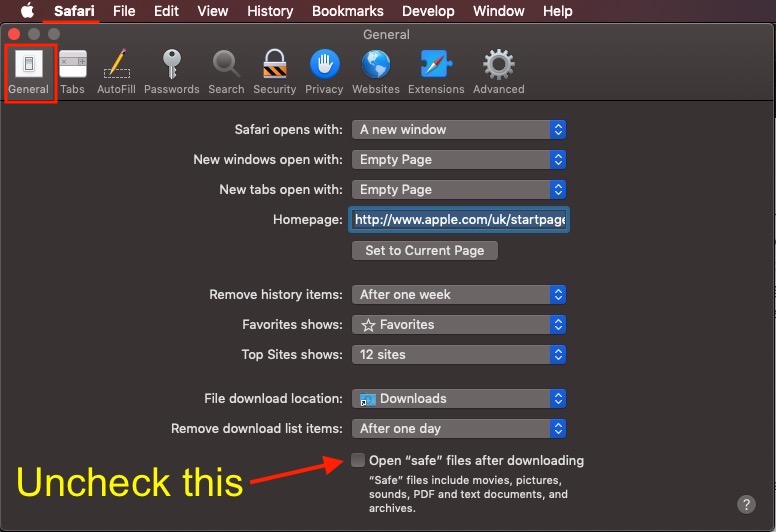
*NOTE: If you are using the Safari Browser on a Mac, the zip file of the extension may be automatically unzipped after you download it via Safari. You can change this setting in Safari to only download the ZIP file and not unpack it.

Follow this step: 1. Open Safari, 2. Click on Safari > Preferences, 3. Under the General tab, uncheck the option 'Open “safe” files after downloading. See the screenshot below.

Disable automatic opening of zip file in Safari
Disable automatic opening of a zip file in Safari

Installation

You can install the downloaded extension plugin in one of the two following ways.
1. Via the WordPress Dashboard
2. via FTP

1. Installing via the WordPress Dashboard:

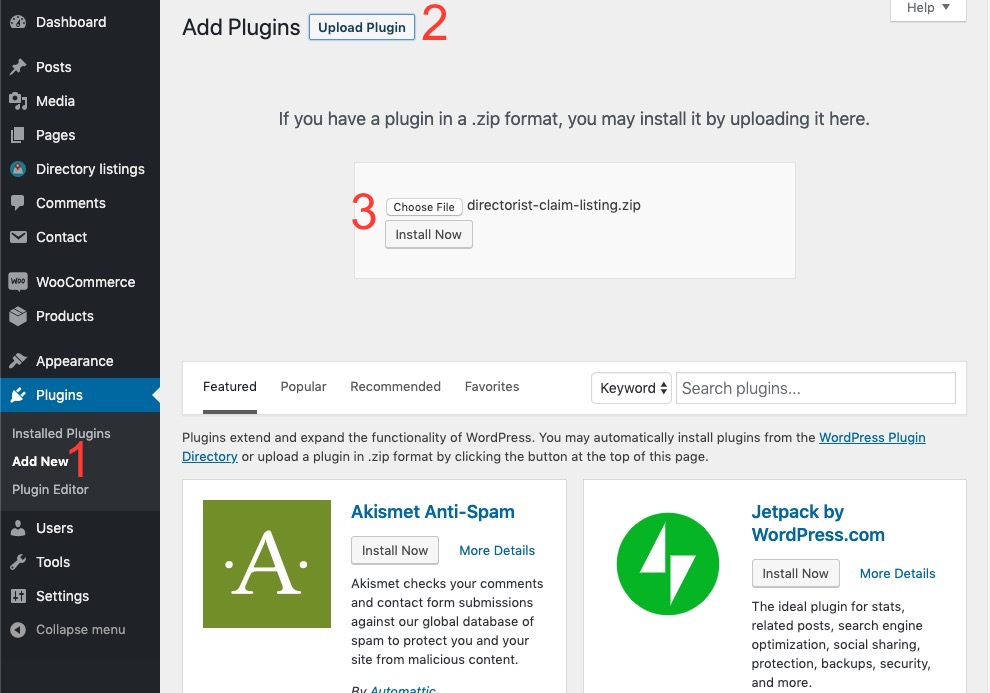
⇒ Go to Plugins → Add New → Upload Plugin page
⇒ Click choose file and select your downloaded zip file of the extension and click the 'Install Now' button.
⇒ Activate the plugin after uploading is completed. We are installing the directorist claim listing extension in the following screenshot as an example. You can install any extensions similarly.

Installing Directorist Claim Listing via WP dashboard

2. Installing via FTP
⇒ Log into your hosting panel using any FTP client like FileZilla.
⇒ Go to wp-content/plugins directory
⇒ Upload your downloaded zip file of the extension and unzip the file inside the plugins directory. All of your unzipped files should be inside the wp-content/plugins/name-of-the-extension/ directory after unzipping.

Congratulations, you have successfully installed the extension! Now you can start using the installed Directorist extension. Read the documentation to get the most out of it. You can find the list of documentation of all extensions here.

Last Updated: September 5th, 2021

Related Article

  • Activate/Renew License

© 2025 All rights reserved