• Why Directorist
    • All Features
    • Solutions
    • Customer Showcase
    • Testimonials
  • Extensions
  • Themes
  • App
  • Resources
    • Documentations
    • Support Center
    • Contact Us
    • Roadmap
    • Beta
    • About Us
    • Team
  • Pricing
  • Blog
Sing In

Extensions

Installation

  • Installation
  • Activate/Renew License

Pricing Plans

  • Configuring Checkout Pages
  • Managing Orders
  • What are the differences between different listing plans?
  • Switching Plan
  • Submitting listings using a free package/plan
  • Listing Renew with Plan
  • Create a Plan
  • Display Plans
  • Directorist Pricing Plan Overview Video
  • Step By Step Guide

WooCommerce Pricing Plans

  • Creating Plans
  • Displaying Plans
  • Managing Orders
  • Video Walkthrough
  • Create WooCommerce Subscription
  • Step By Step Guide

Claim Listing

  • Overview
  • Initial Configuration
  • Permalinks & Default Pages
  • Monetization & Gateways
  • Setting up a price or plan
  • Display of Claim Listing
  • Moderating Claims
  • Notification Settings

PayPal Payment Gateway

  • PayPal Payment Gateway
  • Recurring Plan/Package

Stripe Payment Gateway

  • Stripe Payment Gateway

Business Hours

  • Business Hours

Listings Slider & Carousel Listing

  • Listings Slider & Carousel

FAQs

  • Listing FAQs

Image Gallery

  • Image Gallery

Google ReCAPTCHA

  • Google ReCAPTCHA

Social Login

  • Overview
  • Configure Google Client
  • Configure Facebook APP ID

Post Your Need

  • Overview
  • Shortcodes

Listings with Map

  • Overview
  • Configure

Directorist Booking

  • Installation
  • Configure
  • Service Booking
  • Rental System
  • Event Booking
  • Booking Payment Service (Coming Soon)
  • Split Payment System (Commission and Wallet)
  • Booking Refund

Directorist Live Chat

  • Install and Configure

Rank Featured Listings

  • How To Use Rank Feature Listing – A step by step guide

Compare Listing

  • Compare Listings Overview

Mark as Sold

  • Configuration
  • Installation and License Activation
  • Mark as Sold
  • Mark as Negotiating

Directorist Coupon

  • Installation and Activation
  • Create a Coupon
  • Publish a Coupon

Oxygen Builder

  • Getting Started
  • All Listings Page
  • Single Details
  • Single Taxonomy
  • All Taxonomies

BuddyBoss Integration

  • Overview
  • Installation and Configuration
  • Add Listings
  • Add Listings to Groups
  • How to use BB Message with Directorist

BuddyPress Integration

  • Overview
  • Installation and Configuration
  • Add Listings
  • Add Listings to Groups
  • How to use the BuddyPress Private Messaging in Directorist

Directorist - GamiPress Integration

  • How to earn points with GamiPress in Directorist
  • How to redeem points

Directorist WPML – Translation Guide

  • Directory Type Translation
  • Listings Translation
  • String Translation
  • Admin Text Translation
  • Directorist Pages Translation

Directorist Job Manager

  • Overview

Directorist Marketplace

  • Directorist Marketplace

Directorist Ads Manager

  • Ads Manager Overview
Configuring Checkout Pages
Directorist plugin and some of the directorist add-ons use different pages with some specific shortcodes to function properly. You need to make sure all the pages are set properly in the settings. The directorist plugin and any directorist add-on should create all the required pages automatically for you and you just need to assign them to the settings if they are not already assigned. However, if the page is not created/you deleted before, then do not worry. You can create those pages manually and put the shortcode inside each page. All required shortcodes and other information are clearly mentioned in the settings page. Please go to Directorist Listings > Directorist Settings > Pages, Links & Views Page. And make sure the following pages are set properly. You need to assign those pages for charging your users using created plans.
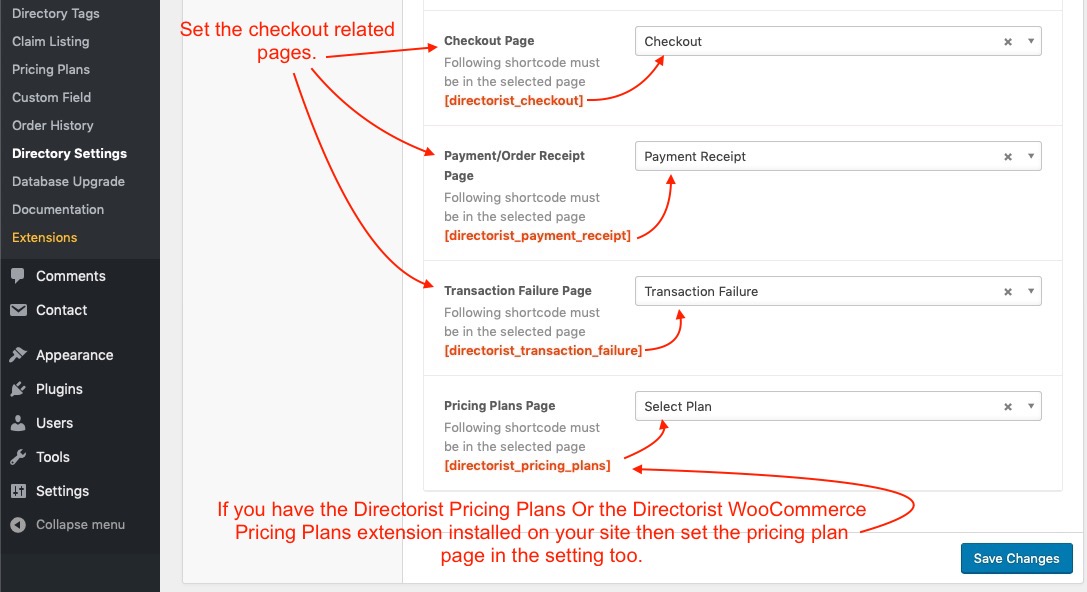
the checkout process related pages setup
  1. A page with the content [directorist_checkout] should be assigned to the Checkout Page option. Directorist will show checkout information using this page.
  2. A page with the content [directorist_payment_receipt] should be assigned to the Payment/Order Receipt Page option. Directorist will show an Order Receipt to the user using this page.
  3. A page with the content [directorist_transaction_failure] should be assigned to the  Transaction Failure Page option. Directorist will show a transaction failure message to the user using this page.
  4. Optionally if you have any of the directorist pricing plans and the directorist WooCommerce pricing plans add-on installed and active on your website, a page with the content [directorist_pricing_plans] should be assigned to the  Pricing Plans Page option. Directorist will show pricing plans to the user using this page during submitting a listing and making a claim etc.

Last Updated: June 1st, 2020

Related Article

  • Step By Step Guide
  • Directorist Pricing Plan Overview Video
  • Display Plans

© 2023 All rights reserved