Service Booking
Service type booking refers to service-oriented booking. For example, Restaurant reservations, Saloon Booking, Appointment for Doctors & Lawyers, and so on.
 To add a service booking listing as an admin navigate to WP-Admin Dashboard → Directory Listings → Add New Listing or to add a service booking listing as a business owner you need to add just like the way you add a regular listing.
Step 1: While filling out the form you will notice a section that reads "Booking".
Step 2: Select "Service" as the Booking Type
To add a service booking listing as an admin navigate to WP-Admin Dashboard → Directory Listings → Add New Listing or to add a service booking listing as a business owner you need to add just like the way you add a regular listing.
Step 1: While filling out the form you will notice a section that reads "Booking".
Step 2: Select "Service" as the Booking Type
 Step 3: "Enable Instant Booking"- With this option enabled booking requests will be immediately approved. If you do not want to immediately approve booking and want to review before publishing, then leave it "unchecked".
Step 4: "Choose Timing Type"- There are two types of timing.
i. Time Slot: Time Slot option lets you set up a start time and specific duration of services. The service providers can set the availability of their respective services while listing the booking. You can also limit the number of available slots per booking. For example, if you select 5 slots, then only 5 reservations will be allowed within that specific period.
Step 3: "Enable Instant Booking"- With this option enabled booking requests will be immediately approved. If you do not want to immediately approve booking and want to review before publishing, then leave it "unchecked".
Step 4: "Choose Timing Type"- There are two types of timing.
i. Time Slot: Time Slot option lets you set up a start time and specific duration of services. The service providers can set the availability of their respective services while listing the booking. You can also limit the number of available slots per booking. For example, if you select 5 slots, then only 5 reservations will be allowed within that specific period.
 Suppose, a doctor provides service from 10:00 am to 6:00 pm on Mondays and only examines 5 patients per slot.
Display Available Slots: Directorist Bookings allows you to display the"Available Slot" count during the booking process.
Suppose, a doctor provides service from 10:00 am to 6:00 pm on Mondays and only examines 5 patients per slot.
Display Available Slots: Directorist Bookings allows you to display the"Available Slot" count during the booking process. However, if you want to hide the "1 slot available" section then just uncheck the "Display Available Slot" option and available slots will no longer come in view.
Slots Available Text: You can also change the text that reads "slots available" to anything you like. For example, it could be "Seats Available" or "left only" etc.
ii. Time Picker: Using the Time Picker feature users can choose their preferred booking time for a service. You simply need to define the time frame for the individual day and within that time frame, users can select their preferred timing.
However, if you want to hide the "1 slot available" section then just uncheck the "Display Available Slot" option and available slots will no longer come in view.
Slots Available Text: You can also change the text that reads "slots available" to anything you like. For example, it could be "Seats Available" or "left only" etc.
ii. Time Picker: Using the Time Picker feature users can choose their preferred booking time for a service. You simply need to define the time frame for the individual day and within that time frame, users can select their preferred timing. Display Available Time: Directorist Bookings allows you to display the"Available Time" for the service during the booking process.
 If you want to hide the "Available Time" section then just uncheck the "Display Available Time" option and available time will no longer come in view.
Available Time Text: You can also change the text that reads "Available Time" to anything you like. For example, it could be "Business Hours" or "Service Time" etc.
Step 5: Choose the maximum number of guests you want to allow per reservation.
If you want to hide the "Available Time" section then just uncheck the "Display Available Time" option and available time will no longer come in view.
Available Time Text: You can also change the text that reads "Available Time" to anything you like. For example, it could be "Business Hours" or "Service Time" etc.
Step 5: Choose the maximum number of guests you want to allow per reservation.
 Step 1- Click on the listing to view the Single listing page.
Step 2- On the right sidebar, you will notice the Directorist Booking widget from where you can select the date, time, and the number of guests you want to book the service for and then hit the "Request Booking" button.
Step 3- Following that, you will land on a confirmation page wherein you have to put your personal information i.e name, email, phone number, and a short message to the listing owner.
Step 4- Clicking on the "Confirm" button will confirm the booking and upon confirmation, you will receive an email.
Booking a service using "Time Picker"- If the admin or listing owner selects "Time Picker" as the timing type then this is how a user will book the service.
Step 1- Click on the listing to view the Single listing page.
Step 2- On the right sidebar, you will notice the Directorist Booking widget from where you can select the date, time, and the number of guests you want to book the service for and then hit the "Request Booking" button.
Step 3- Following that, you will land on a confirmation page wherein you have to put your personal information i.e name, email, phone number, and a short message to the listing owner.
Step 4- Clicking on the "Confirm" button will confirm the booking and upon confirmation, you will receive an email.
Booking a service using "Time Picker"- If the admin or listing owner selects "Time Picker" as the timing type then this is how a user will book the service.
 Step 1- Click on the listing to view the Single listing page.
Step 2- On the right sidebar, you will notice the Directorist Booking widget from where you can select the date, time, and the number of guests you want to book the service for and then hit the "Request Booking" button. The basic difference between time slot and time picker is using the latter, you can pick your own time unlike the time slot, wherein you need to select a time from a set of predefined time slots.
Step 3- Following that, you will land on a confirmation page wherein you have to put your personal information i.e name, email, phone number, and a short message to the listing owner.
Step 4- Clicking on the "Confirm" button will confirm the booking and upon confirmation, you will receive an email.
Notification: When a user requests for booking, an email will be sent to the user as well as the listing owner.
Step 1- Click on the listing to view the Single listing page.
Step 2- On the right sidebar, you will notice the Directorist Booking widget from where you can select the date, time, and the number of guests you want to book the service for and then hit the "Request Booking" button. The basic difference between time slot and time picker is using the latter, you can pick your own time unlike the time slot, wherein you need to select a time from a set of predefined time slots.
Step 3- Following that, you will land on a confirmation page wherein you have to put your personal information i.e name, email, phone number, and a short message to the listing owner.
Step 4- Clicking on the "Confirm" button will confirm the booking and upon confirmation, you will receive an email.
Notification: When a user requests for booking, an email will be sent to the user as well as the listing owner.
Adding a service type booking listing
Upon successful configuration, you will notice a new section "Booking" on the Add Listing Form.
To add a service booking listing as an admin navigate to WP-Admin Dashboard → Directory Listings → Add New Listing or to add a service booking listing as a business owner you need to add just like the way you add a regular listing.
Step 1: While filling out the form you will notice a section that reads "Booking".
Step 2: Select "Service" as the Booking Type
Step 3: "Enable Instant Booking"- With this option enabled booking requests will be immediately approved. If you do not want to immediately approve booking and want to review before publishing, then leave it "unchecked".
Step 4: "Choose Timing Type"- There are two types of timing.
i. Time Slot: Time Slot option lets you set up a start time and specific duration of services. The service providers can set the availability of their respective services while listing the booking. You can also limit the number of available slots per booking. For example, if you select 5 slots, then only 5 reservations will be allowed within that specific period.
Suppose, a doctor provides service from 10:00 am to 6:00 pm on Mondays and only examines 5 patients per slot.
Display Available Slots: Directorist Bookings allows you to display the"Available Slot" count during the booking process.However, if you want to hide the "1 slot available" section then just uncheck the "Display Available Slot" option and available slots will no longer come in view.
Slots Available Text: You can also change the text that reads "slots available" to anything you like. For example, it could be "Seats Available" or "left only" etc.
ii. Time Picker: Using the Time Picker feature users can choose their preferred booking time for a service. You simply need to define the time frame for the individual day and within that time frame, users can select their preferred timing.
Display Available Time: Directorist Bookings allows you to display the"Available Time" for the service during the booking process.
If you want to hide the "Available Time" section then just uncheck the "Display Available Time" option and available time will no longer come in view.
Available Time Text: You can also change the text that reads "Available Time" to anything you like. For example, it could be "Business Hours" or "Service Time" etc.
Step 5: Choose the maximum number of guests you want to allow per reservation.
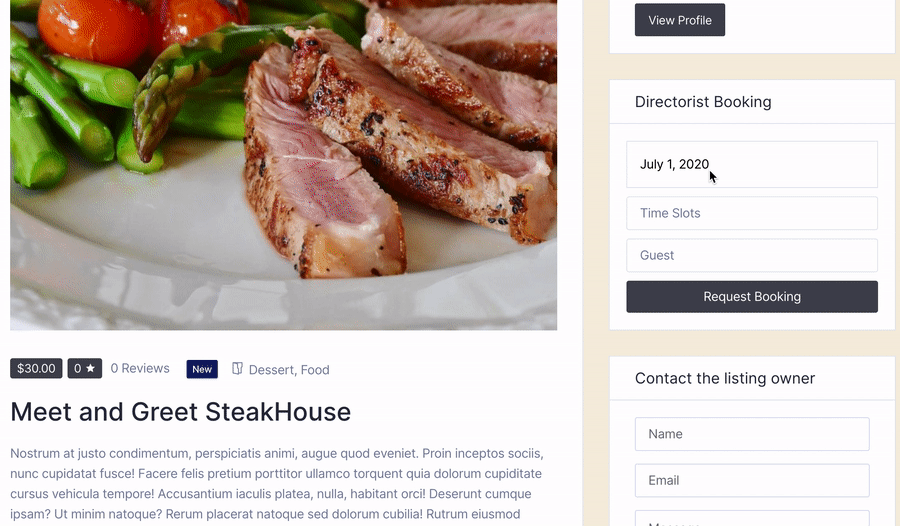
How to book a service
Book A Service: Booking a service or an appointment requires just a few clicks. A user needs to log in to the site and click/view the listing service he/she is interested in. A user can book a service from the sidebar "Directorist Booking" widget. Booking a service using "Time Slot"- If the admin or listing owner selects "Time Slot" as the timing type then this is how a user will book the service.
Step 1- Click on the listing to view the Single listing page.
Step 2- On the right sidebar, you will notice the Directorist Booking widget from where you can select the date, time, and the number of guests you want to book the service for and then hit the "Request Booking" button.
Step 3- Following that, you will land on a confirmation page wherein you have to put your personal information i.e name, email, phone number, and a short message to the listing owner.
Step 4- Clicking on the "Confirm" button will confirm the booking and upon confirmation, you will receive an email.
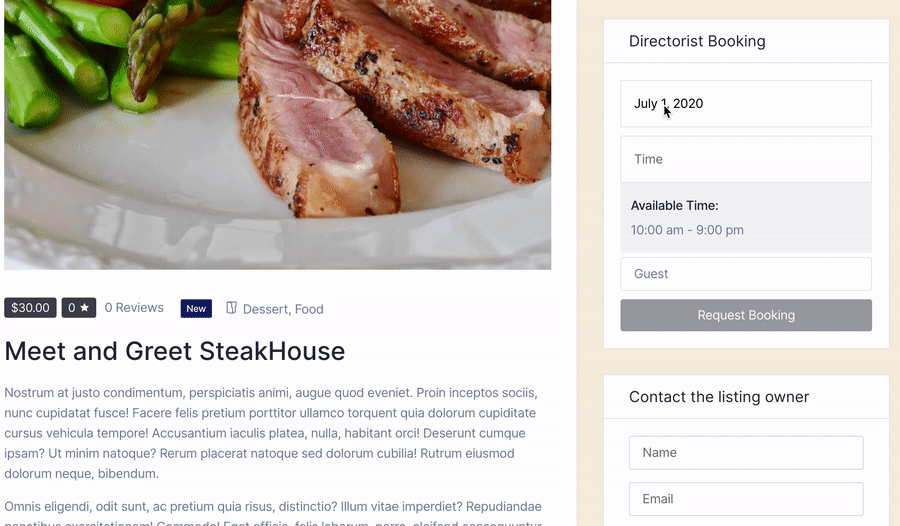
Booking a service using "Time Picker"- If the admin or listing owner selects "Time Picker" as the timing type then this is how a user will book the service.
Step 1- Click on the listing to view the Single listing page.
Step 2- On the right sidebar, you will notice the Directorist Booking widget from where you can select the date, time, and the number of guests you want to book the service for and then hit the "Request Booking" button. The basic difference between time slot and time picker is using the latter, you can pick your own time unlike the time slot, wherein you need to select a time from a set of predefined time slots.
Step 3- Following that, you will land on a confirmation page wherein you have to put your personal information i.e name, email, phone number, and a short message to the listing owner.
Step 4- Clicking on the "Confirm" button will confirm the booking and upon confirmation, you will receive an email.
Notification: When a user requests for booking, an email will be sent to the user as well as the listing owner. Last Updated: July 19th, 2021