• Why Directorist
    • All Features
    • Solutions
    • Customer Showcase
    • Testimonials
  • Extensions
  • Themes
  • App
  • Resources
    • Documentations
    • Support Center
    • Contact Us
    • Roadmap
    • Beta
    • About Us
    • Team
  • Pricing
  • Blog
Sing In

Extensions

Installation

  • Installation
  • Activate/Renew License

Pricing Plans

  • Configuring Checkout Pages
  • Managing Orders
  • What are the differences between different listing plans?
  • Switching Plan
  • Submitting listings using a free package/plan
  • Listing Renew with Plan
  • Create a Plan
  • Display Plans
  • Directorist Pricing Plan Overview Video
  • Step By Step Guide

WooCommerce Pricing Plans

  • Creating Plans
  • Displaying Plans
  • Managing Orders
  • Video Walkthrough
  • Create WooCommerce Subscription
  • Step By Step Guide

Claim Listing

  • Overview
  • Initial Configuration
  • Permalinks & Default Pages
  • Monetization & Gateways
  • Setting up a price or plan
  • Display of Claim Listing
  • Moderating Claims
  • Notification Settings

PayPal Payment Gateway

  • PayPal Payment Gateway
  • Recurring Plan/Package

Stripe Payment Gateway

  • Stripe Payment Gateway

Business Hours

  • Overview
  • Key Features
  • Installation and Configuration
  • Builder Setup
  • Sidebar setup
  • How It Works

Listings Slider & Carousel Listing

  • Listings Slider & Carousel
  • Detailed Guideline

FAQs

  • Listing FAQs

Image Gallery

  • Overview
  • Installation & Configuration
  • Settings
  • Builder Setup

Google ReCAPTCHA

  • Google ReCAPTCHA

Social Login

  • Overview
  • Configure Google Client
  • Configure Facebook APP ID

Post Your Need

  • Overview
  • Shortcodes

Listings with Map

  • Overview
  • Configure

Directorist Booking

  • Installation
  • Configure
  • Service Booking
  • Rental System
  • Event Booking
  • Booking Payment Service (Coming Soon)
  • Split Payment System (Commission and Wallet)
  • Booking Refund

Directorist Live Chat

  • Install and Configure

Rank Featured Listings

  • How To Use Rank Feature Listing – A step by step guide

Compare Listing

  • Compare Listings Overview

Mark as Sold

  • Configuration
  • Installation and License Activation
  • Mark as Sold
  • Mark as Negotiating

Directorist Coupon

  • Installation and Activation
  • Create a Coupon
  • Publish a Coupon

Oxygen Builder

  • Getting Started
  • All Listings Page
  • Single Details
  • Single Taxonomy
  • All Taxonomies

BuddyBoss Integration

  • Overview
  • Installation and Configuration
  • Add Listings
  • Add Listings to Groups
  • How to use BB Message with Directorist

BuddyPress Integration

  • Overview
  • Installation and Configuration
  • Add Listings
  • Add Listings to Groups
  • How to use the BuddyPress Private Messaging in Directorist

Directorist - GamiPress Integration

  • How to earn points with GamiPress in Directorist
  • How to redeem points

Directorist WPML – Translation Guide

  • Directory Type Translation
  • Listings Translation
  • String Translation
  • Admin Text Translation
  • Directorist Pages Translation

Directorist Job Manager

  • Overview
  • Key Features
  • Installation
  • Builder Setup
  • Page Setup
  • Email template Setup

Directorist Marketplace

  • Directorist Marketplace

Directorist Ads Manager

  • Ads Manager Overview

Directorist Multi Directory Linking

  • Multi Directory Linking

Authorize.net Payment Gateway

  • Overview
  • Installation
  • Configuration
  • Settings

Directorist Helpgent Integration

  • Overview
  • Key Features
  • Installation
  • User Dashboard

Directorist Mailchimp Integration

  • Overview
  • Key Features
  • Installation
  • Configuration
  • Settings
Managing Orders
Please go to Directory Listings > Order History to view all of the orders received on your site. You will receive an order when a user submits a listing using a plan(if you are using directorist pricing plans/ Directorist Pricing Plans) or buy the featured listing. An order will have different statuses depending on the type of gateways a user chooses to pay at the checkout process. An order can have one of the following 6 statuses.
  1. Created: When an order created, it will have a "Created" status by default as an initial status.
  2. Pending: You can set this status manually when the payment for an order is pending.
  3. Completed: An order will have this "Completed" status when payment for an order is completed. However, only online gateways like PayPal or Stripe will update the status of an order to "Completed" automatically when the payment is made successfully, but you need to update the order status manually if the gateway is an offline gateway like the bank transfer gateway.
  4. Failed: An order will have this status when a payment fails. You can also set this status to any orders manually. Keep reading to know how to change order status.
  5. Cancelled: When an order is cancelled, it will have this 'Cancelled' status. You can cancel any order manually.
  6. Refunded: When you refund the money of an order, it will have this status. An online gateway will update the order status to refunded automatically when a refund is made. However, you need to update the order status manually if you make a refund manually.
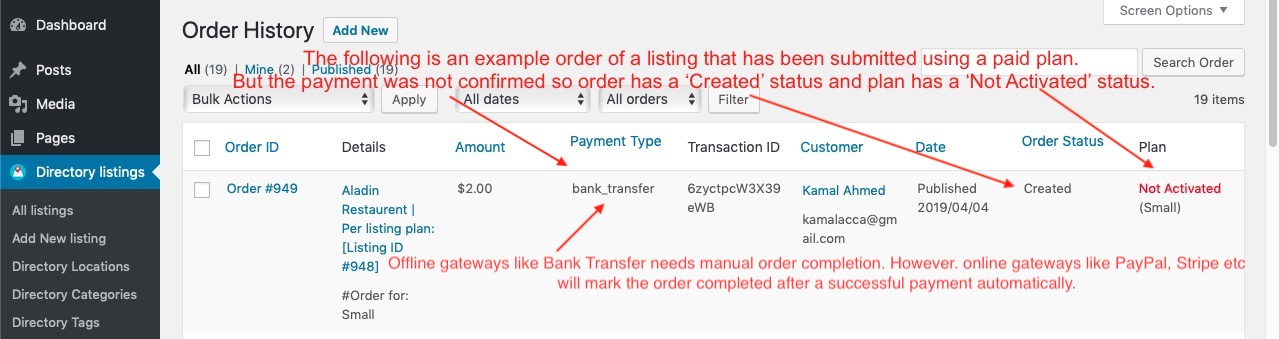
When a listing submitted using a plan, the user will land on the checkout page. The user can pay for the plan using an online or an offline gateway. Of course, you need to have one or more online gateways like the Directorist PayPal Gateway or Stripe gateway installed on your site for your users to be able to pay using an online gateway. However, the default gateway available for free with directorist is the Bank Transfer gateway which is an offline gateway.
Managing Order - Order Recevied using a offline gateway like Bank Transfer
Managing Order - Order Received using an offline gateway like Bank Transfer (click on the image to view the full size)
Example of a completed order using the PayPal Gateway
Example of a completed order using an online gateway - the Directorist PayPal Gateway
Online vs Offline Gateway:
An online gateway like PayPal or Stripe can mark the order completed if the payment is successful during the checkout. The purchased plan gets activated upon order completion. All the listings submitted under the activated plan will be visible to the website users. An offline gateway like the Bank Transfer Gateway will create an order and set the status of the order as "Created". Then once you receive the payment in your bank account, you should mark the order completed manually. See how to change the status of order below.
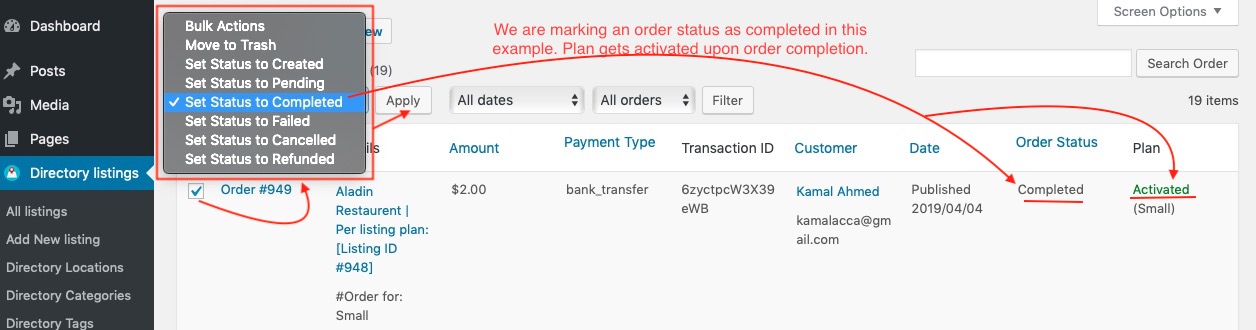
How to change an order status manually:
Please go to Directory Listings > Order History page and check the orders you would like to change the status of and select a status from the highlighted box and hit apply. The order will have a new status. For example, we are marking an order status as completed in the example below.
Managing Order - Changing the status of order manually
Managing Order - Changing the status of the order manually (click on the image to view the full size)

Last Updated: June 1st, 2020

Related Article

  • Step By Step Guide
  • Directorist Pricing Plan Overview Video
  • Display Plans

© 2025 All rights reserved