


Table of Contents
- 1 What Is a Business Directory Website?
- 2 Why Business Directory Websites Are Still Profitable
- 3 Choosing the Right Business Directory Model
- 4 Designing the Structure of a Business Directory
- 5 Structuring Your Business Listings
- 6 Category and Location Structure
- 7 Local SEO Strategy for Business Directories
- 8 Google Maps Integration for Business Discovery
- 9 Business Submission Workflow
- 10 7 Easy Steps to Create a Business Directory Website in WordPress
- 11 Preview of the Directory Website from the Frontend
- 12 Monetization Blueprint for Business Directories
- 13 Advanced Features to Enhance Your Business Directory
- 14 How to Get More Business Listings For Your Business Directory Website
- 15 Scaling a Business Directory Website
- 16 Conclusion on How to Create a Business Directory Website
- 17 FAQ About Create a Business Directory
- 17.1 Where can I get a WordPress directory plugin with customizable listing templates?
- 17.2 Which WordPress directory plugin provides easy integration with popular SEO tools?
- 17.3 What WordPress directory plugin is best for real estate listings?
- 17.4 Which WordPress directory plugins offer advanced search and filtering options?
- 17.5 How do I customize the design of a WordPress directory plugin?
- 17.6 Are there free WordPress directory plugins suitable for event directories?
- 17.7 What features should I look for in a WordPress directory plugin for local listings?
- 17.8 Can I integrate a WordPress directory plugin with payment gateways?
- 17.9 Where can I download popular WordPress directory plugins?
- 17.10 Which WordPress directory plugins support user reviews and ratings?
- 17.11 How can I add a professional business directory to my WordPress site?
- 17.12 What are the best WordPress directory plugins for small businesses?
How to Create a Business Directory Website (Pro Guide)
-

- Tutorials Directorist Themes
- 28 mins read
Are you looking to create an online platform that bridges the gap between businesses and customers? Learning how to create a business directory website might be the solution you need.
A business directory website organizes companies into structured listings so users can easily browse services, compare options, and contact businesses. Each listing typically includes essential information such as the business name, location, contact details, operating hours, images, and customer reviews. When designed thoughtfully, a directory becomes a powerful platform that connects customers with the right services while helping businesses gain visibility.
For founders looking to create a local business directory, the opportunity is especially strong. Local search queries continue to rise, and businesses are willing to pay for exposure where potential customers are actively searching.
Whether you are inquiring about the nature of a directory website or are set to launch one, this article has the information you require. This article will take you through the process of including all elements building a directory site using WordPress themes and plugins to devising monetization strategies.
What Is a Business Directory Website?

A business directory website is a structured platform that organizes companies into searchable listings. Instead of browsing random search results, users can navigate categorized profiles to discover relevant services quickly. Each listing acts as a digital profile for a business, presenting key information in a clear and standardized format.
Entrepreneurs often create a business directory to connect customers with local services while building a scalable online asset. When executed properly, the platform becomes a discovery hub where users can evaluate businesses, compare options, and contact providers directly. This structured approach benefits both sides of the marketplace. Visitors find reliable services faster, and businesses gain consistent visibility.
Many founders start by choosing a niche or geographic area. For instance, you might create a local business directory focused on a single city, industry, or professional category. Over time, the directory can expand into additional locations or service sectors, gradually increasing its reach and commercial potential.
How Business Directories Work
Business directories function through organized listings. Each business profile contains essential information that helps users understand what the company offers and how to contact it.
A typical listing includes:
- Business name
- Contact details (phone, email, website)
- Location or address
- Business description
- Images or media gallery
- Customer reviews and ratings
This consistent structure allows users to scan information quickly. Instead of visiting multiple websites, they can compare several businesses in one place. For entrepreneurs who want to create an online business directory, this organized listing format forms the foundation of the entire platform.
Examples of Business Directories
Several large platforms demonstrate how effective business directories can become when they combine structured listings with strong user experience.
Yelp is widely known for its extensive database of local businesses and customer reviews. Its success comes from detailed profiles and community-driven feedback that helps users make informed decisions.
YellowPages represents one of the earliest directory models. Originally a printed listing resource, it successfully transitioned into a digital directory that organizes businesses by category and location.
Angi focuses primarily on home service providers such as contractors and repair specialists. It distinguishes itself through verified reviews and service recommendations.
Houzz serves a more specialized niche, connecting homeowners with interior designers, architects, and renovation professionals. Its success stems from rich visual content and well-structured professional profiles.
These platforms illustrate a fundamental principle: successful directories combine clear listing structures, trustworthy information, and intuitive search systems.
Why Business Directory Websites Are Still Profitable

In an era dominated by digital discovery, customers find services in a transformed landscape. Organized platforms serve as the backbone of this shift, offering structured formats that entrepreneurs leverage to create profitable business directories.
A well-designed directory sits at the intersection of demand and visibility. Users arrive with a specific intent—finding a service provider—while businesses seek exposure to potential customers. When these two needs converge, the directory becomes a powerful intermediary that generates sustained value.
Understanding the factors driving directory profitability is crucial for entrepreneurs looking to capitalize on this trend.
1. Local Search Demand
Local search activity remains a strong driver of directory traffic. Every day, people search for nearby services such as restaurants, electricians, lawyers, and marketing agencies. These searches often include geographic modifiers like city names or phrases such as “near me.”
When you create a local business directory, you position your platform to capture this search demand. Organized listings, category pages, and location-based filters make it easier for users to identify relevant providers within their area. Over time, these pages attract consistent organic traffic from search engines.
2. Lead Generation Potential
Business directories function as lead-generation platforms. Visitors arrive with a clear objective—to find a service provider. Once they discover a listing that matches their needs, they often proceed to contact the business directly.
This process creates measurable value for listed companies. Phone calls, form submissions, and website visits all represent potential leads. Entrepreneurs can capitalize on this connection by offering premium visibility or enhanced listing features that help businesses attract more inquiries.
3. Business Visibility
Visibility remains a constant challenge for many companies, particularly smaller local businesses. Competing for attention on search engines and social media can be difficult without a substantial marketing budget.
Directories provide an alternative path to exposure. Businesses gain visibility by appearing in curated listings where potential customers are already searching. For this reason, many companies are willing to pay for enhanced placement, featured listings, or subscription-based profiles when they create a business directory in WordPress or similar platforms.
In essence, a directory becomes valuable because it aligns two incentives: users want reliable services, and businesses want discoverability.
Choosing the Right Business Directory Model

Before you create a business directory, you must decide what type of platform you want to build. The directory model determines your audience, your listing structure, and your monetization strategy. Some directories focus on a specific city. Others specialize in a single industry. Each model carries distinct advantages.
Selecting the right structure early will make your directory easier to grow and manage. It also ensures that your platform attracts the right businesses and users from the beginning.
1. Local City Directory
A local directory focuses on businesses within a specific geographic area. The goal is simple: help users discover services in their city or region.
For example, a directory might list restaurants, plumbers, lawyers, and repair services within Dallas or Chicago. Visitors can browse categories and quickly identify nearby providers.
Many entrepreneurs start with this approach because it is easier to scale gradually. You can create a local business directory for one city first, build traction, and later expand into additional locations.
2. Industry-Specific Directory
An industry-focused directory concentrates on a single professional niche. Instead of listing many different services, it highlights one category of businesses.
Examples include directories for:
- dentists
- legal professionals
- marketing agencies
- fitness trainers
This model often attracts a highly targeted audience. Because the platform serves a specialized market, it can become a trusted resource within that industry.
3. B2B Business Directory
A B2B directory connects businesses with other businesses rather than individual consumers. These platforms typically list service providers such as consultants, software companies, logistics providers, or manufacturing partners.
Companies often use these directories to identify vendors, partners, or contractors. If you plan to create an online business directory aimed at professional services, a B2B structure can generate strong commercial demand.
4. Multi-Category Local Directory
This model combines multiple business categories within a specific region. It resembles traditional city directories where users can explore a wide variety of services.
For instance, a platform may include restaurants, healthcare providers, real estate agencies, repair services, and local shops. Because the directory serves many industries, it attracts a broader audience and offers multiple monetization opportunities.
Entrepreneurs who create a business directory in WordPress frequently choose this structure. It allows the directory to grow organically as new categories and locations are added.
Selecting the right directory model is a strategic decision. A focused niche often accelerates early growth, while broader directories offer greater expansion potential over time.
📌 If you want to explore this topic, this guide may help you – Online Directory Business Model: Complete 2026 Guide to Start and Monetize
Designing the Structure of a Business Directory

As you consider the type of directory model to pursue, it’s equally important to establish a clear structural framework. Without it, listings become disorganized, navigation becomes confusing, and search engines struggle to interpret the hierarchy of your website. Surprisingly, many guides overlook this step entirely. They focus on installation and setup, yet ignore the architectural logic that determines whether a directory can scale effectively.
When you create an online business directory, the structure should follow a logical taxonomy. Categories help users explore industries, while location pages allow visitors to narrow results to their geographic area. Together, these elements create a navigable ecosystem that benefits both users and search engines.
A well-organized directory typically follows a hierarchical structure similar to the following:
Homepage
├── Categories
│ ├── Restaurants
│ ├── Dentists
│ ├── Plumbers
│
├── Locations
│ ├── New York
│ ├── Chicago
│ ├── Dallas
│
├── Category + City Pages
│ ├── /restaurants-in-dallas
│ ├── /plumbers-in-chicago
│
└── Individual Business Listings
This structure creates a clear path for visitors. A user might begin on the homepage, browse a category such as restaurants, then narrow the search to a specific city like Dallas. From there, the visitor can review individual listings and choose the most suitable option.
For entrepreneurs who want to create a local business directory, this architecture provides several important advantages.
First, it enables intuitive navigation. Users can move from broad categories to specific listings without confusion. Second, it creates a strong SEO structure. Category pages, location pages, and combined category-location pages each target distinct search queries. Finally, it supports scalable growth. As your directory expands, you can add new cities, industries, and listings without disrupting the overall framework.
In short, a carefully planned architecture transforms a simple listing site into a structured discovery platform.
Structuring Your Business Listings

When you create a business directory, the quality of individual listings determines how useful the platform becomes. A directory filled with incomplete or inconsistent profiles quickly loses credibility. Visitors want clear, reliable information. Businesses, in turn, want a profile that represents their services accurately.
For that reason, every listing should follow a consistent format. A standardized structure allows users to compare multiple businesses efficiently while helping search engines interpret the content of each page. When you create an online business directory, well-organized listings form the backbone of the entire platform.
Essential Information in a Business Listing
A strong business profile includes several essential elements. These details help users evaluate a company quickly and decide whether it meets their needs.
Typical listing fields include:
- Business name
- Address or physical location
- Phone number or contact information
- Official website link
- Business hours
- Company description
- Images or media gallery
- Customer reviews and ratings
Together, these elements create a comprehensive snapshot of a business. Visitors can immediately understand what the company offers, where it operates, and how to get in touch.
Why Detailed Listings Matter
Detailed listings significantly improve the effectiveness of a directory. When profiles contain complete information, users feel more confident exploring the platform and contacting businesses.
Comprehensive listings offer several advantages:
- Improved user trust – Accurate profiles signal professionalism and reliability.
- Better search visibility – Structured information helps search engines understand each listing.
- Higher engagement – Images, reviews, and descriptions encourage users to spend more time evaluating options.
For entrepreneurs who create a local business directory, investing in well-structured listings is crucial. Rich profiles not only enhance the user experience but also strengthen the overall authority of the directory.
Category and Location Structure
An effective organizational system is essential when you create a business directory. Without a clear taxonomy, listings quickly become difficult to browse, and users struggle to locate relevant services. Categories and locations solve this problem by arranging businesses into logical groups. The result is a directory that feels intuitive, navigable, and scalable.
Categories define the type of service a business offers, while location pages help users narrow their search geographically. When both elements work together, visitors can quickly refine their search and identify businesses that match their needs. This structure also helps search engines understand the relationships between listings, categories, and geographic regions.
Category Structure Example
Categories organize businesses by industry or service type. A hierarchical structure allows broad industries to branch into more specific subcategories.
Example:
Restaurants
→ Italian
→ Chinese
→ Cafes
This structure allows users to move from a general category to a more specific service. Someone looking for dining options might start at “Restaurants,” then filter further into Italian cuisine or cafés. When you create an online business directory, this layered approach improves usability and ensures listings remain organized as the directory expands.
Location Structure Example
Location pages organize listings geographically. This is particularly important for directories that serve multiple cities or regions.
Example:
USA
→ Texas
→ Dallas
Visitors can begin at the country level and gradually refine their search to a specific state or city. This method is especially effective when you create a local business directory, as it mirrors how people typically search for nearby services.
Beyond usability, location structures also strengthen search visibility. City and region pages can target location-based queries, which are common in local search. When combined with category pages, these location layers create valuable entry points for search engines.
A thoughtful combination of categories and locations results in a directory that is easy to navigate, optimized for search, and capable of growing without structural complications.
Local SEO Strategy for Business Directories

Search visibility determines whether a directory attracts steady traffic or remains unnoticed. When you create a business directory, your platform must align with how people actually search for services online. Most users include geographic cues—city names or phrases such as “near me.” A directory optimized for local search can capture this intent and convert it into consistent traffic.
A thoughtful local SEO strategy helps your directory appear in relevant searches while guiding users to the most appropriate listings.
1. Create City Landing Pages
City landing pages allow your directory to target location-based queries directly. Each page focuses on a specific geographic area and highlights businesses within that city.
For example: /plumbers-in-chicago
A page like this aggregates all plumbing services in Chicago and presents them in a structured format. When you create a local business directory, city pages become powerful entry points that attract users searching for services in a particular location.
2. Optimize Category + Location Pages
Combining industry categories with city pages strengthens both usability and search relevance. These pages focus on a specific service within a specific location.
For instance: /restaurants-in-dallas
This approach creates highly targeted pages that match real search queries. Visitors looking for restaurants in Dallas can immediately access curated listings instead of navigating multiple filters.
3. Encourage User Reviews
Reviews play a critical role in both credibility and search visibility. A listing with authentic feedback signals trust to potential customers. It also provides fresh content that search engines can evaluate.
When users share experiences, they enrich the listing with insights that help others make informed decisions. For platforms that create an online business directory, reviews become a key driver of engagement and reputation.
4. Maintain Consistent Business Information
Accurate business information is essential for local SEO. Each listing should display consistent details, including the business name, address, and phone number. Even small discrepancies can confuse search engines and weaken visibility.
Consistency reinforces credibility. It helps search engines verify the authenticity of listings and improves the likelihood that your directory appears in local search results.
A well-executed local SEO strategy ensures that your directory does more than store listings—it becomes a reliable gateway through which users discover nearby businesses.
Google Maps Integration for Business Discovery

Location plays a decisive role in how users choose local services. When people search for restaurants, repair shops, or professional services, they often want options close to their current location. For this reason, map integration has become an essential component of modern directory platforms. When you create a business directory, adding map-based browsing can significantly improve the way users explore listings.
Maps provide a visual representation of where businesses operate. Instead of scrolling through long lists of results, users can view nearby options instantly. This visual approach helps visitors understand distances, neighborhoods, and service coverage areas. For entrepreneurs who create a local business directory, integrating map functionality transforms the directory into a more practical discovery tool.
Why Maps Improve Directory UX
Maps simplify the search process. Users can quickly identify businesses within a specific area without navigating multiple pages. A visitor looking for nearby restaurants, for example, can simply scan the map and see which options are closest.
This approach creates a smoother browsing experience. Rather than relying solely on text-based search filters, users can interact with the directory visually. When you create an online business directory, this interactive layer encourages exploration and helps users reach decisions faster.
Benefits of Map-Based Listings
Map-enabled listings offer several advantages that enhance both usability and engagement.
- Location discovery – Users can easily identify businesses near their current location or within a specific city.
- Geographic browsing – Visitors can explore services across different neighborhoods or regions without changing multiple filters.
- Better engagement – Interactive maps encourage users to explore listings more actively, which increases time spent on the directory.
For directories built around local services, map integration becomes a powerful feature. It not only improves navigation but also reinforces the geographic relevance of each listing.
Business Submission Workflow

A well-defined submission workflow is essential when you create a business directory. Without a structured process, listings may become inconsistent, inaccurate, or even spammy. A clear workflow ensures that business owners can submit their information easily while administrators maintain control over listing quality.
Most directory platforms follow a simple but effective sequence. Business owners create an account, submit their listing details, and wait for approval before the profile appears publicly. This system keeps the directory organized and ensures that each listing meets basic quality standards. For founders who create an online business directory, a reliable submission process allows the platform to grow steadily through user-generated content.
Step 1 – User Registration
The process typically begins with user registration. A business owner creates an account on the directory platform using an email address or social login.
This account serves as the control panel for managing listings. Once registered, business owners can update their profile, edit business information, and monitor customer interactions. For directories designed to create a local business directory, user accounts make it easier for businesses to maintain accurate information over time.
Step 2 – Submit Business Listing
After registering, the user proceeds to submit their business listing. During this stage, the owner enters key details such as the company name, contact information, location, operating hours, and a short description of services.
Many directories also allow images, logos, and additional media. These elements make the listing more informative and visually appealing, which helps visitors evaluate the business quickly.
Step 3 – Admin Review
Once the listing is submitted, administrators usually review the information before publishing it. This moderation step protects the directory from inaccurate data, duplicate listings, or spam submissions.
The review process ensures that every listing meets the directory’s standards for clarity and authenticity. When you create a business directory in WordPress, moderation tools often allow administrators to approve, edit, or reject listings from a centralized dashboard.
Step 4 – Listing Published
After approval, the listing becomes visible on the directory website. At this point, users can discover the business through category pages, location filters, or search results.
Published listings may also appear on map views or featured sections depending on the directory’s design. As more businesses submit profiles, the directory gradually expands, offering visitors a richer set of options.
7 Easy Steps to Create a Business Directory Website in WordPress

Following this step-by-step guide, you can create an engaging and money making business directory website in WordPress without spending a lots of time or money.
The technical setup process is similar to building any directory website. For a complete step-by-step walkthrough—including hosting, WordPress installation, and directory configuration—refer to our detailed guide on creating a directory website.
Step 1: Installing Directorist
Supposing that you have your WordPress site up and running, now, navigate to the WP Admin Dashboard > Plugins > Add New. Now search for the keyword ‘directorist’. Then, click on the “Install Now” button.

After that, simply click on the ‘Activate’ button.
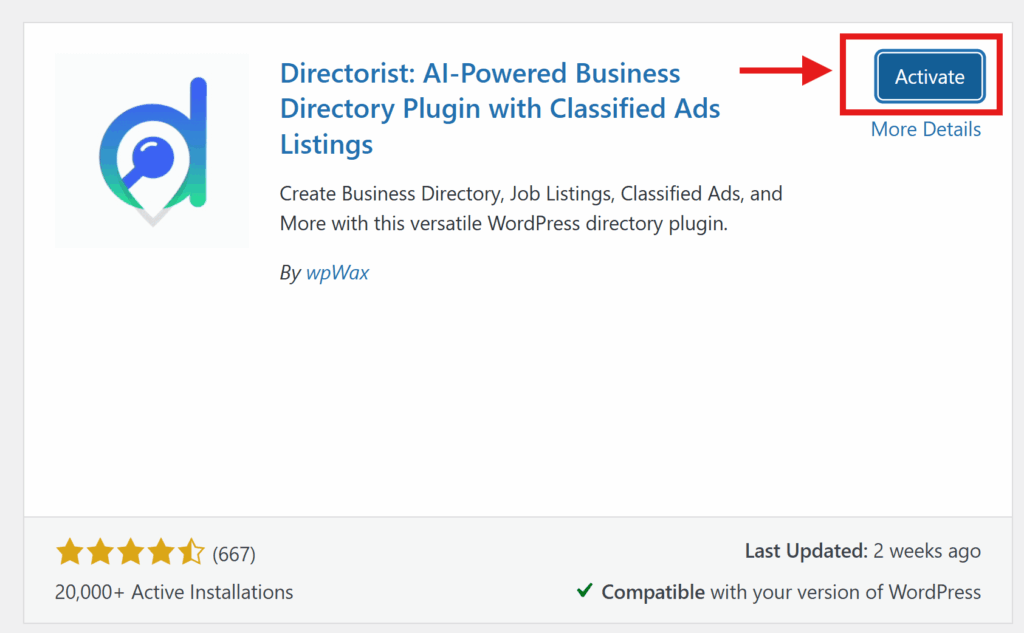
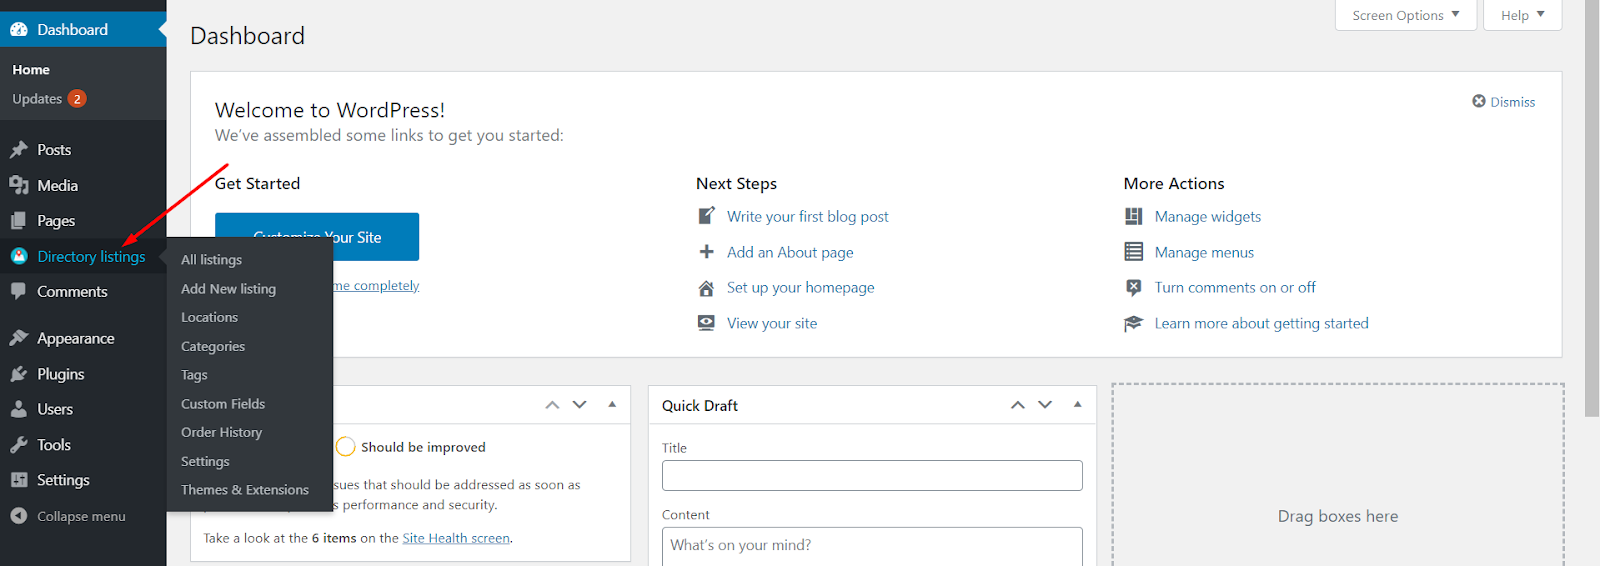
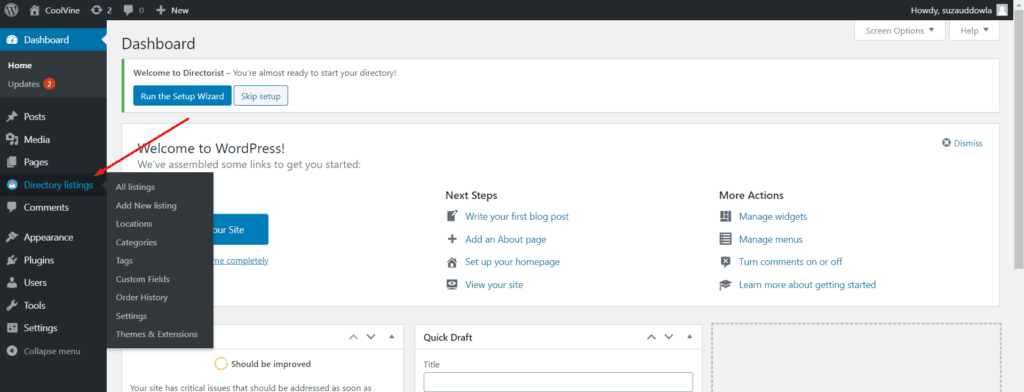
Now, you will see the following menu item on your WordPress dashboard.
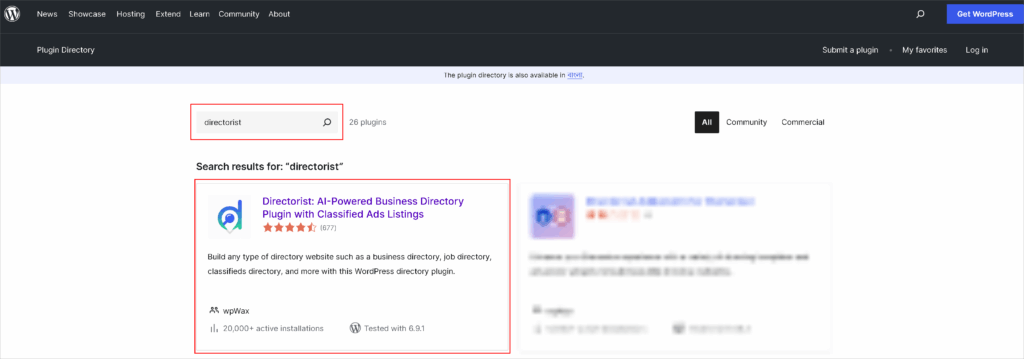
Alternative way: Getting the plugin from the WordPress directory
That’s not the end of looking up your favorite WordPress directory plugin, you can also go ahead to the official WordPress repository and search for the same keyword “directorist” and again you will find the plugin from therein.
Here, we are selecting the plugin, ‘Directorist’:
After that, you should see the download option:
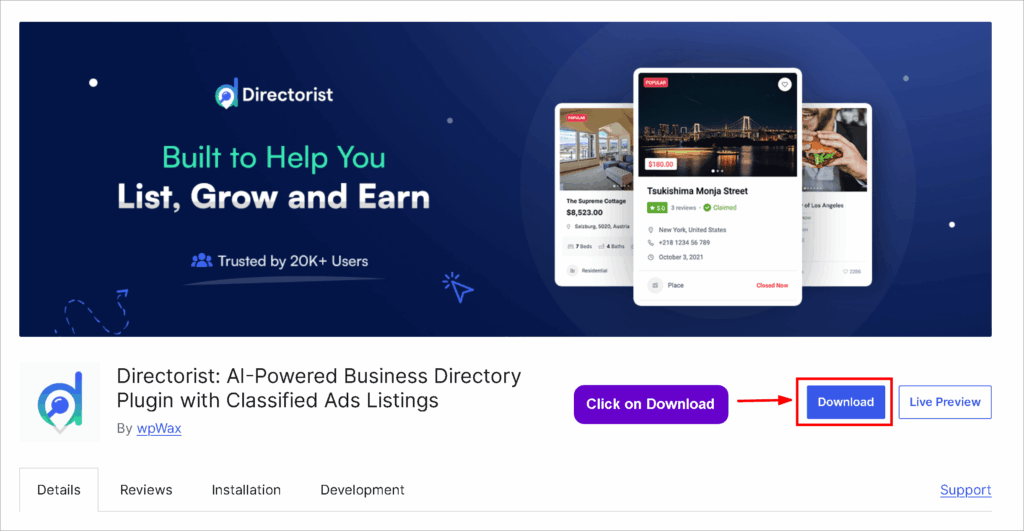
Now, you can download or get the plugin in .zip file format and install it just like any other WordPress plugin by simply uploading it from WordPress Dashboard > Add New > Upload Plugin:

Now, choose the plugin from your local storage and upload it:
Finally, activate the plugin.
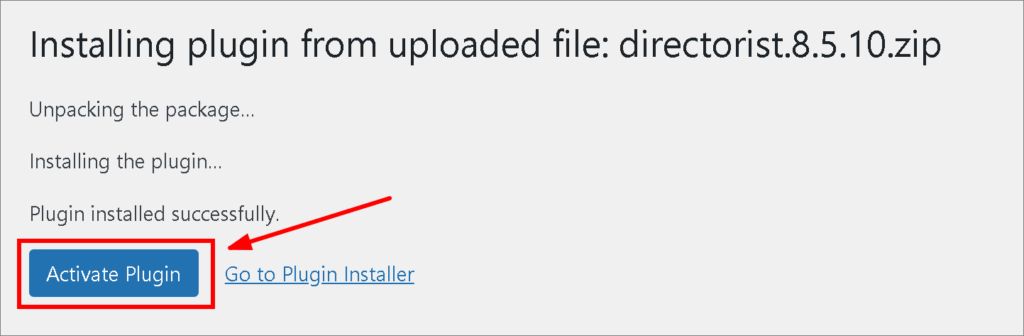
And congratulations, you are all done with activating your directorist plugin.
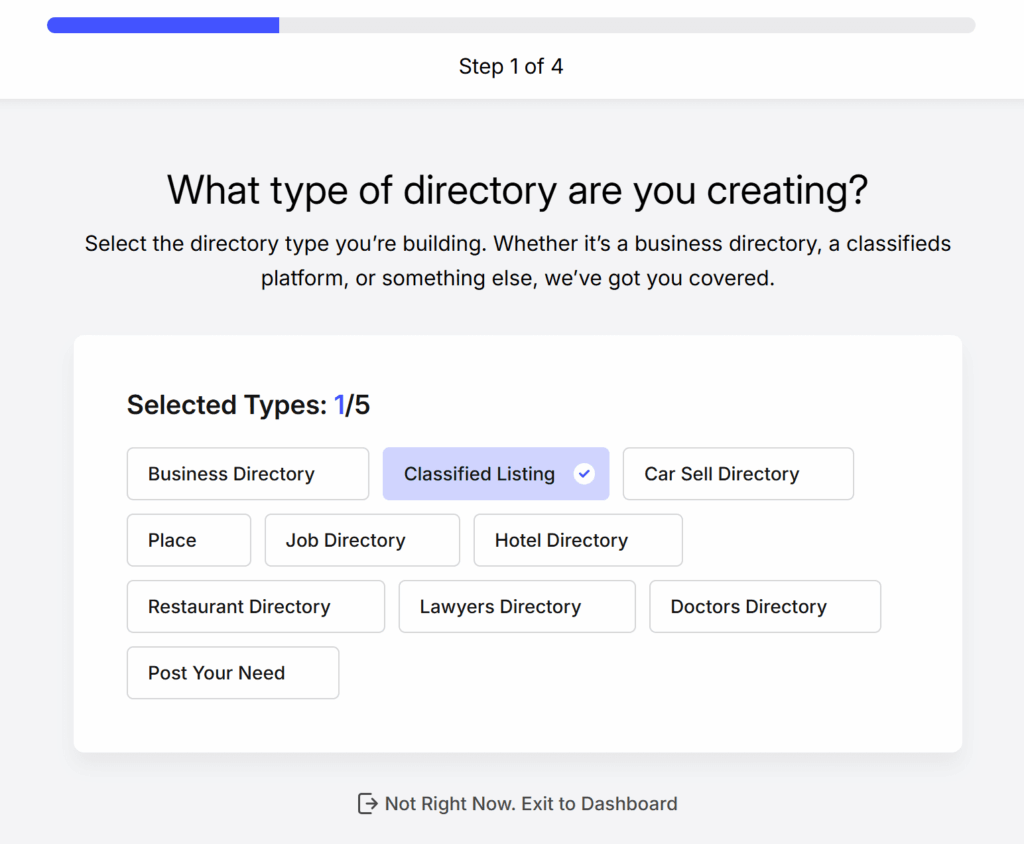
After that, you should see a setup wizard you can configure (recommended) or skip to configure later.
Next up, the following navigation bar options on the Admin Dashboard will appear:
Step 2: Time to Install a Directory Theme
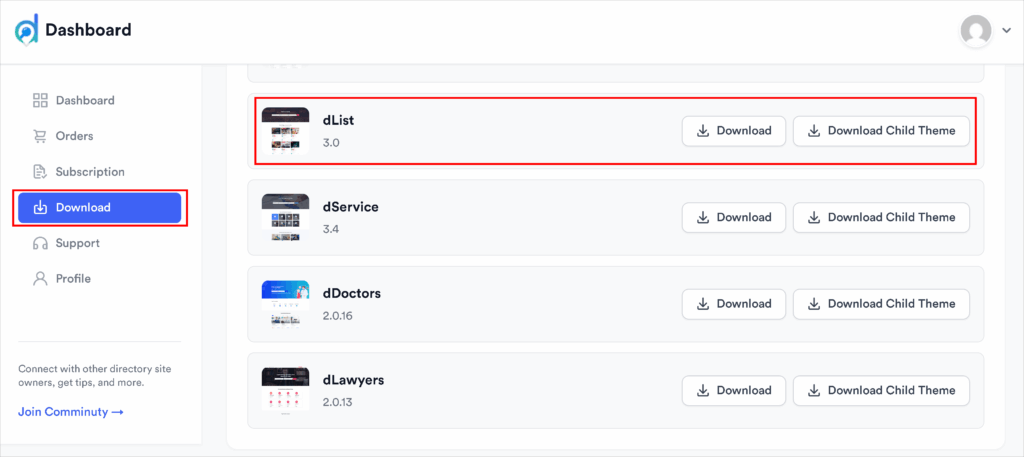
Let’s give professional vibe to your directory. Here we are using “dList” theme which is a popular to design and create a Business Directory. You can also try other popular themes as the process remain same.
Download the ZIP file of the dList theme in your local storage from your user dashboard.
Now, navigate to the WP Admin Dashboard > Appearance > Themes > Add New > Upload theme > Install now.
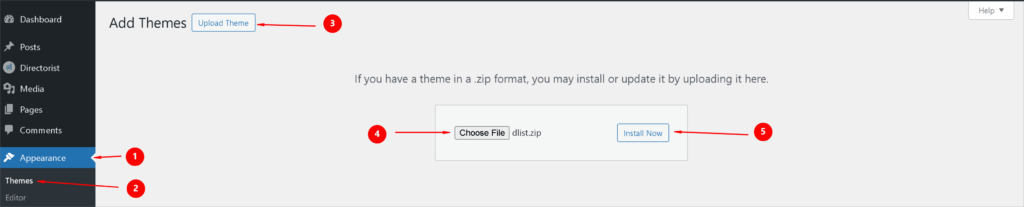
Finally, activate the theme.
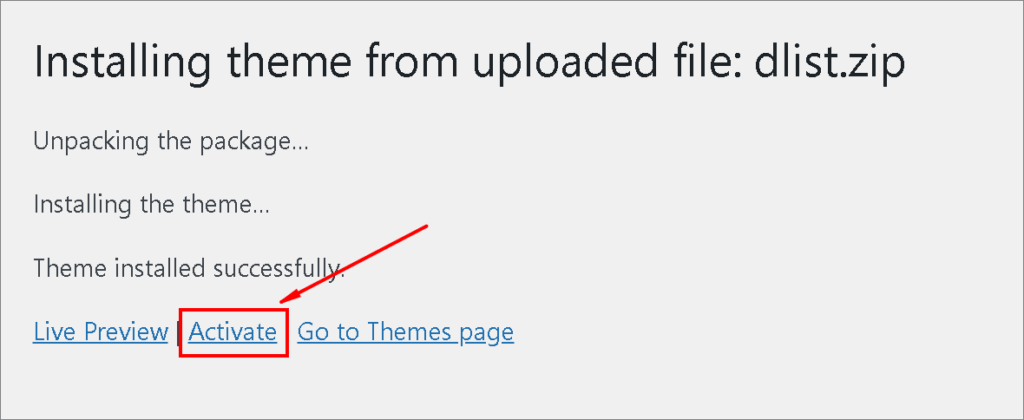
Then you will be required to install some necessary plugins.

Hit the “Begin installing” option to include the plugins and click on the “Visit Site” option to see the site from the frontend.
After selecting the “Begin Installing Plugins” option, you will find the following screen:
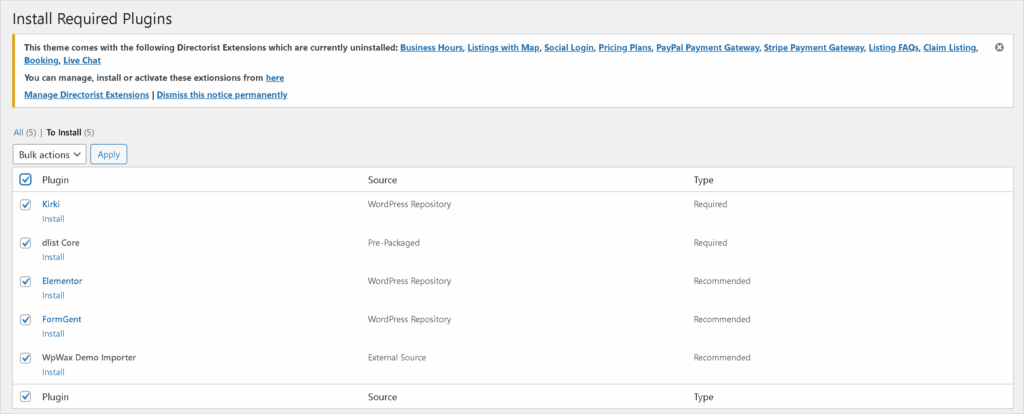
We recommend you install all of them.
Now, activate all the plugins:

Here are some recommend extensions that will help you to add or extend functionalities of your directory business. You can add as per your business requirement.

Beyond these extensions, there are more extensions to ease and scale up your directory business. Browse our extensions collections. You can also get clear idea from our documentation section how every extension works!
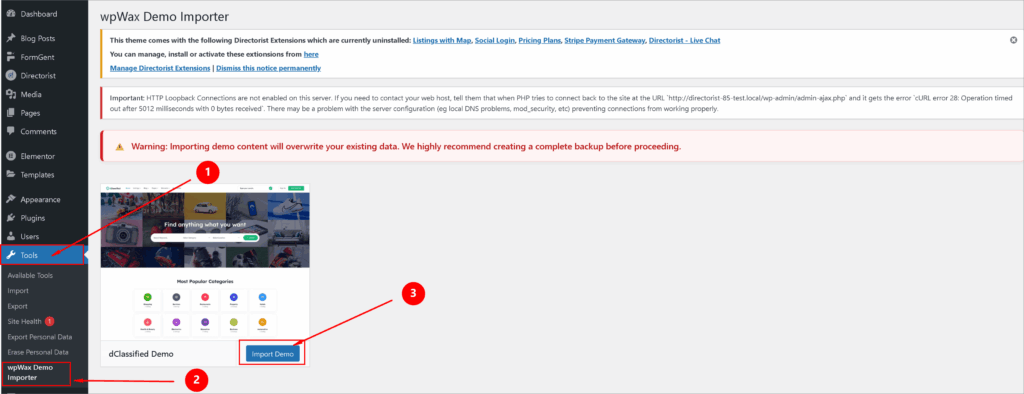
Quick Tip: You can use “wpWax Demo Importer” to save your time and get the exact design as you seen in demo. Before using the importer, make sure a keep a complete backup if you have any important data as importing demo content will overwrite your existing data.
Here is a frontend view after selecting the “visit site” option:
Since the fact that the site is all new, there are no listings submitted. After finishing some core tweaks quickly, we’ll proceed to the next step to add business listings.
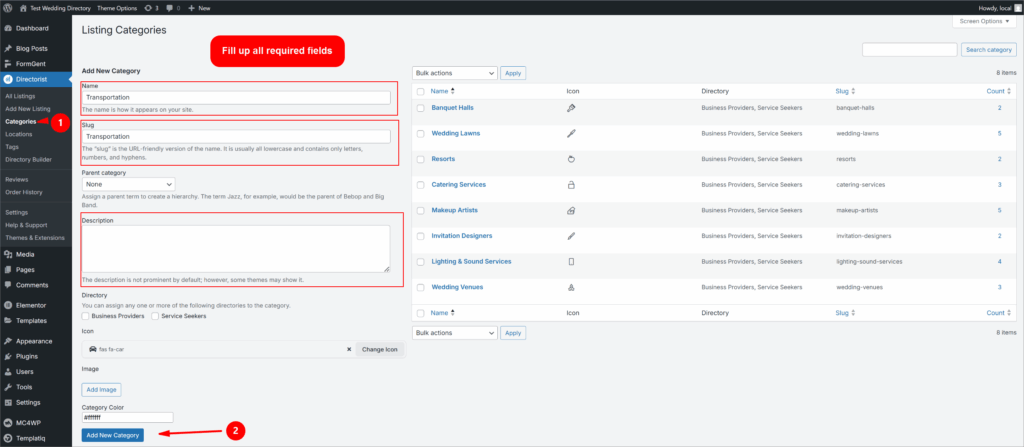
Step 3: Add Required Categories, Tags and Locations
The process of adding categories, Tags and Locations are almost same. Follow the process for adding each of the section.
Add Category: Navigate to the WP Admin Dashboard > Directorist > Categories > Add New and add some relevant categories to your website.
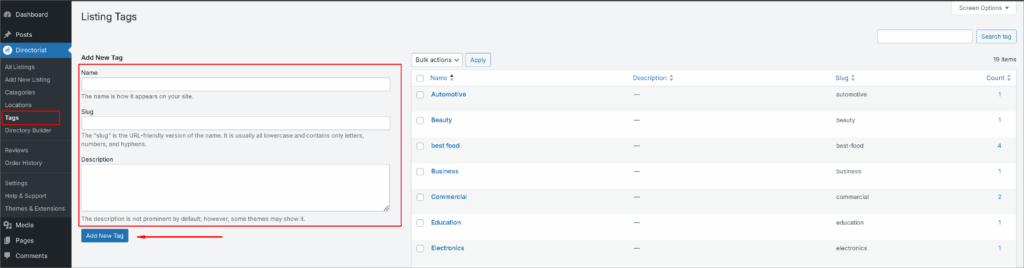
Add Tags: Navigate to the WP Admin Dashboard > Directorist > Tags > Add New
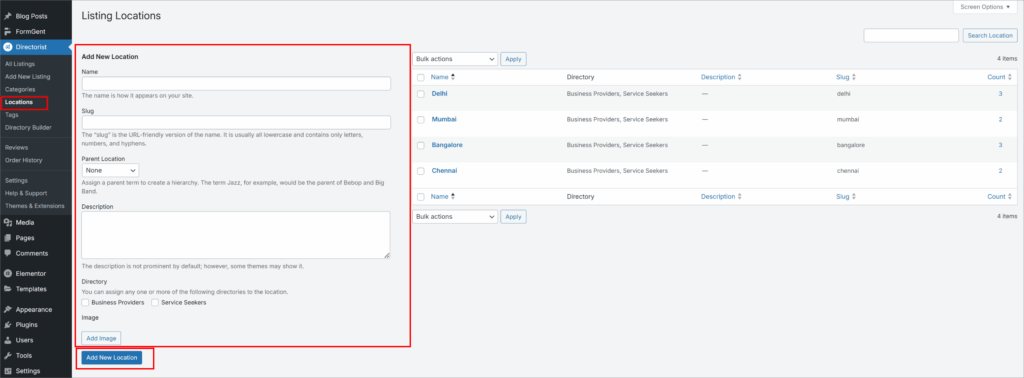
Add Locations: Navigate to the WP Admin Dashboard > Directorist > Locations > Add New
Step 4: Monetizing (Add Pricing Plan)
Monetize for free with a free theme:

If you are not using the premium theme, you will not be able to create the pricing plan. But that’s not the end of your hope. You can still monetize your directory website using the free ” Monetize by Featured Listing” option.
Or, Monetize with premium pricing plan option:
If you are using the any theme from Directorist’s niche theme collection, Adding a pricing plan is necessary to charge the business owner against the directory service. or You can also buy individual extension.
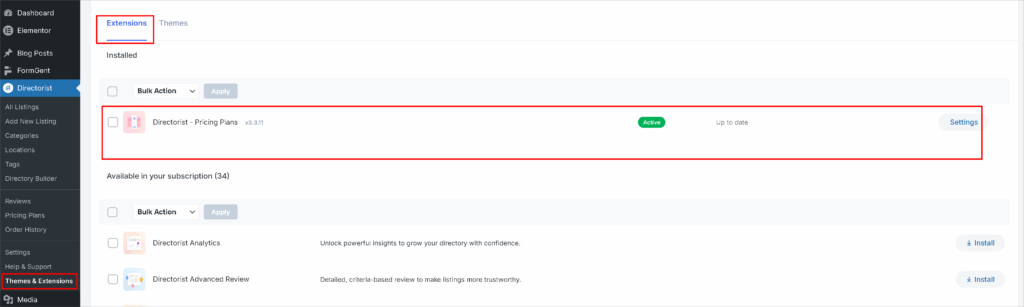
For adding a pricing plan, you need to install an extension named “Pricing Plan”.
go to the WP Admin Dashboard > Directory Listings > Themes & Extensions > Extensions > Sign in You Dashboard > Find “Pricing Plan” > Install & Activate
Now, navigate to the WP Admin Dashboard > Directorist > Pricing plan and then configure pricing plans. Finally, hit the publish button to publish the plans. Follow the video tutorial to grasp the full set up of pricing plan.
Step 5: Create a Pricing Plan Page
Now, you need to create a pricing plan page to show the pricing plans you have created just now.
Go to the WP Admin Dashboard > Pages > Add New.
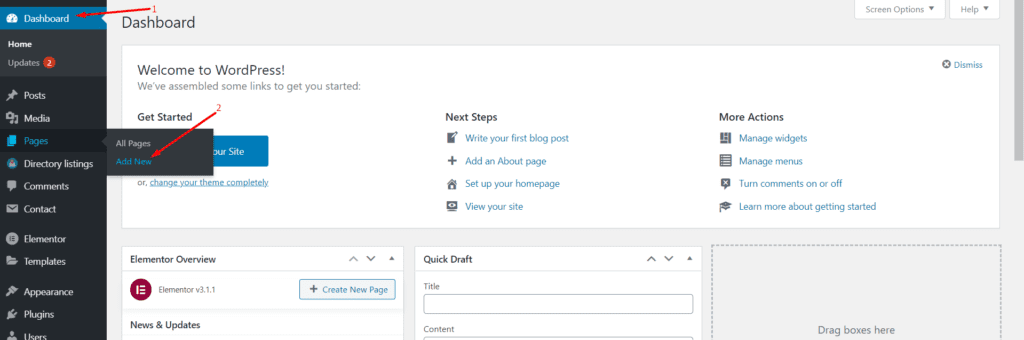
Then copy and paste the following shortcode:

Finally, hit the Publish button. Now, let’s take a look at the Pricing plan page from the frontend. Click on the “View Page” option:
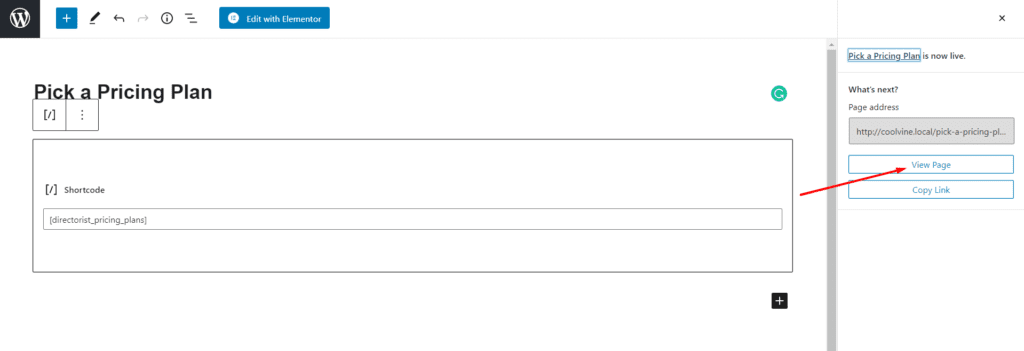
After that, you will be able to preview the frontend view of the pricing page:
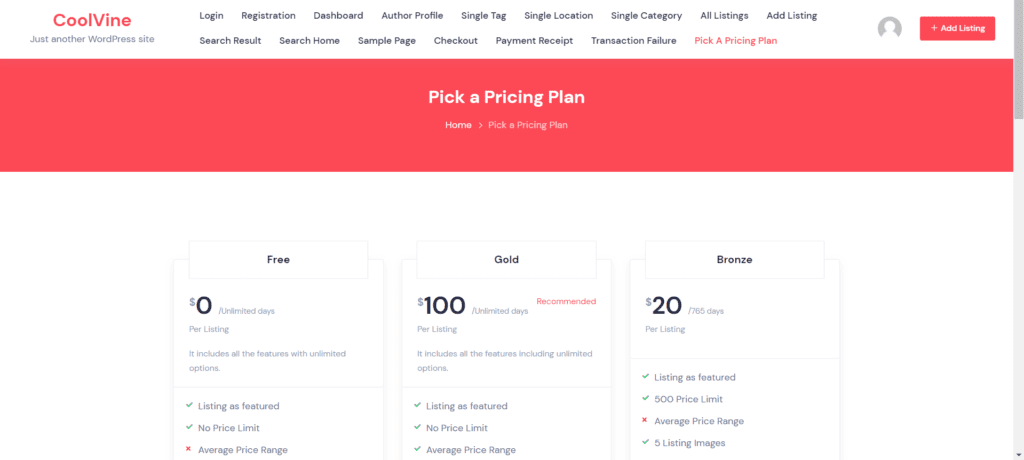
This is exactly what your business owners will see while they land on the pricing page.
Step 6: Add New Listings (Front-End + Back-End)
Now, from a different browser, a business owner will be able to register or signup. The business owner should be able to see the Registration option (you can control the registration access)
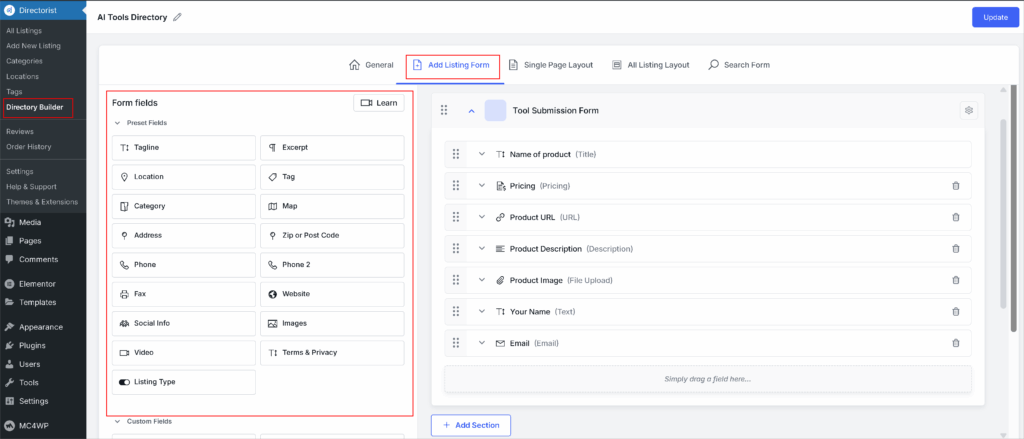
Create a Submission Form For Front End Listing
To create a submission form, adhere to the following steps: Directorist → Directory Builder → Add Listing Form. Utilize the ‘Form Fields’ to personalize the form.
If moderation is turned on, you are required to review and approve the listing through Dashboard → Directorist → Listings. Following approval, the listings will be listed in your directory, accessible for users to discover.
How This Submission Form Works?
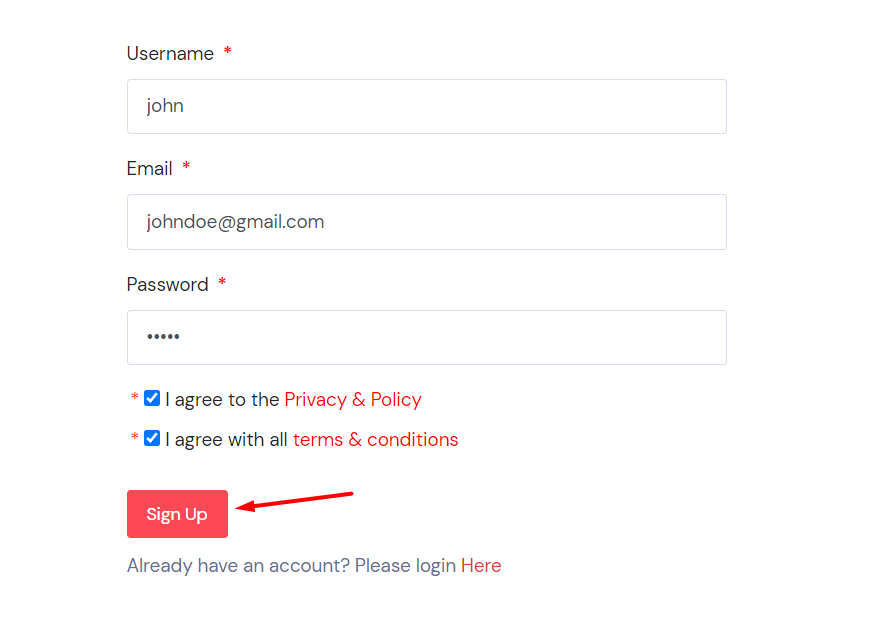
On clicking the ‘Registration’ option, a business owner (Here, John Doe) will be able to get a signup form:

Now, after hitting the Sign up button, he will be registered.
After that, he will have to log in again to be able to add listings:
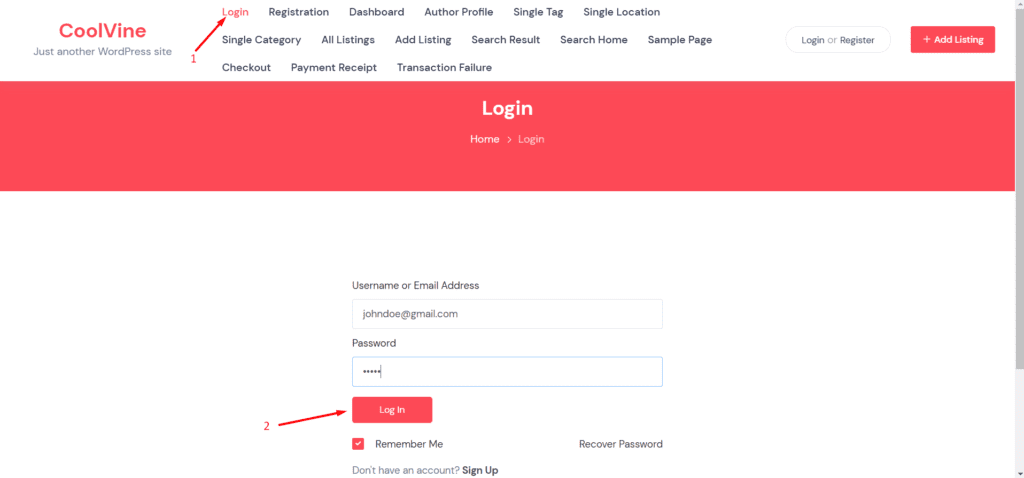
After hitting the login button, he has to select the “Add Listing” option.
Then he will find the pricing plans you created.
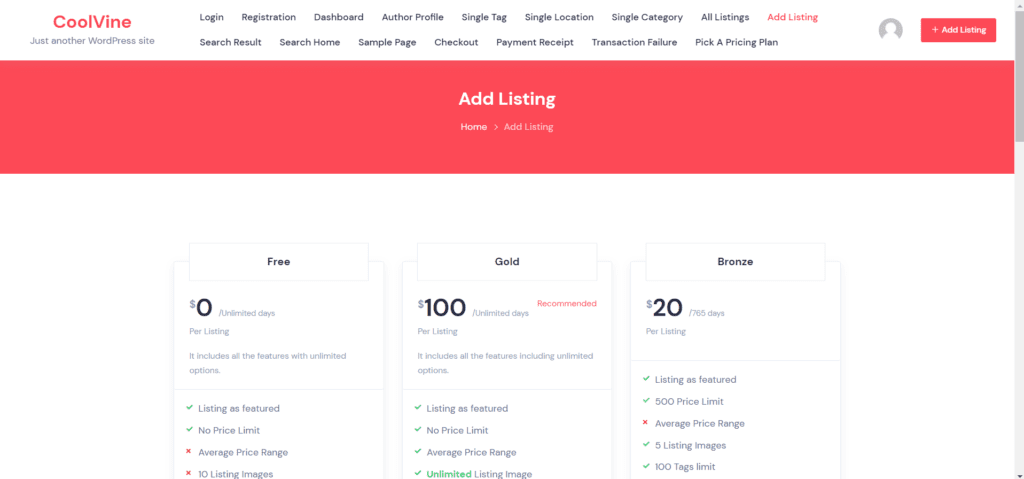
From here, he can choose a pricing plan and submit their listings.
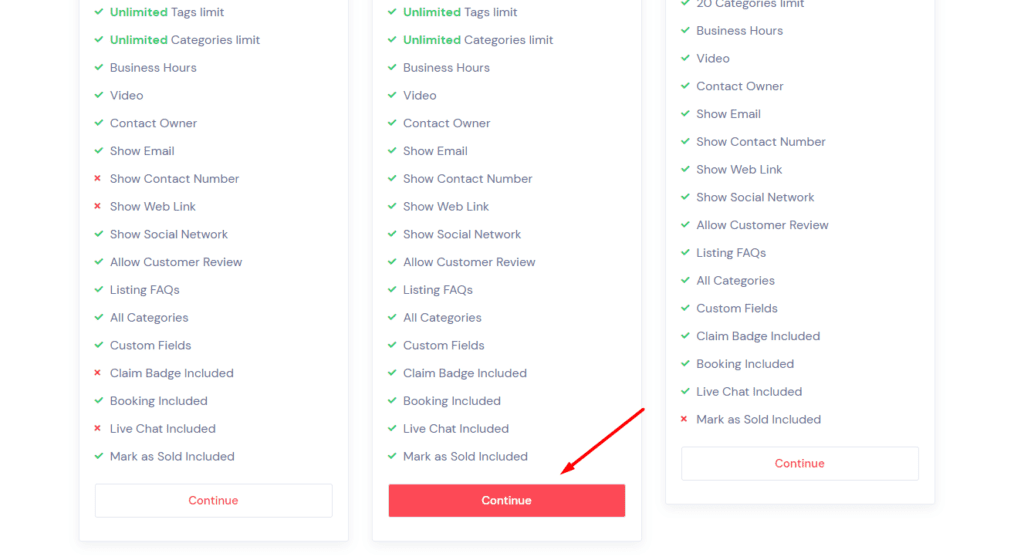
Suppose, John chooses the Gold pricing plan then, he has to select the Continue button to proceed:

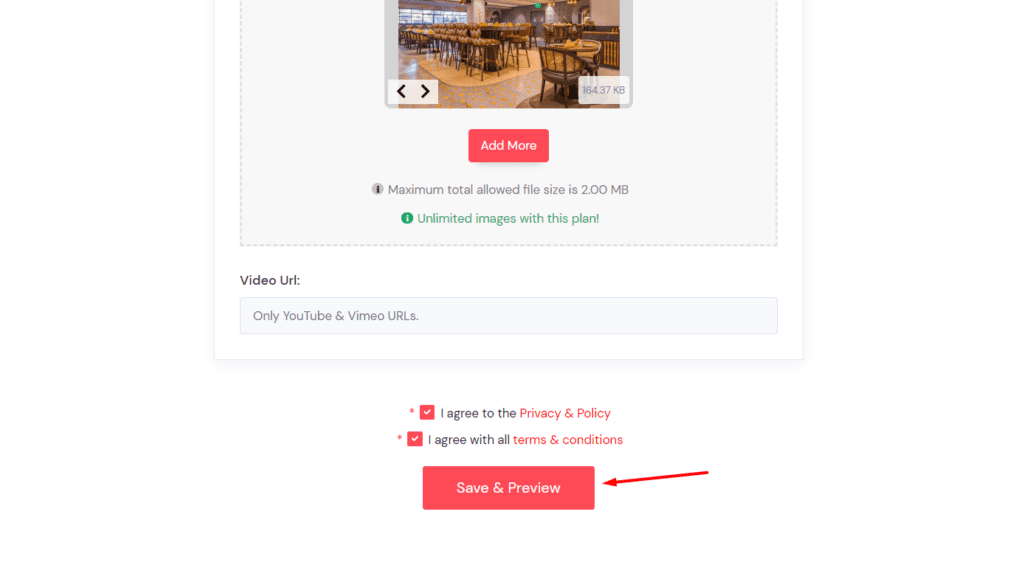
After entering all the essential data he will then click on the Save and Preview button:
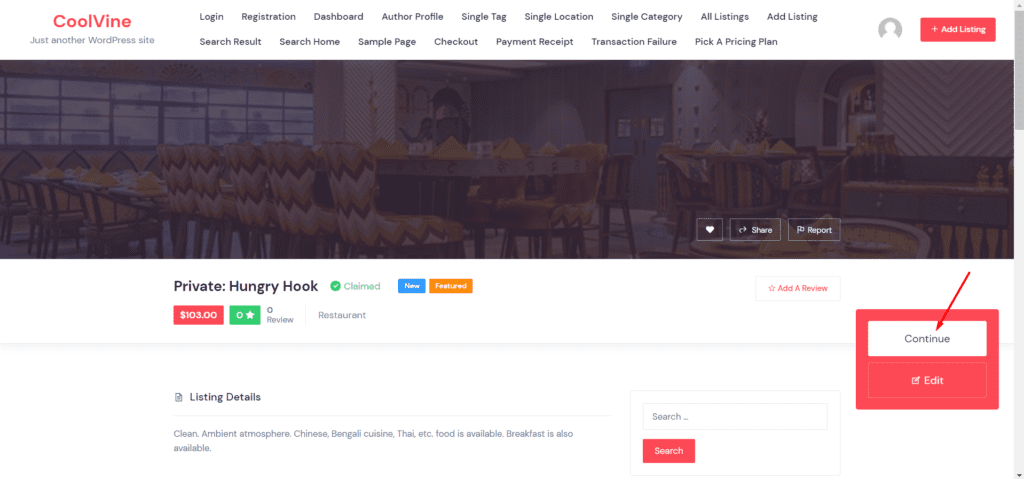
After that, he will hit the Continue button to proceed to checkout:
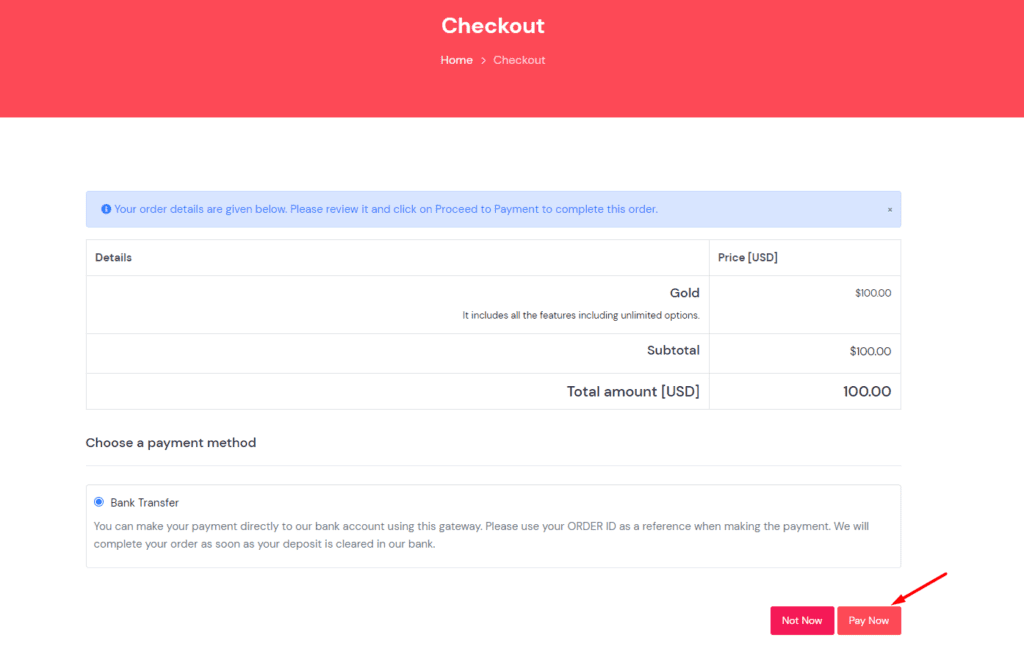
Now, he will see options to pay. Here, John will be paying by Bank Transfer.
After the payment, he will be able to view a welcome message:

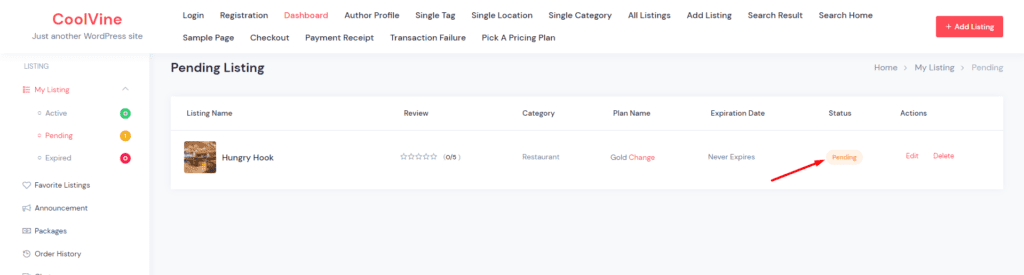
Now, John can see his listing as pending by default (As an admin, you can change it any time though):
Add Listing Manually
This step is mainly for the business owners.
Then again, you can also manually add a business owner from WP Admin Dashboard > Directory Listings > Add New Listings too!

Once, you manually add listings, the business owners will later claim the orders in exchange for a certain charge which is a good way for you (as an admin) to make a profit.
Learn More: 10 Tips To Attract Businesses On Online Directory Website
Step 7: Accepting Orders
Now, it’s time to accept orders! Go to the WP Admin Dashboard > Directory Listings > All Listings > Publish a Pending Order:
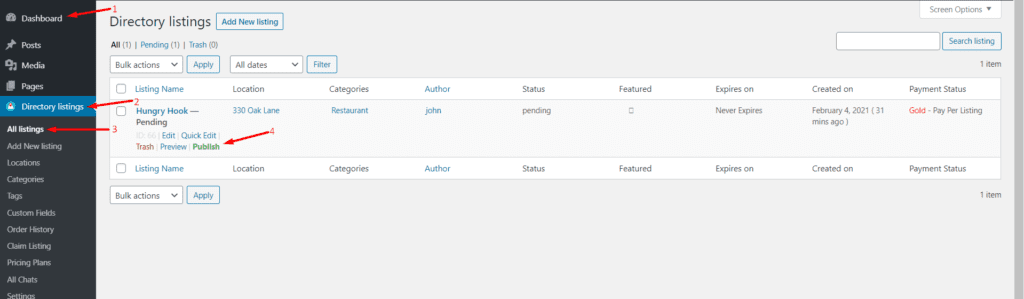
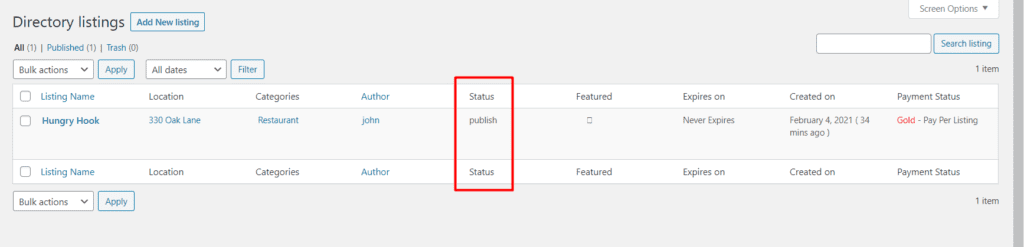
Now, John’s order status will be changed to published from pending:
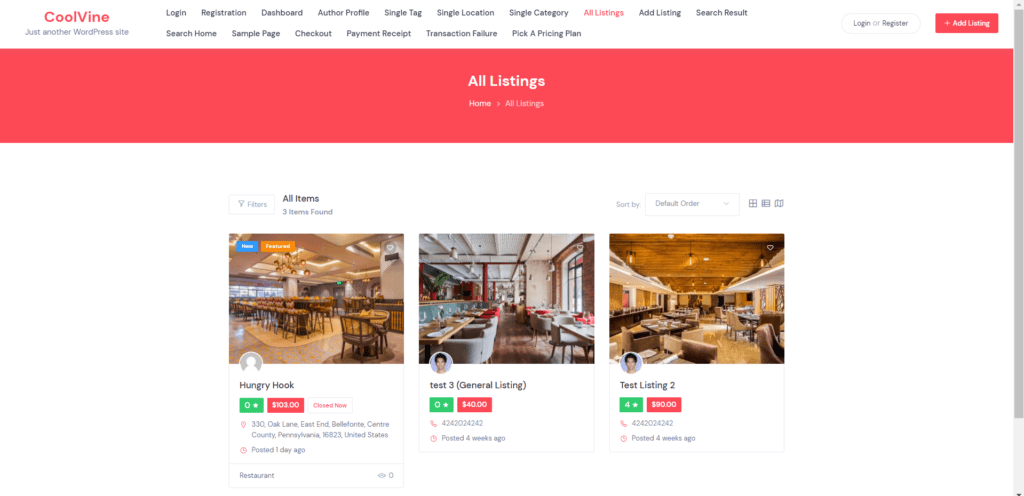
Preview of the Directory Website from the Frontend
Here we are inserting a few data on behalf of some business owners so that we can emulate a real directory site. This will give you a comprehensive idea of how a full-fledged website will look like:
Ready to get started without the technical work? Skip the setup entirely with Done For You.
Monetization Blueprint for Business Directories

A directory website becomes sustainable when it generates consistent revenue. While attracting visitors and listings is important, a clear monetization strategy transforms the platform into a viable business. When you create a business directory, revenue models should align with the value businesses receive from increased visibility and customer leads.
Most successful directories rely on a combination of monetization methods rather than a single source of income. This diversified approach allows the platform to grow while offering businesses multiple ways to promote their services.
1. Paid Listings
Paid listings are one of the most straightforward revenue models. Businesses pay a fee to publish their profile on the directory. In return, they gain visibility among users actively searching for services.
Directories often provide multiple listing tiers. A basic plan may allow a simple profile, while premium plans include additional features such as enhanced descriptions, images, or priority placement. This model works particularly well when you create an online business directory focused on a specific niche or geographic market.
2. Featured Listings
Featured listings provide businesses with greater visibility within the directory. These listings typically appear at the top of category pages or in highlighted sections of the website.
Because featured placements attract more attention, businesses are often willing to pay an additional fee for this exposure. For directories serving competitive industries, featured listings can become a significant source of recurring revenue.
3. Subscription Plans
Subscription models offer a predictable income stream. Instead of paying once, businesses subscribe to monthly or annual plans that maintain their listing on the directory.
Subscription tiers may include additional benefits such as advanced profile customization, promotional placements, or analytics dashboards. Entrepreneurs who create a business directory in WordPress frequently adopt subscription-based pricing because it provides stable, long-term revenue.
4. Sponsored Advertising
Advertising placements provide another monetization opportunity. Businesses can purchase banner ads or promotional sections that appear across the directory.
These ads may be displayed on the homepage, within category pages, or alongside relevant listings. Sponsored advertising works especially well for directories that attract steady traffic and serve a clearly defined audience.
5. Claim Listing Model
Another effective approach is the claim listing model. In this system, directory owners initially populate the platform with publicly available business data. Businesses are then invited to claim their profile and gain control over their listing.
Once claimed, owners can update information, add images, respond to reviews, and unlock additional promotional features. This model encourages participation while creating opportunities for paid upgrades.
A thoughtful monetization blueprint ensures that your directory evolves from a simple listing platform into a sustainable digital business.
Advanced Features to Enhance Your Business Directory

Launching a directory website is only the first step. As your platform grows, you may want to introduce additional features that improve user experience, strengthen credibility, and unlock new revenue opportunities. When entrepreneurs create a business directory, advanced functionality can transform a simple listing site into a comprehensive discovery platform.
Modern directory ecosystems often expand through extensions. These tools allow you to add specialized capabilities without rebuilding the entire website. Instead of modifying the core system, you can gradually introduce features that match the needs of your audience.
Below are several advanced capabilities that can significantly enhance a directory platform.
1. Advanced Reviews and Ratings
Reviews play a crucial role in helping users evaluate businesses. A multi-criteria review system allows visitors to rate different aspects of a business such as service quality, pricing, or customer support.
More detailed reviews increase transparency and encourage meaningful feedback. This type of structured evaluation can strengthen trust across the directory.
2. Smart Search and Discovery
As the number of listings grows, search functionality becomes increasingly important. Advanced search systems help users locate businesses quickly by filtering results across multiple categories or directory types.
Unified search experiences also improve navigation, particularly for directories that host several industries or regions.
3. Booking and Appointment Features
Many directories evolve into service marketplaces. Businesses such as salons, consultants, or repair professionals need booking and appointment features and can benefit from appointment scheduling directly within their listing.
Booking functionality allows users to move from discovery to action without leaving the platform.
4. Analytics and Business Insights
Business owners value measurable performance data. A detail analytics system can provide insights into listing views, user behavior, and engagement trends.
These insights help businesses understand how their listings perform and whether premium features deliver meaningful results.
5. Interactive Maps and Location Browsing
Map-based exploration helps users identify businesses geographically. Interactive maps allow visitors to browse listings visually, making it easier to locate nearby services.
This feature is particularly valuable when you create a local business directory where geographic proximity matters.
6. Communication and Customer Interaction
Directories increasingly support direct communication between users and business owners. Messaging systems, live chat, or asynchronous communication tools allow visitors to ask questions before contacting a business.
Improved communication often leads to stronger engagement and higher conversion rates.
Directorist offers a bunch of premium extensions that can help you to include all those advance features in your business directory website. Explore the extension section to learn more.
How to Get More Business Listings For Your Business Directory Website

A directory without listings cannot deliver value to users. The early stage of your platform requires deliberate effort to populate it with relevant businesses. When you create a business directory, the initial listings establish credibility and encourage further participation. Businesses are more likely to join a directory that already appears active and trustworthy.
Fortunately, several practical strategies can help you build momentum during the early stages.
1. Contact Local Businesses Directly
Direct outreach remains one of the most effective ways to acquire initial listings. Identify businesses within your target niche or city and introduce your directory through a brief, professional message.
Explain the value your platform offers—greater visibility, exposure to local customers, and an additional channel for lead generation. For entrepreneurs who create a local business directory, personal outreach often produces the first wave of listings that anchor the platform.
2. Offer Free Listings Initially
Offering free listings at the beginning can accelerate adoption. Businesses are more willing to join when there is no financial commitment involved. Once your directory gains traction and traffic increases, you can introduce premium plans or featured listing options.
This approach allows you to create an online business directory with a healthy base of listings before implementing a monetization strategy.
3. Import Public Business Data (Where Permitted)
Another strategy involves populating the directory with publicly available business information. Many directories begin by importing basic data such as business names, addresses, and categories from open sources.
This method provides an initial database of listings that can later be claimed or updated by business owners. However, it is important to ensure that the data source allows such usage and complies with local regulations.
📌Want to know how to get data for your business directory? Read this: How to Get Data for Your Directory Website
4. Partner with Local Organizations
Local associations, business groups, and community organizations can become valuable partners. These groups often represent numerous businesses within a specific region or industry.
Collaborating with them can introduce your directory to a broader audience and accelerate the growth of your listing database.
5. Promote Through Social Media
Social media platforms offer another channel to attract businesses. Share updates about new listings, highlight featured businesses, and invite companies to join the directory.
Consistent promotion increases awareness and encourages business owners to participate. Over time, this visibility helps transform your platform into a recognized resource for discovering local services.
Building the first wave of listings requires persistence, but once momentum develops, the directory can begin to grow organically as businesses recognize its value.
Scaling a Business Directory Website

Launching your platform is only the beginning. Once your directory starts attracting businesses and visitors, the next objective is sustainable growth. Entrepreneurs who create a business directory must eventually expand their platform to reach new audiences, increase listings, and strengthen search visibility. Scaling requires a deliberate approach. Each step should reinforce the structure and value of the directory rather than overwhelm it with uncontrolled expansion.
Several practical strategies can help your directory grow steadily.
1. Expand to New Cities
Geographic expansion is one of the most natural ways to grow a directory. After establishing traction in one location, you can gradually introduce nearby cities or regions. This approach allows the platform to maintain its local relevance while increasing its reach.
For example, a directory that begins in Dallas might later expand to Austin, Houston, and San Antonio. When you create a local business directory, expanding city by city helps preserve quality while steadily increasing the number of listings.
2. Add Industry Subcategories
As your directory grows, you may discover opportunities to refine existing categories. Adding subcategories allows users to navigate listings more precisely and helps businesses appear in more relevant searches.
For instance, a general “Restaurants” category could expand into subcategories such as Italian, Mexican, or Cafés. This deeper classification improves usability and supports the long-term growth of your directory ecosystem.
3. Encourage Reviews and Engagement
User participation strengthens the credibility of a directory. Reviews, ratings, and comments add valuable context to business listings and help visitors make informed decisions.
Encouraging customers to share feedback also increases engagement. Active listings with reviews often receive more attention, which benefits both the businesses and the platform itself.
4. Optimize SEO Content
Content optimization remains essential as your directory expands. Category pages, location pages, and curated lists can all serve as valuable entry points for search engines.
When you create an online business directory, well-crafted SEO content ensures that new listings remain discoverable. Over time, optimized pages targeting specific industries and locations can generate steady organic traffic.
Scaling a directory successfully requires patience and consistency. By expanding thoughtfully—through new locations, refined categories, user engagement, and strong SEO—you transform a simple listing platform into a comprehensive discovery network.
Conclusion on How to Create a Business Directory Website
We hope this article on how to create a directory website in WordPress will be effective enough to guide you in building a directory site with the least effort. If you get stuck with any problem, check out our documentation section or submit your questions in the comment section below. We will be super responsive to take you to the rescue.
You can check out more helpful resources in our blog section or video tutorials on building and optimizing profitable directory niche. Get connected with other directory business owner and exchange your business insights through our Directorist Community
Last but not least, We are set to introduce Directorist Academy, a platform designed for exploring various applications of Directorist with specialized video tutorials and written transcripts. Keep an eye out for updates.
So, why’re you waiting for? Start your Directory business journey with Directorist.

FAQ About Create a Business Directory
Where can I get a WordPress directory plugin with customizable listing templates?
You can use Directorist that offers WordPress directory plugin with customizable listing templates for business directory, job directory, classified ad listing website, event directory, real estate directory, wedding directory and more.
Which WordPress directory plugin provides easy integration with popular SEO tools?
Directorist is a SEO friendly WordPress directory plugin provides easy integration with popular SEO tools like Yoast SEO, Rank Math or AISEO.
What WordPress directory plugin is best for real estate listings?
Directorist is the best WordPress directory plugin for real estate listings.
Which WordPress directory plugins offer advanced search and filtering options?
Directorist is the advanced WordPress directory plugin that offer advanced search and filtering options to find listing quickly.
How do I customize the design of a WordPress directory plugin?
You can customize the design of a WordPress directory plugin from the Directorist drag and drop feature using Gutengberg or Elementor blocks.
Are there free WordPress directory plugins suitable for event directories?
Yes. Directorist is a free WordPress directory plugin that is suitable for event directories
What features should I look for in a WordPress directory plugin for local listings?
Front end submission, easy approval, listing customization, SEO friendly are some core features you should look in a WordPress directory plugin for local listings. Directorist offers all these features by default.
Can I integrate a WordPress directory plugin with payment gateways?
With Directorist, You can integrate a WordPress directory plugin with payment gateways like PayPal or Stripe.
Where can I download popular WordPress directory plugins?
You can download Directorist that is a popular WordPress directory plugins from the official website or WordPress plugin repository.
Which WordPress directory plugins support user reviews and ratings?
Directorist is a popular WordPress directory plugin that offer user reviews and ratings. You can handle all user reviews and ratings with by deafult or more functions with Advance Review extension.
How can I add a professional business directory to my WordPress site?
You can use Directorist plugin to add a professional business directory to your WordPress site.
What are the best WordPress directory plugins for small businesses?
Directorist is the best WordPress directory plugins for small businesses. It offers all the features to grow small businesses.

suzauddowla
Al Suzud Dowla plays the role of a content strategist at Directorist. He is basically a digital marketing expert and a tech enthusiast (by heart) who excels particularly in technical content writing. In his pastimes, he is seen playing Ping Pong, performing Karaoke, reading books, and playing around with JavaScript as well.

Leave a Reply
You must be logged in to post a comment.