Creating a pricing plan using Directorist WooCommerce Pricing plan is very easy. If you have used WooCommerce before then creating a plan will be very familiar to you. Directorist WooCommerce pricing plan adds a new product type to WooCommerce called Listing Pricing Plan. Therefore, creating a pricing plan using WooCommerce is nothing but creating a WooCommerce Product. Let's see how to create a plan using WooCommerce.
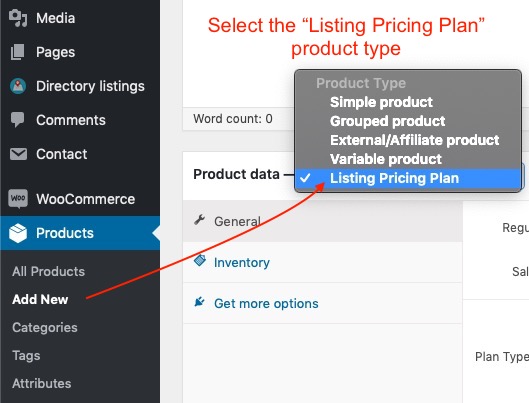
Please go to WordPress Dashboard > Products and Click "Add New".
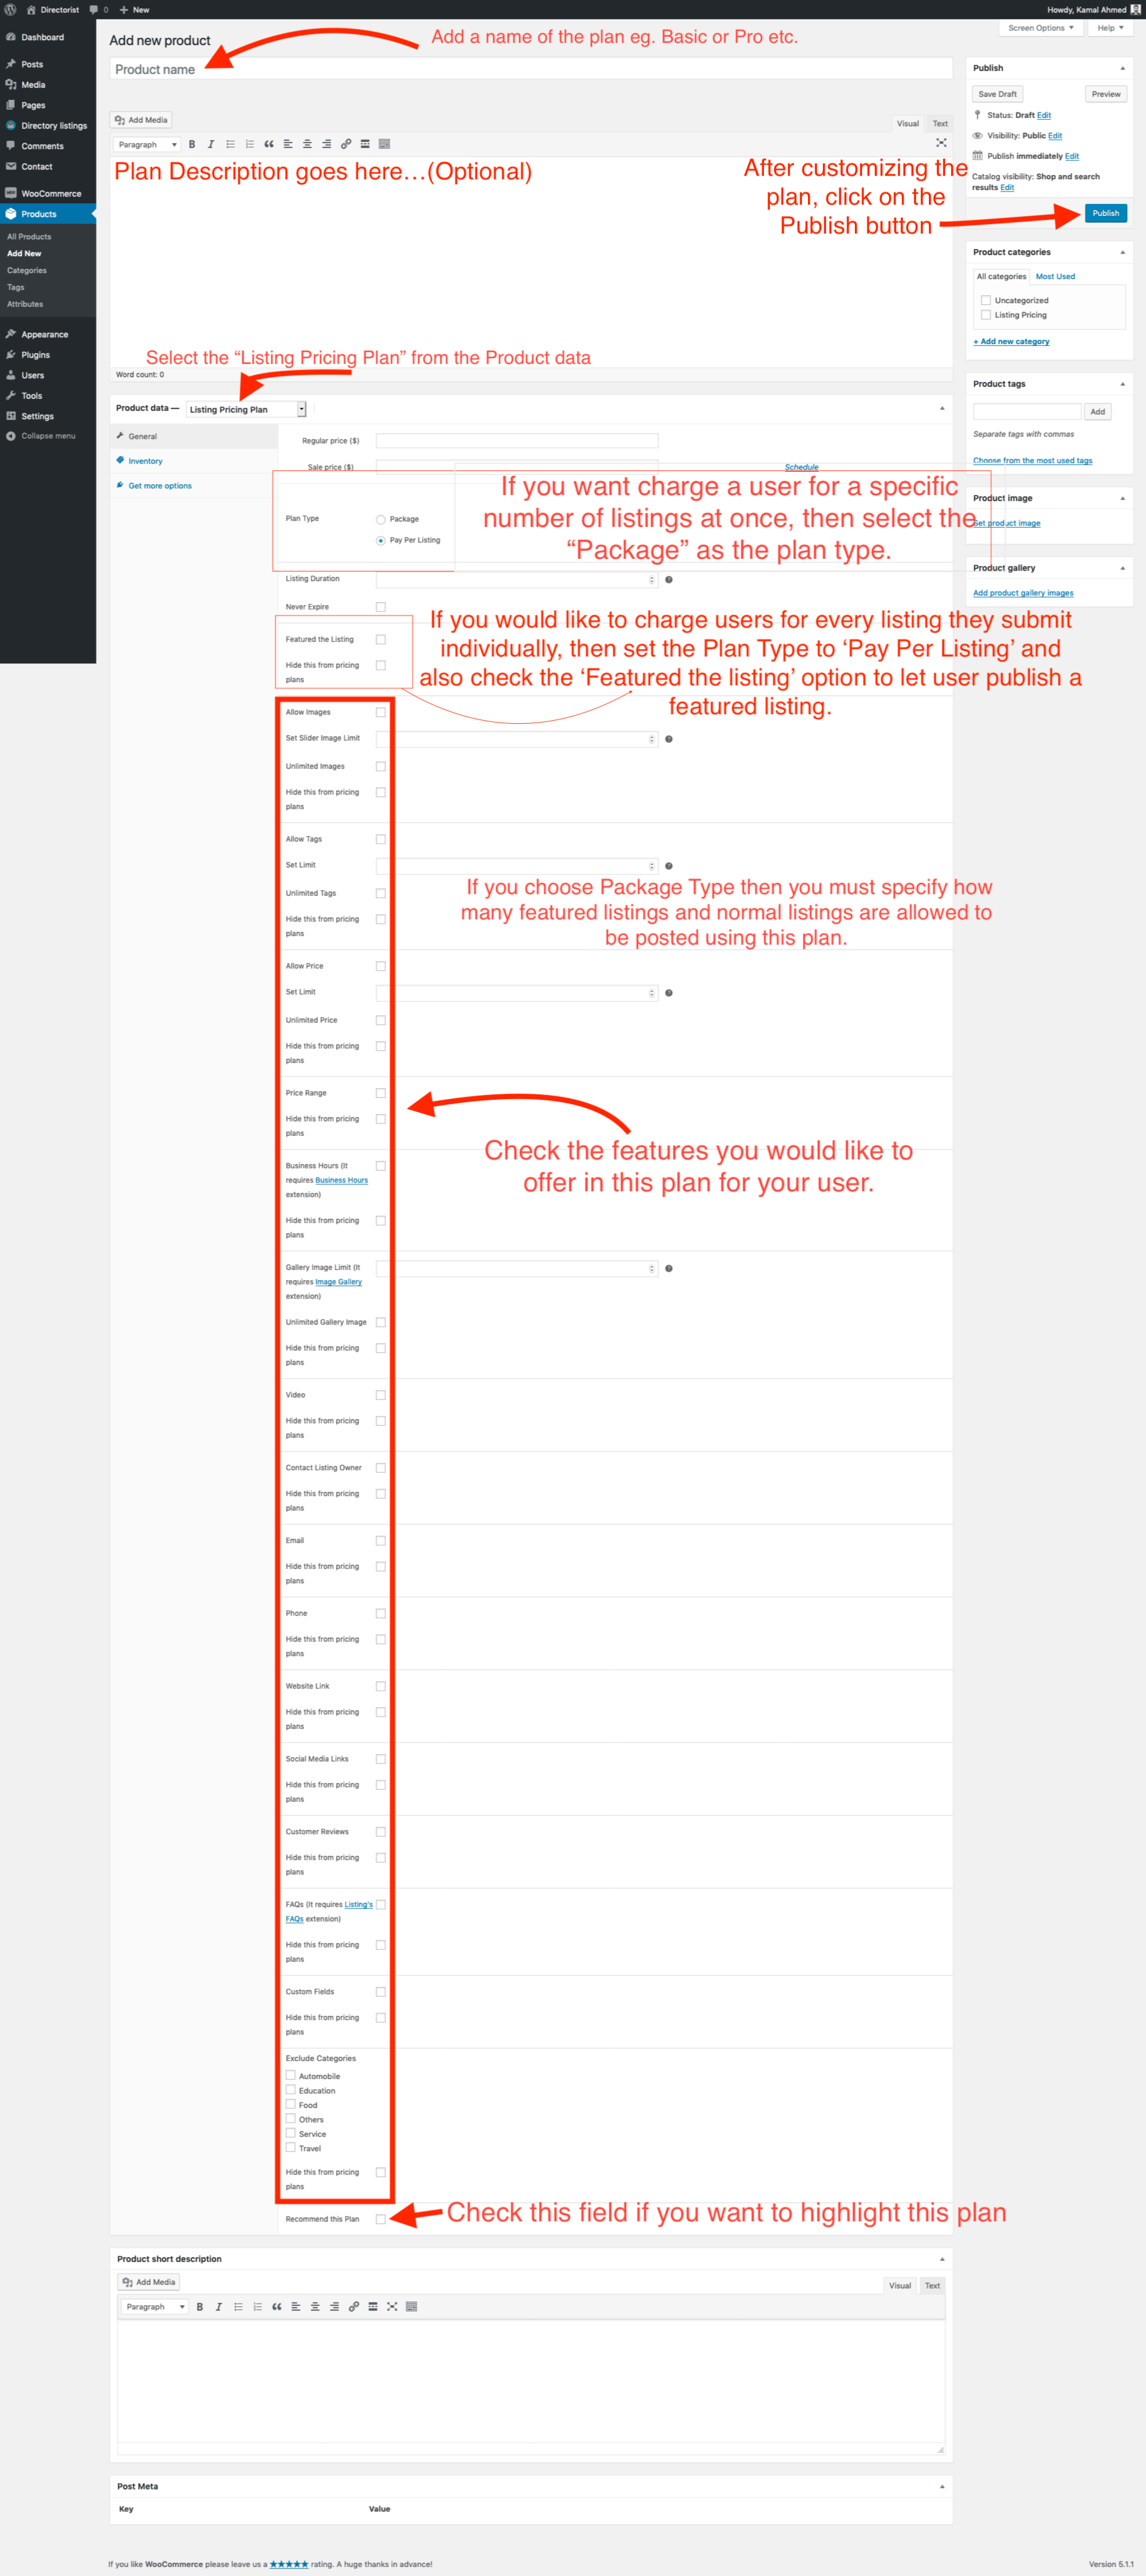
Give your plan a name. For example, basic or pro, etc.
Enter your plan description in the product description field. You may leave it as blank as it is optional.
Select the Listing Pricing Plan product type from the Product Data dropdown. Please see the screenshot below for reference.
Fill out all the fields of the listing pricing plan product type form and hit publish. The description of all the fields is given below.
Select Listing Pricing Plan Product TypeAdd new plan using WooCommerce (Click on the image to see the full size)
Short description of all fields of pricing plans is given below.
Regular Price: Enter the regular price for this plan.
Sale Price: Enter the sale price for this plan. User will be charged by regular price if the sale price is not set. You can provide some discount as a sale price for attracting your users.
Select Plan Type:
(A) Pay Per Listing - Select this plan type if you want to charge a user for every listing he/she submits.
(B) Package - Select this plan type if you want to charge a user for multiple listings at once. You must define number featured listings and normal listings available for this plan. When a user will choose this plan with this package, they will be allowed to submit the number of listings defined in this plan for the price of this plan. A user will not have to pay for each listing.
Duration (in days): Enter how many days you would like a listing should be live for this plan. When a user submits a listing using this plan, that listing will be live for the number of days defined in this field.
Featured the Listing: If the Plan type is "Pay Per Listing", then check this field if you want to let a user submit a featured listing using this plan.
Listing Slider Image Limit: Check this field to enable Image uploading feature for the listing. You can enable an unlimited number of images to be uploaded for the listing or limit the number of images to be uploaded by providing a number in the input field.
Allow Tag and set Limit: Check this field if you want to allow a user to add tags to a listing when submitting. You can also limit the number of tags a user can add to his/her listing.
Allow Price and set Limit: Check this field if you want to allow a user to set a price for a listing when submitting. You can also limit the highest amount of a price a user can set for his/her listing.
Price Range: Some user may want to use expense range instead of a price. If you check this field then a user will be able to choose a price range instead of setting a price. However, users will be able to choose between a price and a range during adding a listing. The available expense levels in the range selector are Ultra High ($$$$), Expensive ($$$), Moderate ($$) and Cheap($).
Business Hours (It requires Business Hours extension): if you check this field, a user will be able to add business our to a listing using this plan. However, you must have the Directorist Business Hours Extension installed on your site for this feature to work.
Image Gallery (It requires Image Gallery extension): Check this field if you want to let a user upload an image gallery to a listing under this plan. You can also limit the number of images a user can upload to an image gallery by inserting a number in the Gallery Image Limit field. Or you can let a user upload unlimited images by checking the "mark as unlimited" checkbox. However, this feature requires the Directorist Image Gallery extension to be installed on your site.
Video: Check this field to let a user upload a video to a listing.
Contact Listing Owner: Check this field if you want to let users add the contact information of their business. A user will be able to add different type of contact information to their listed business during submission. You can also determine what type of contact information a user can add using the following fields. Continue reading the fields described below.
Phone Number: Check this field to let a user add a phone number to the listing address.
Website Link: Check this field to let a user add a website link to the listing address.
Social Media Links: Check this field to let a user add social media links to the listing address.
Customer Reviews: Check this field to enable review feature on a listing. Other users will be able to post a review on the submitted listing using this plan.
FAQs (It requires Listing's FAQs extension): A user can add a Frequently Asked Questions sections to a listing if you enable this feature for a plan. However, this feature requires the Directorist Listing's FAQsextension installed on your website.
Custom Fields: Check this fields if you want a user to have access to the custom fields created by you(admin) for listings. If you check this, a user will be able to add custom fields information to a listing during submission.
Exclude Categories: Check all the categories that you want to exclude for a plan. User will not be able to select the excluded categories when they submit using the specific plan.
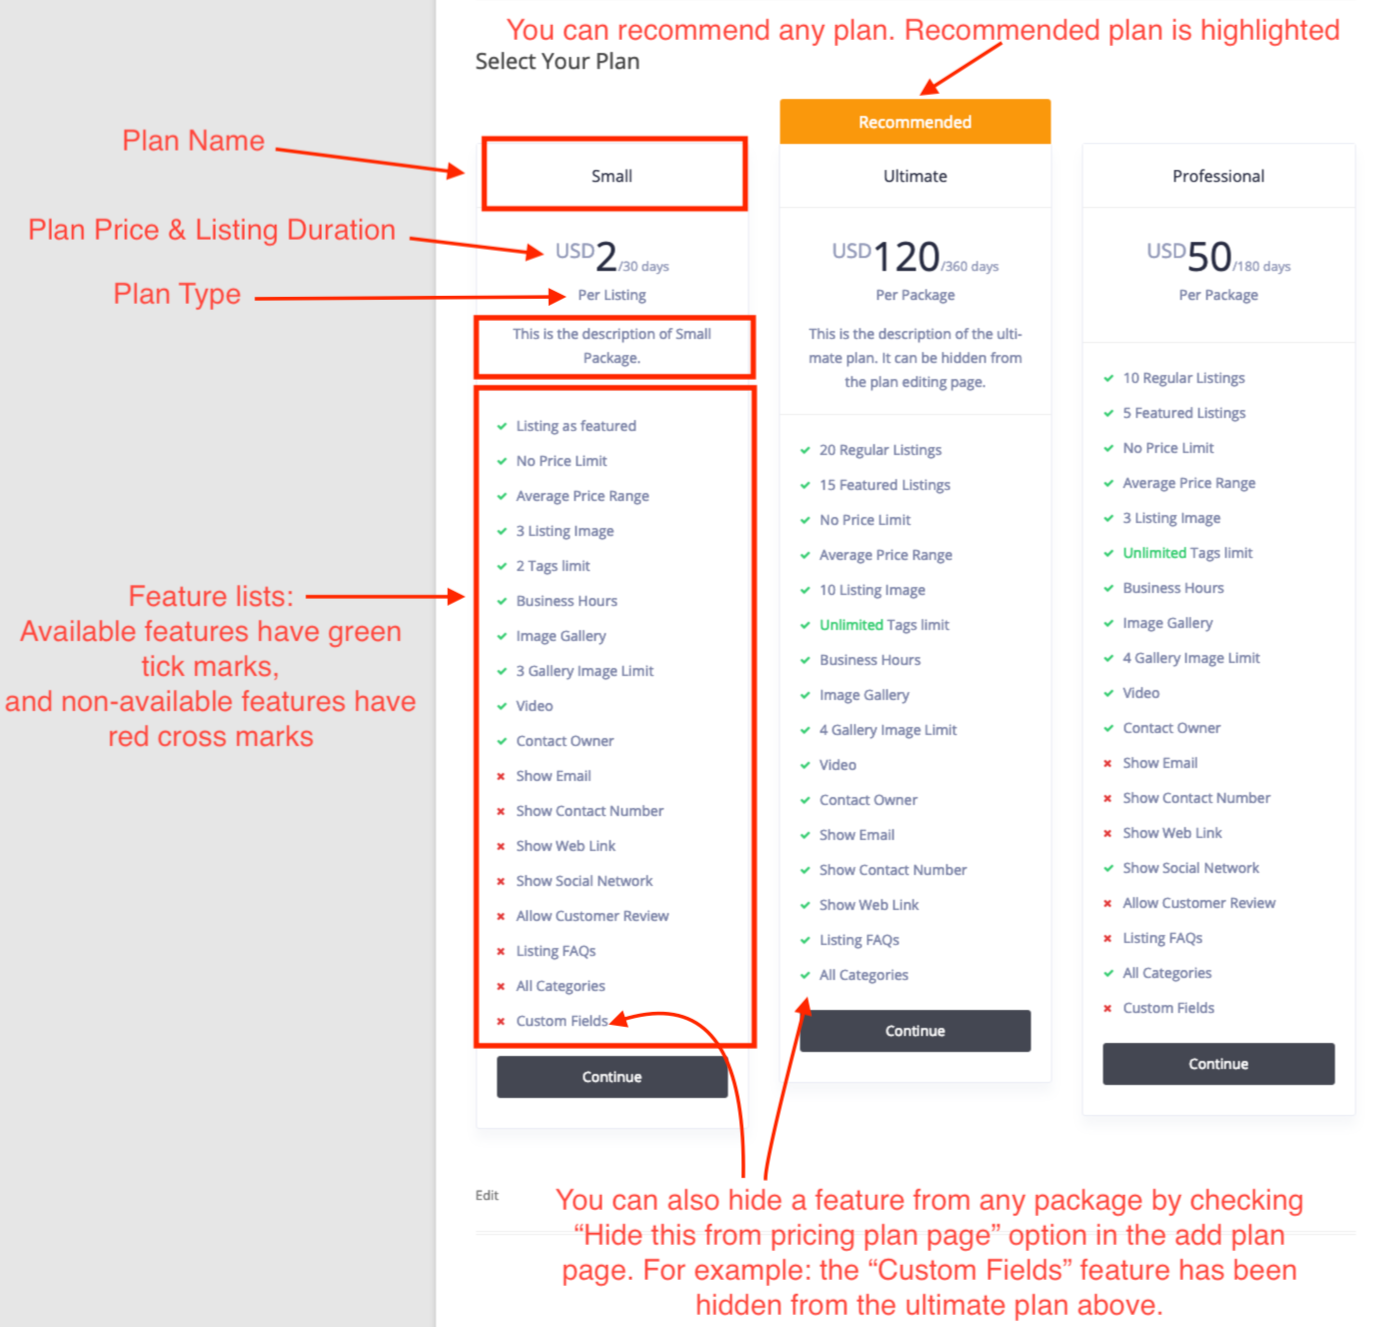
Recommend this Plan: Check this field if you want to highlight a plan as recommended when displayed to the user. Please see the screenshot below for more visual understanding of the pricing plan.
*Note: check "Hide this from pricing plan page" field if you want to hide any field on the pricing plan selection page. A sample screenshot of the pricing plan selection page given below
Pricing Plans displayed on the website ( Click on the image to view the full image )