How to Add Products to Google Shopping: A Step-by-Step Guide
Are you struggling to compete with big brands as your marketing budget is draining out without seeing results?
Google Shopping bridges these gaps and gives you a breakthrough in your growing online business.
As we move forward, we will spotlight how to add products to Google Shopping as a complete beginner. We will also navigate lights into the benefits that might help you to get started. So, without further ado, let’s dig deeper.
What is Google Shopping?
Google Shopping is a product search engine for both customers and retailers. It showcases a wide range of products, enabling users to compare prices and find the best products with the best deals. Google Shopping has numerous functionalities. Here’s the breakdown.
- Full control of store management: Store owner can upload and manage their product listings, including titles, descriptions, prices, images, and inventory status. You can create and manage your online store.
- Draw brick-and-mortar and online consumers: Google Shopping enables store owners to draw online and foot-visited consumers. It will give you a golden opportunity to attract nearby consumers.
- Price comparison: Listings from multiple store owners pave the way to compare prices and learn about exclusive deals.
How to Add Products to Google Shopping: A Step-By-Step Guide
Adding products to Google Shopping involves several key steps, from opening a Merchant Center account to setting up your store and uploading product information. Here’s a step-by-step guide on how to add products to Google Shopping.
Step 1: Create a Google merchant center account
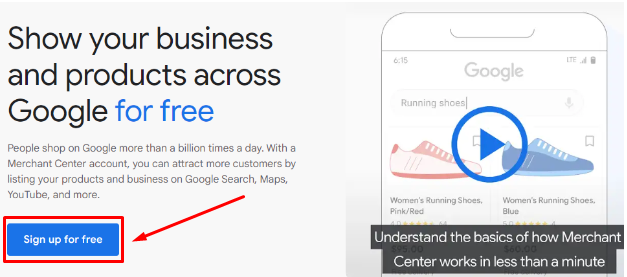
To get started, set up a Google Merchant Center account where you’ll manage your product data. After that, hit the ‘sign up for free’ blue box button. Bear in mind, that you’re signing in with a Google account. Otherwise, create an account to sign in further.
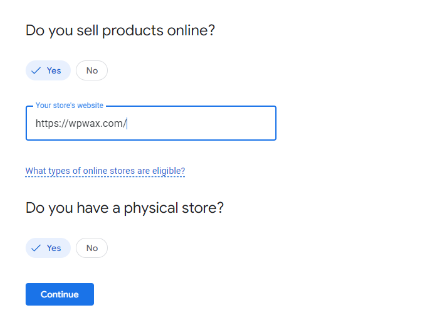
Moving forward, the screen will pop up like the following. Here you will discover two options.
- Your store’s name
- A query about a physical store
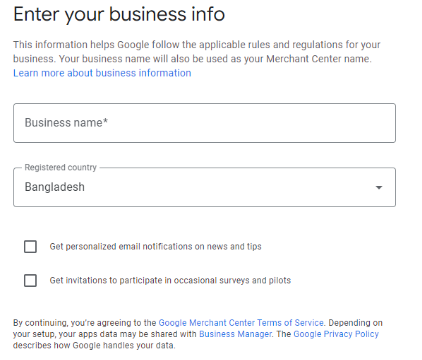
Then, provide your business information such as business name, country, and time zone. This information will be used for your account settings and redirected to you in the Google Merchant Center Next Panel.
When done sharing business credentials, you’re the operator of a merchant panel. Here you will get a manual that includes the following things.
- Product overview where you opt to share business address store details, contact, shipping policy, and product listing. You need to put data sequentially.
- In the left panel, you’ll get the product summary and shipping status. Interestingly, you can also run ad campaigns. Ads reporting will be recorded accordingly. That’s a fine thing without any doubt.
The following will illustrate the best about the merchant panel.
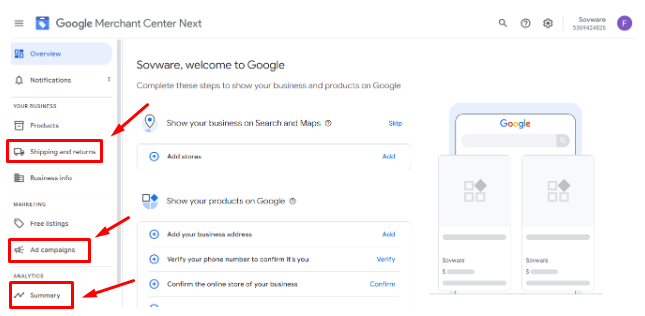
However, you haven’t done it yet. You cannot upload products if you don’t verify the website address.
This involves two simple steps.
- Verify your website credentials
- Authenticate the site on Google Merchant Center
Alternatively, you can authenticate credentials in several other ways.
- Authenticate getting a personalized code dropping to your business email
- Use the code of your already-built website builder
- Paste the HTML tag to your website’s home page
- Use the tag manager code
Don’t worry, you don’t need to verify every option. You can select any of these convenient ways. Sounds fine? Moving forward.
It’s time to upload products to your Google Merchant Center.
Step 2: Upload your products To the merchant center
Now your Google Merchant Center is rolling. It’s time to upload your products as it is the primary touchpoint to get into your website. There are multiple ways to add products to Google Shopping. You can select from any of these given methods.
- Google algorithm will add the latest edition automatically, once you let the system know about the new product
- Upload products from a comprehensive file. The file must contain the ins and outs of the product such as title, description, price, quantity, SKU, usability and many more.
- Input product-related information such as title, description, availability, image link, size, color, and many more. The data has to be in XLS format.
Now, we will walk you through the stated methods in a bit depth for better understanding.
Add products from your website directly
This is one of the easiest ways to upload products in Google Shopping. Before selecting this option you must need to verify the website. This is the magic of the algorithm that automatically uploads products from your website. What else do you need?
Add products from a file
To use the second method you need to have a product file that contains all the products. Don’t forget to save the file format in an XLS and XML format. This is the only way to go.
Before heading to drop the link, how do you create the file or link? You can make the file here. This guide from Google will help you in the best way possible.
Next, using SFTP you can add a file. It ensures online file transfer security.
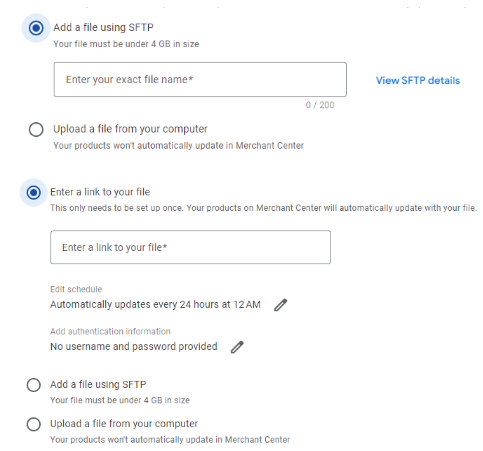
Add products from the spreadsheet
People from all ranges widely use spreadsheets to keep records of tasks. It might be the preferred option for most people just because of familiarity. You can use it in the same manner.
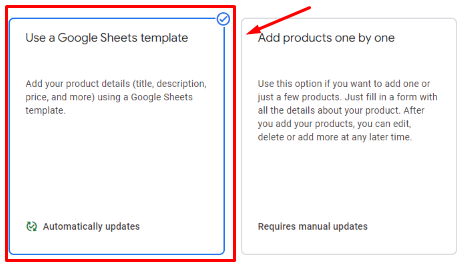
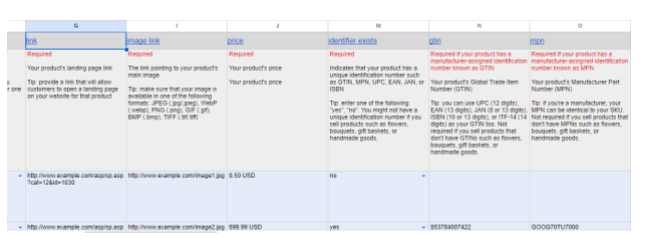
Clicking on the template you’ll discover a pre-built template.
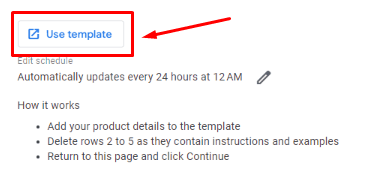
After clicking the template, it shows you what information you need to input on the sheet. This is how it illustrates the information.
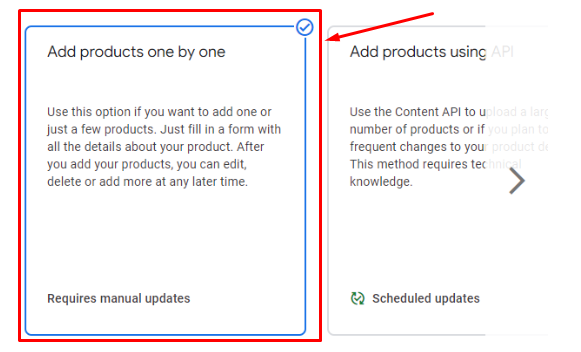
Add one, two, or a few products
Are you doing business in a niche segment? Then it might be helpful for you. Here you can add products one by one. If you’re selling a few products, you don’t need to open a spreadsheet or product file to add a product to the merchant panel. It’s time-saving.
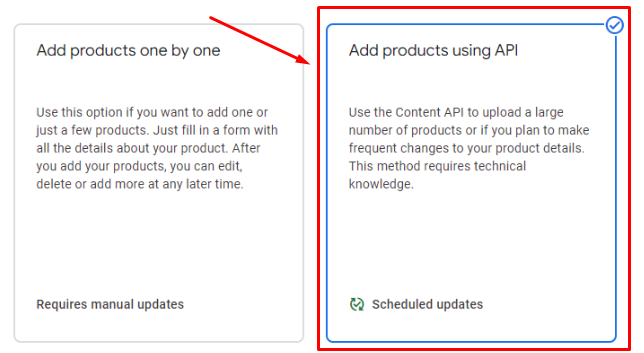
Add product using API
This is the last one. Retailers operating businesses in several segments might find it more beneficial than other stated methods. The retailer who deals with large data sets and needs to bring changes frequently is likely to go for API.
So far, so good? We’ve discussed the available methods on how to add products to Google Shopping in a step-by-step guide.
Once you’re done with the steps, your store will be live from the Google Merchant Center. You will appear with products from your newly created Merchant ID.
Benefits of Using Google Shopping
Google Shopping benefits a lot to retailers and e-commerce owners. It helps reduce customer acquisition costs, global customer reach, and effective advertising. Being on such a platform can make you the jack of all trades. So, let’s see what are the benefits waiting for you.
- Reducing customer acquisition cost: Google Shopping increases online presence visibility. The cost of acquiring new customers can be lowered. The algorithm and ads campaign will take you to the targeted customers.
- Attracting nearby customers: Adding products to Google Shopping drives foot traffic to physical stores, showing product availability to local shoppers. Nearby location helps to convert customers immediately. So, you can see a rise in conversion.
- Ensuring return on investment (ROI): Who doesn’t want to run ads? Create targeted advertising campaigns to reach niche customers, maximizing return on investment (ROI). If you run ad campaigns like pay-per-click (PPC) then customers only pay if they go to your website. Besides, you are getting comprehensive data that navigates the clarity of investment.
These are the main benefits of adding products to Google Shopping. We tried to bring unique benefits that cater to the needs and preferences of the retailers.
Final Words
This guide has walked you through the essential steps of setting up a Google Merchant Center account, from verifying your website to uploading product information. Leveraging Google Shopping, you can enjoy significant benefits such as reduced customer acquisition costs, increased visibility, and the ability to attract both online and local shoppers.
Are you ready to take the next step and harness the full potential of Google Shopping for your online store?



Leave a Reply
You must be logged in to post a comment.