


Table of Contents
- 1 Before We Move Any Further
- 2 Elementor Directory Website - How to Create a Business Directory Website with Elementor for Free
- 2.1 Step 1: Create menus, categories or tags, locations
- 2.2 Step 2: Create a home page for your Elementor directory website
- 2.3 Step 3: Create an "Add Listing" page for your Elementor directory website
- 2.4 Step 4: Create an "All Listings" page for the Elementor directory website
- 2.5 Step 5: Create a single listing page layout
- 2.6 View from the frontend
- 3 Bonus: Extending the Functionalities of Your Directory Website
- 4 Putting It Altogether
How to Create a Directory Website Using Elementor for Free
-

- Directorist Plugins Tutorials WordPress
- 7 mins read
With the advent of WordPress, you can now build any website within minutes. Interestingly enough, it gets even crazier if you are using page builder plugins like Elementor. Not only does it facilitate all your design requirements but also extends your website functionalities with the use of widgets and other customizations with full control.
And it is no different if you are to create a directory website with the popular page builder tool, Elementor. In this tutorial, we will show you how you can effortlessly create an Elementor directory website or Elementor based directory website. Now, let’s begin.
Before We Move Any Further
First, you need to install the Elementor page builder plugin. To install the plugin, you can get it from the WordPress.org for free and install it like any other WordPress plugin. To take further assistance, you can also see the below video from the official channel of Elementor:
Now, download the Directorist plugin (free) from here and install it by following this documentation. Once you are done with it, get a Directorist theme for free from here and install it like any other WordPress theme.
Elementor Directory Website – How to Create a Business Directory Website with Elementor for Free
Now that you are done with all the required installations, follow these steps to create your business directory website:
Creating menus, categories, tags, and locations makes your website more accessible, intuitive, and user-friendly. Now, why do you need a menu? The answer is simple – To show the pages or posts to your visitors that you will be creating later on. Follow this documentation to show the pages taking help from the official website of WordPress.org. As Directorist creates several important pages out of the box, feel free to delete any menu item that you don’t want to show. You can also delete or mark the status draft of the pages you want to replace with Directorist Elementor widgets.
Next up, you need to create necessary categories, tags, and locations so that your website visitors can navigate to their desired listings in the fastest way possible. You can follow these documentations to create them:
Step 2: Create a home page for your Elementor directory website
Next up you need to change the status of the default home page to a draft. These default pages came with the default installation of Directorist.
After that, you need to create a homepage for your directory website. To create a homepage, navigate to WP admin dashboard > pages > add new page (home) > publish > edit with elementor.

Now, you should be able to see the following edit panel of Elementor in which you can find the Directorist widgets. Meaning you don’t have to code anything because everything will be generated automatically. For example, you can click on the Directorist Search Listings widget from the Directorist menu:
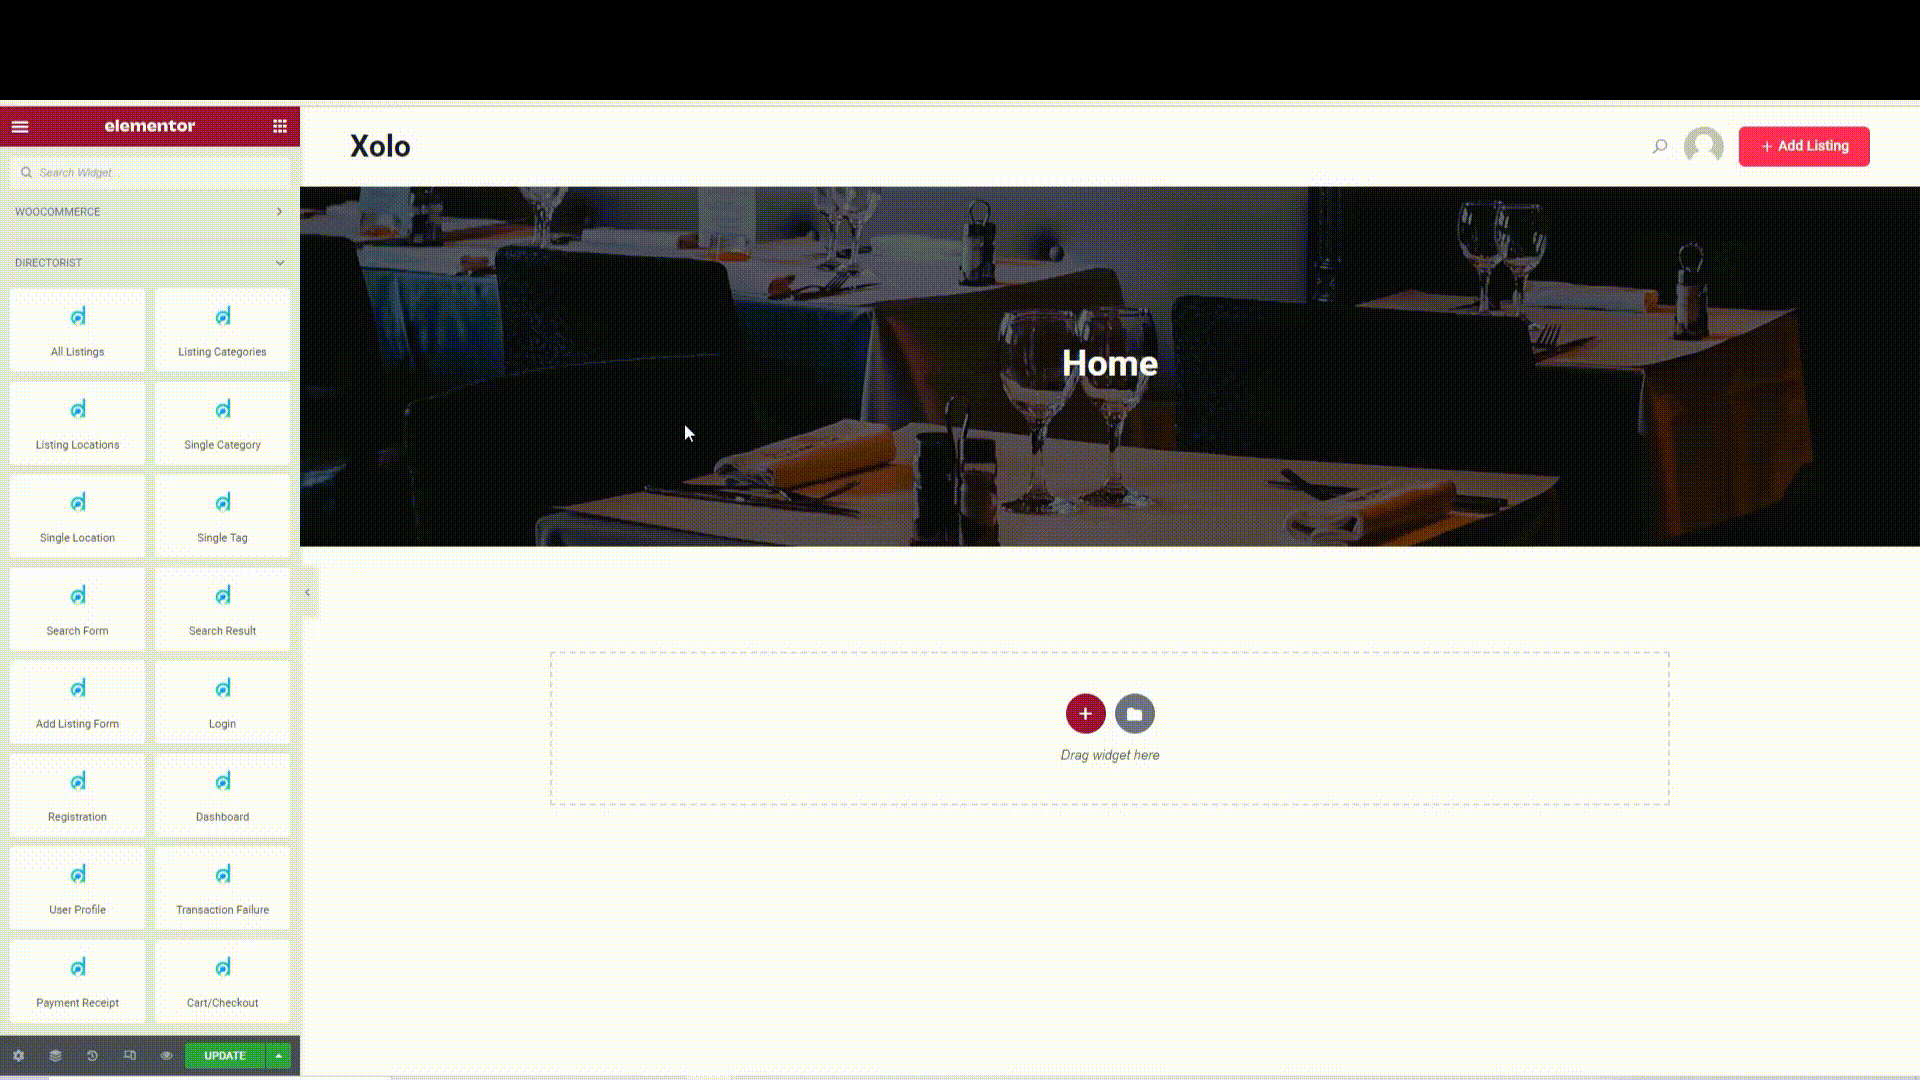
Finally, hit the ‘Update’ button.
Bonus tips: You may set this page as the home page from Settings > Reading > Select “A Static Page” from the “Your homepage displays” option > select the “Home” page from the Homepage option > hit “Save Changes”.
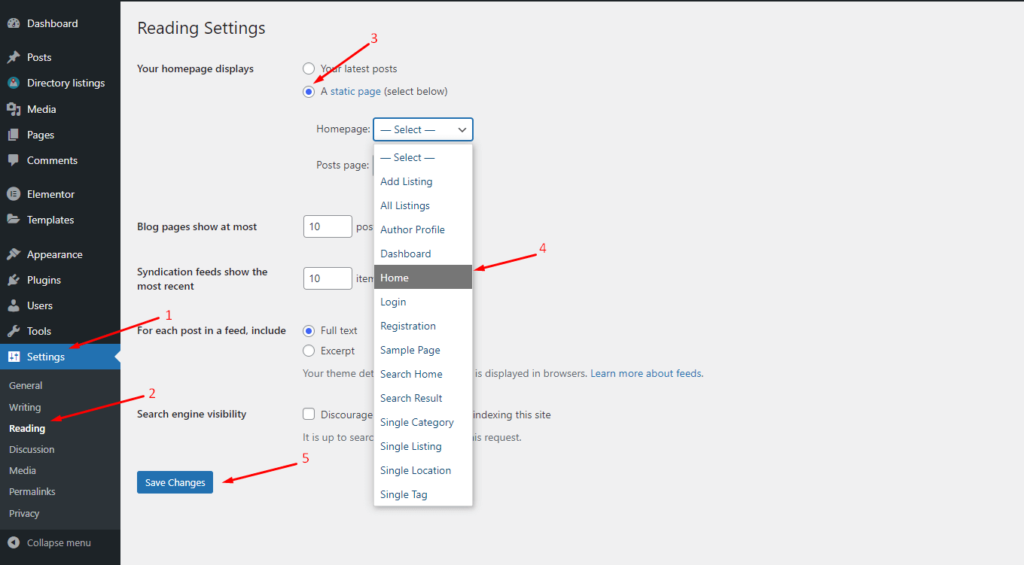
Doing so will prevent the site from showing any blank home page.
Step 3: Create an “Add Listing” page for your Elementor directory website
With “Add Listing” page, the users of your website will be able to submit their listings. To do so, you need to mark the default “Add LIsting” page as a draft and then create a page with the title “Add listing”. Go to the Pages > Add New page (Add Listing) > Publish > Edit with Elementor.
Step 4: Create an “All Listings” page for the Elementor directory website
All listings page contains all of the listings that your listing owners submit. Make sure you have marked the default “All Listing” page as a draft.
To create the “All Listing” page, you can follow the previous step. That is you can navigate to Secondly, you need to create a homepage for your directory website. To create a homepage, navigate to WP admin dashboard > pages > add new page (All Listings) > publish > edit with Elementor.
After that, drag and drop the All Listings widget from the Directorist menu. After that, you can include pagination from the “Show Pagination” option.
Step 5: Create a single listing page layout
Creating a dynamic single listing page with Directorist and Elementor is fun because it is a combination of the directory builder and Elementor Widgets.
Now, create a “Single Listing” page by going to the Pages > Add New > “Single Listing” Page > Publish.
Then, go to the Directory Listings > Directory Builder > Single Page Layout > Other Settings > Single Page > Turn on the Custom Single Listing Page > Generate shortcode > Copy the Shortcode.
Now, you will have to paste the shortcode on the text widget of Elementor.
Hence, navigate to the Pages > Edit the “Single Listing” page > Edit with Elementor > Drag & Drop the Text widget on the page > Paste the shortcodes in the text widget > hit the Update button.
For further assistance, you can see the video below to remove your confusion:
Congratulations! You are done with creating the Single Listing Page Layout.
View from the frontend
Now, let’s take a look from the front end so that you can understand how all of the previous steps paid off. Here is a glimpse of:
Bonus: Extending the Functionalities of Your Directory Website
Now that you have set up a directory business website, you will have to extend its functionalities to earn more revenue:
1. Monetizing your Elementor directory website
Now, you need to monetize your directory website to expand your business. In addition to a free monetization feature, Directorist allows you to streamline the monetization feature using different add-ons. For example:
- Make Money from the “Claim Listing” extension
In the beginning, your website may not be as popular as the big guns. Howbeit, over time your website will gain popularity with marketing efforts which opens up a wide range of opportunities to earn from the business owners. For example, you can reach out to the individual business owner saying “You have a lot of potential customers in your directory website. So, claim your listing right away!” You can then charge a certain amount of money in exchange for their claim.
Get the Claim Listing Extension!
- Monetize using “Pricing Plan” extension
Interestingly, you can create an unlimited pricing plan for the listing service you are offering to the listing owners. With this extension, you can also create a subscription-based pricing plan to earn more revenue by making your listing owners renew their plans to continue using your directory website’s service. If you are using WooCommerce, you can create an unlimited pricing plan using the “WooCommerce Pricing Plan” extension as well.
Get the Pricing Plan Extension!
- Monetize by showing ads
Directorist allows you to show ads like Google Ads or local ads and earn money from them. Whenever a visitor buys something from the ads you are showing you will enjoy a certain amount of affiliate commission. It will help you make more money from your website.
Get the Directorist Ads Manager
2. Allow Live Chat option to the users
The Live Chat Option is necessary to make your website highly engaging. The visitors can send their message to the listing owners using a simple yet effective contact form. This will make your website more appealing and highly interactive at the same time. Isn’t that cool?
You can use the Directorist Social Login extension to make the login process easier. It eliminates the need to register by manually entering the credentials. Consequently, you will be able to diminish the friction and bounce rate making your website more user-friendly.
Get the Social Login Extension!
4. Reach 7.5 billion mobile users with a native mobile app
Now is the time for mobile apps because there are more than 7.5 billion mobile users from around the world. Meaning you have got an enormous opportunity to reach them using a mobile app. Almost every big brand has a mobile app in place. However, we know how hard it is to build an effective mobile app for a startup considering the super high development cost.
Not to worry! ‘Cause, we have come up with a free mobile app (only a little service charge) which we will develop for you from our end.
Putting It Altogether
Making a directory website with Elementor is that easy with the help of the Directorist. Currently, you will get 16 free Directorist widgets in the Elementor Page Builder. In fact, you can implement any feature you can imagine in your Directorist-powered directory website with full control and scalability. For advanced performance and control on the Directorist components or elements found in the Elementor Page Builder, you can use the directory builder. We did not talk about it since we tried to make the process simpler and shorter for you in this article.
However, if you are stuck with a step, don’t hesitate to shoot us a message in the comment section below. We will certainly hear you and respond to you so that you don’t feel helpless and stranded. That’s all!

suzauddowla
Al Suzud Dowla plays the role of a content strategist at Directorist. He is basically a digital marketing expert and a tech enthusiast (by heart) who excels particularly in technical content writing. In his pastimes, he is seen playing Ping Pong, performing Karaoke, reading books, and playing around with JavaScript as well.
Related Articles

2 Comments
Leave a Reply
You must be logged in to post a comment.
prov1
August 17, 2023Hello. Is there a shortcode to add images for Single Listing Page layout in Elementor?
Md. Hamim Khan
August 24, 2023Hello,
If you wish to utilize the dynamic listing image, it can be accomplished by creating a shortcode for the ‘Header’ section, as listing images are meant to be placed within this section. This shortcode is adaptable and can be inserted in any location you prefer. Further information can be found in the documentation: https://directorist.com/documentation/directorist/form-and-layout-builder/custom-single-listing-page/.
Alternatively, if you intend to utilize a static image for the individual listing page, you can easily achieve this by incorporating the image widget from Elementor and inserting the desired image. It’s important to note that if you opt for the shortcode approach, the utilization of the “Custom Single Listing Page” is essential.
Feel free to let us know if you have any further queries or need additional assistance.
Docs