


Table of Contents
- 1 What is a Classified Ad?
- 2 Types of Classified Ads
- 3 How It Changed
- 4 A Detailed Guide on How to Build a Classifieds Website
- 4.1 Step-1: Purchase Domain & Hosting
- 4.2 Step-2: Download & Install WordPress
- 4.3 Step-3: Install & Activate WordPress Classifieds Plugin
- 4.4 Step-4: Install a Classifieds WordPress Theme that Looks Cool
- 4.5 Step-5: Import Demo Listing
- 4.6 Step-6: Turn On the Monetization Feature
- 4.7 Step-7: Create Categories, Locations & Tags
- 4.8 Step-8: Set Up Your Homepage
- 4.9 Step-9: Add Form for Submitting Classified Ads & Ad Submission
- 4.10 Step-10: Review & Publish the classified ad listings
- 5 Bonus Tips: Change the Default View of the Classified Ads
- 6 Wrapping up on How to Build a Classifieds Website
- 7 Frequent Asked Questions
- 7.1 1. What is the best platform to build a classified website in 2026?
- 7.2 2. How do I monetize a classified website effectively?
- 7.3 3. How can I protect my classified site from scammers and spam?
- 7.4 4.What features are essential for a modern classified platform?
- 7.5 5. Is it necessary to have a mobile app for my classified business?
- 7.6 6. How can I improve the SEO ranking of my classified website?
- 7.7 7. How do I manage thousands of listings without slowing down the site?
- 7.8 8. Can I use AI to automate listing descriptions?
How to Build a Classifieds Website in 2026
-

- Classifieds Listing Directorist Tutorials
- 14 mins read
Do you want to launch your business even if you don’t have any physical products? Do you want to avoid the risk and high initial investment of developing your own products? Do you want to keep the business wheel running while you are sleeping or hanging out with your friends? If you are looking for such business tactics, you have landed in the right place. Well, among only a few business models, starting a classified website is the rarest one that will help you achieve a stable profit with the least effort exerted and the least money invested.
Having said that, you will find a wide range of classified site builders out there. Unfortunately, very few of them seem to be worthy of recommending as they come up with an enormous burden of initial cost that is hostile to a wannabe entrepreneur trying to create a classifieds website. Besides, most of the classified site builder also fail to check the essential boxes when it comes to scalability and low maintenance costs down the line.
Not to worry – as the saying goes, “While there is a problem, there is a solution.” In this article, we will not only be showing you the ways how to build a classifieds website like Craigslist, or OLX but also will show you how to monetize them with ease. So let’s get the ball rolling.
What is a Classified Ad?
Before, we dive into the discussion about the process of “build a classifieds website like craigslist”, let’s get a clear picture about what is actually a classified ad as it is the lifeblood of a classified ads website.
You know those small text ads in the back pages of a newspaper — “Used sofa for sale, call John at 555-1234”? That’s a classified ad.
The name comes from how they’re organized: by category (class). Instead of one big jumble, you’d flip to the “Jobs” section if you’re looking for work, or the “For Sale” section if you want to buy a used car.
They’re short, cheap, and straight to the point. No fancy design, no big images — just a few lines of text telling you what someone wants to sell, buy, or offer.
Types of Classified Ads
For Sale Someone wants to get rid of something — a car, a TV, an old couch. They post a short ad with the price and their number. You call, you buy, done.
Jobs A company has an opening, they post it. You’re looking for work, you read it. Before LinkedIn and job websites, this is how most people found jobs — flipping through the newspaper over morning coffee.
Real Estate Houses, apartments, and land for rent or sale. “2BHK, near city center, $800/month, call evenings.” That kind of thing.
Services A plumber, a tutor, a house cleaner advertising their work. Small businesses and freelancers who can’t afford a big display ad use classifieds to get the word out cheaply.
Personals People looking for relationships, friendships, or companionship. This category is mostly gone now — dating apps killed it.
Announcements Births, deaths, marriages, lost pets, public legal notices. Some of these are required by law to be published in a newspaper.
Community / Misc Garage sales, free puppies, carpool needed, local events. The catch-all for everything else.
How It Changed
In newspapers, you paid per word — so people wrote in shorthand to save money. “Gd cond, must sell, no rsbl ofr rfsd” was normal.
Then the internet arrived. Craigslist, Facebook Marketplace, OLX — suddenly posting was free, you could add photos, and anyone could reach an entire city instantly. That killed most of the newspaper classified business almost overnight.
But the concept is the same as it always was: a quick, simple way for ordinary people to connect with other ordinary people to buy, sell, or find something.
A Detailed Guide on How to Build a Classifieds Website
Make sure you have the following requirements to create a classified website:
- Domain & Hosting
- Download & Install WordPress
- Install Directorist
- A Classified Theme (dClassified)
To know how to implement the basic stuffs more efficiently, we recommend you follow the detailed instructions from here: Ultimate Guide to Create a Directory Website. Then, you can proceed to the next steps of this tutorial.
Step-1: Purchase Domain & Hosting
Whether you are to create a classifieds website or any kind of website, you must need to purchase a domain. In case, you did not know it is nothing but the unique website address or the URL of your website. While choosing your domain name, it is always wise to pick a domain that resonates with your brand or business type.
While it’s not necessary to pick such a domain but it is good for search engine optimization in that your website will easily get indexed due to the relevancy of the keywords of the domain. For example, you can choose something like ukclassifieds.com or usclassifieds.com to maintain relevancy. Moreover, if you do not get a .com domain extension followed by your preferred domain, feel free to buy other extensions like .net or .io, etc.
Next up, you need a reliable hosting service to host your website. In this regard, we will be suggesting you purchase a basic hosting plan due to the low traffic coming to your website initially. However, once you start getting a good amount of traffic, you can go for the premium plans.
You can buy domain & hosting services from popular websites like Hostinger or Bluehost or GoDaddy and Kinsta or from anywhere you want.
You can learn more about popular hosting providers from this resource: WordPress Hosting Services for Directory Websites
Step-2: Download & Install WordPress
Now, you need a content management system to manage your website data. For this tutorial, we will be using WordPress because:
- it is powering up 40.0% of all the websites on the internet.
- in the CMS market, it is leading with a 60.8% market share.
- 14.7% of the world’s top websites are being powered up with WordPress.
- The official WordPress Plugin Directory features 59,000+ free plugins including security plugins and SEO plugins.
- the WordPress community is helpful and you will never feel stranded.
- you will get 8,800+ free themes on the official repository in WordPress.org.
- it’s open source.
We suggest you use WordPress for starting a classified website for scalability, stability, and versatility or customizability using open-source code.
With that in mind, you can contact your WordPress hosting provider to install WordPress on your behalf. However, if you are a tech-savvy guy with a DIY mindset, you can do it all by yourself taking help from here.
Step-3: Install & Activate WordPress Classifieds Plugin
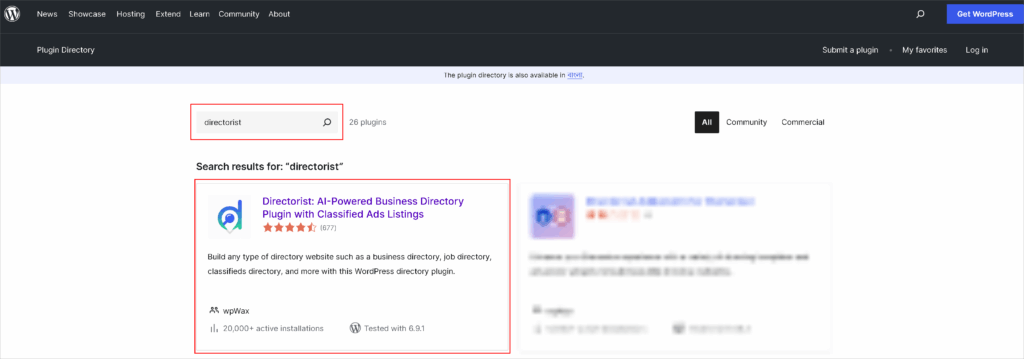
For this tutorial, we will be using a popular WordPress classifieds plugin Directorist as it offers the most versatile features even in the free version. In addition, it has 20,000+ active installations with more than 4.7 ratings on WordPress.org. Besides, its versatility allows you to create any type of create classified ads website and directory website within just a few minutes.
Once your fresh WordPress website is up and running, you can go to WP Admin Dashboard > Plugins > Add New > Search for the keyword ‘directorist’ > Install the following plugin as indicated with an arrow.
Next up, you need to activate and configure the setup wizard to get the ball rolling. We recommend you visit our official documentation that will help you to do so
Step-4: Install a Classifieds WordPress Theme that Looks Cool
You can use any classifieds WordPress theme to create a classifieds website but choosing a niche-optimized classifieds WordPress theme will add extra flavor to the appearance. Thus we will be using a optimized Classified Ad Theme For WordPress called ‘dClassified‘ which is solely developed to meet all the visual needs of a great-looking classified website. You can get the theme for here.
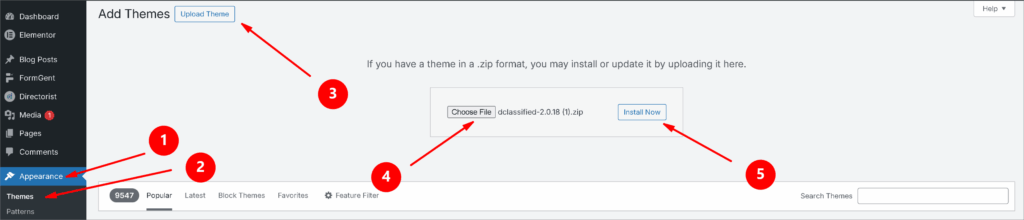
Once you get the theme, navigate to the WP Admin Dashboard > Appearance > Themes > Add Themes.
Then click on Upload Theme > Choose File and select the ‘dClassified.zip’ > Install Now.
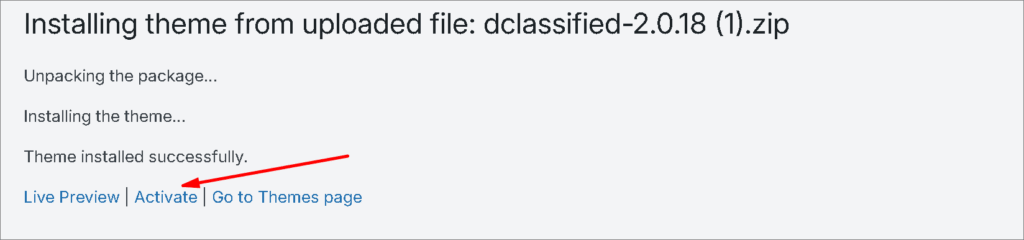
Now, activate the theme to take an effect:
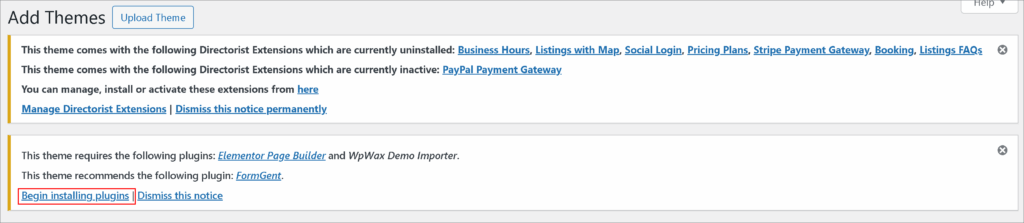
And that’s it! After installing the theme, you’ll see a pop-up that instructs you to install some required tools. Make sure to install and activate these tools as they’re required to add full functionalities to build a classifieds website like Craigslist, Facebook Marketplace, OLX, Gumtree, or eBay Classifieds.
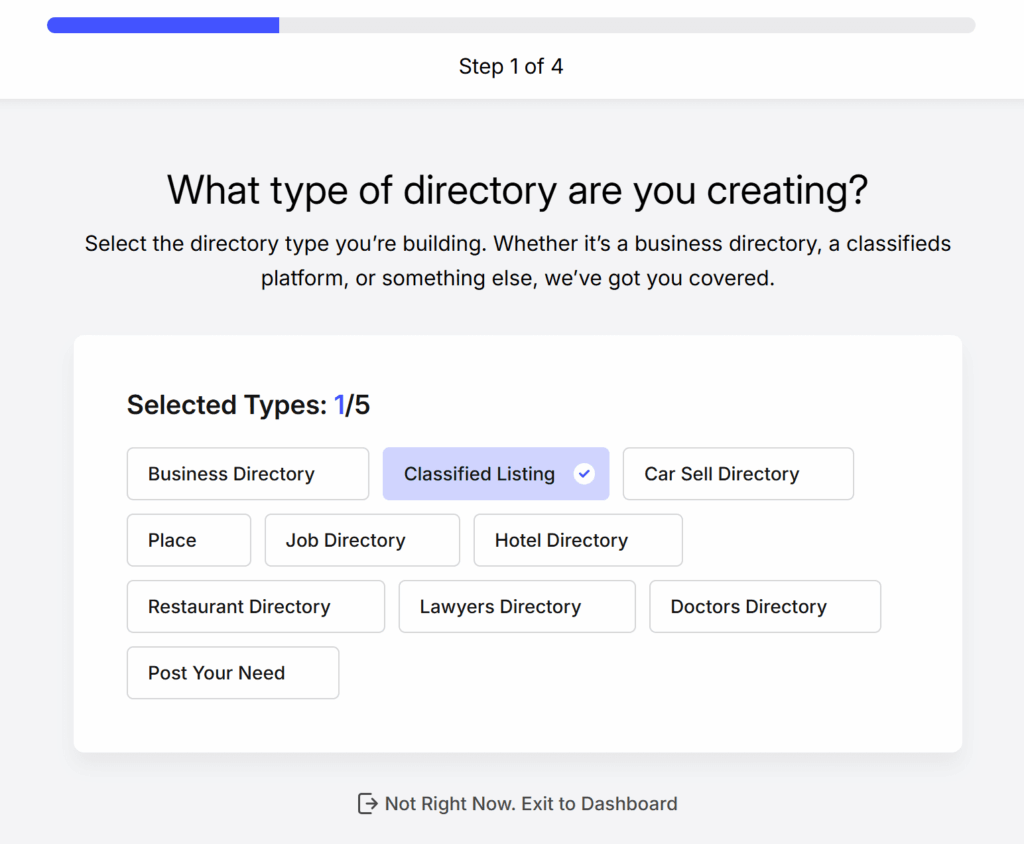
Once all the tools are installed, run the Directorist setup wizard and set up basic options such as directory types, location, and monetization. Once all the tools are installed, run the Directorist setup wizard and set up basic options such as directory types, location, and monetization. You can also opt out of the setup wizard and set up later.
Step-5: Import Demo Listing
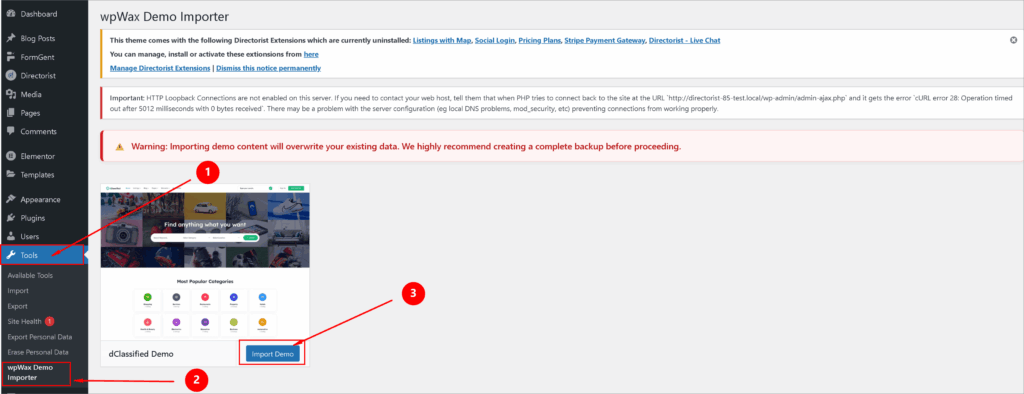
You can use wpWax Demo Importer from WP Dashboard>Tools>wpWax Demo Importer to get the same view you seen on demo. It’ll import the demo listings, locations, categories, pages, and tags to your website. Note that you can edit or delete all this demo info. Make sure to back up any important data you have, as the demo importer will erase all data.
Step-6: Turn On the Monetization Feature
If you are creating a classified website, you must ensure how to earn money from classified websites. Luckily, in Directorist, you can turn on this feature while you get the setup wizard right after installing Directorist for the first time. However, if you missed it or to make sure that the feature is turned on, navigate to the WP Admin Dashboard > Directory Listings > Settings > Monetization > General Settings > Enable Monetization > Save Changes.

While installing for the first time you must make sure you turned on the “Enable Monetization Feature“, “Monetize by Featured Listing” and Price for the featured listings in the setup wizard.
However, if you missed it or to make sure that the feature is turned on, navigate to the WP Admin Dashboard > Directory Listings > Settings > Monetization > Featured Listing > Turn on “Monetization by Featured Listing” > Save Changes.
It is a great news that dClassified comes with a package of handy extensions to make your monetization process easier and create multiple income streams. Like with Pricing Plan extensions, you can charge for each and every listing or to create an amazing pricing plan for the business listings.
The Pricing Plan extension will allow you to create any type of pricing plan tier whereas the Rank Featured Listing will help you to show the featured listings according to the amount the users are paying. The more the users pay to you the higher their listings will appear on the All Listings page.
Related Post: How to Set Listing Rates for Your Business Directory that Attracts New Customers
Step-7: Create Categories, Locations & Tags
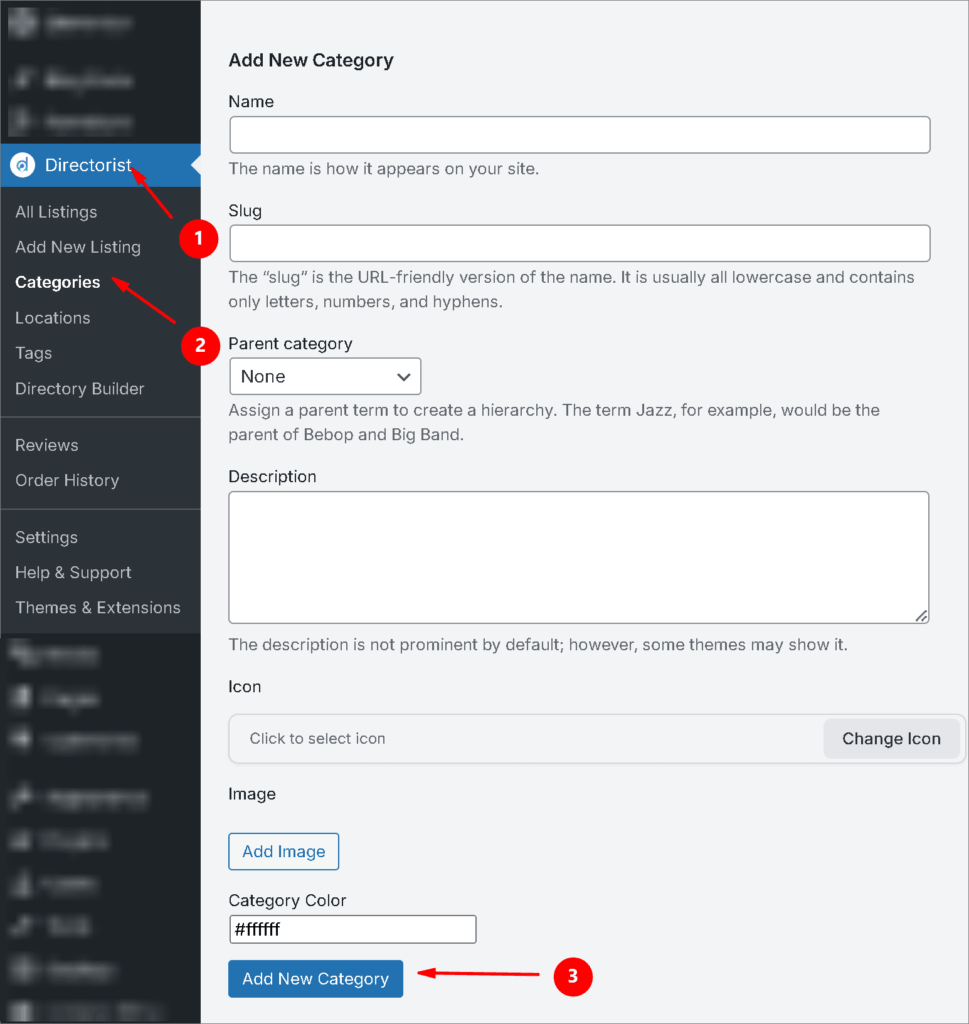
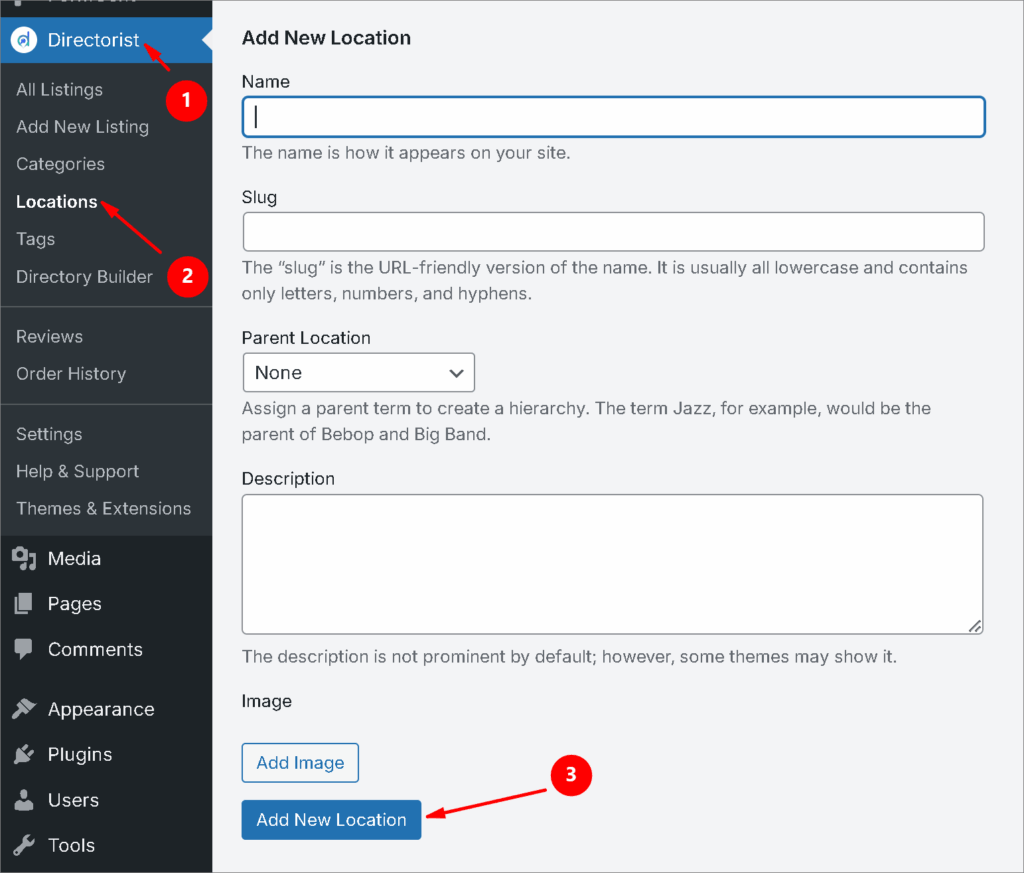
Categories are really important for the visitors to find their desired product faster. Without adding a category, it will be much harder for a listing owner to make his ads classified. With Directorist, you can not only give a name to a certain category but also assign it to a parent category, give a description, add an image, and assign a category icon & color to it.
To do so, navigate to the Directorist > Categories > Fill out the fields and make sure to hit the “Add New Category” button.
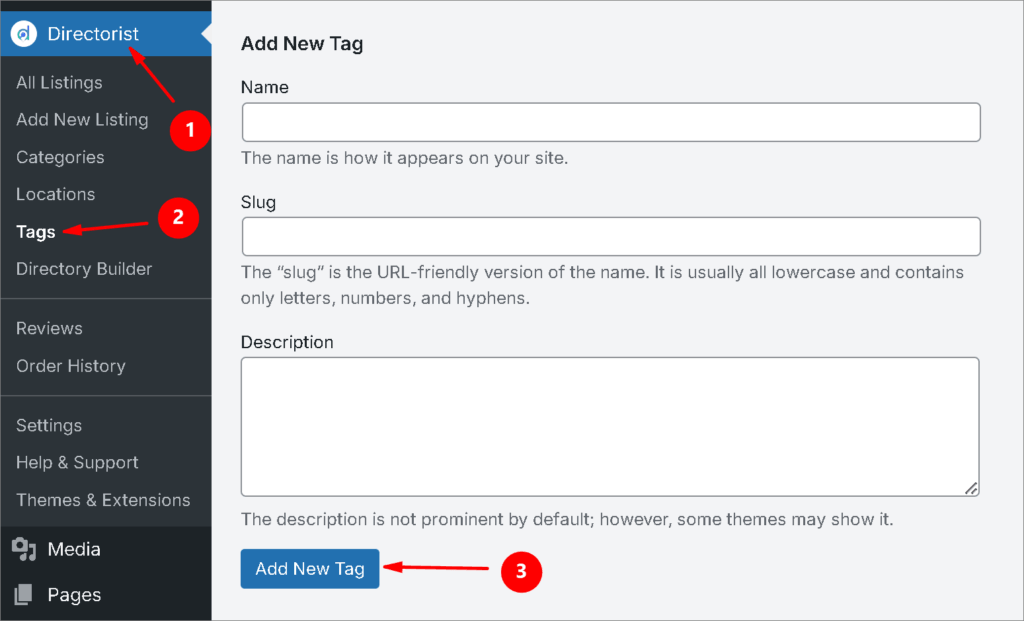
Similarly, you can add tags so that the visitors can find their desired item as fast as possible. You can do it from Directorist > Tags > Enter Credentials > Add New Tag.
This is just like adding categories or tags. It helps the users show relevant ads to the relevant locations. To add locations, you have to go to the Directorist > Locations > Enter credentials > Add New Locations.
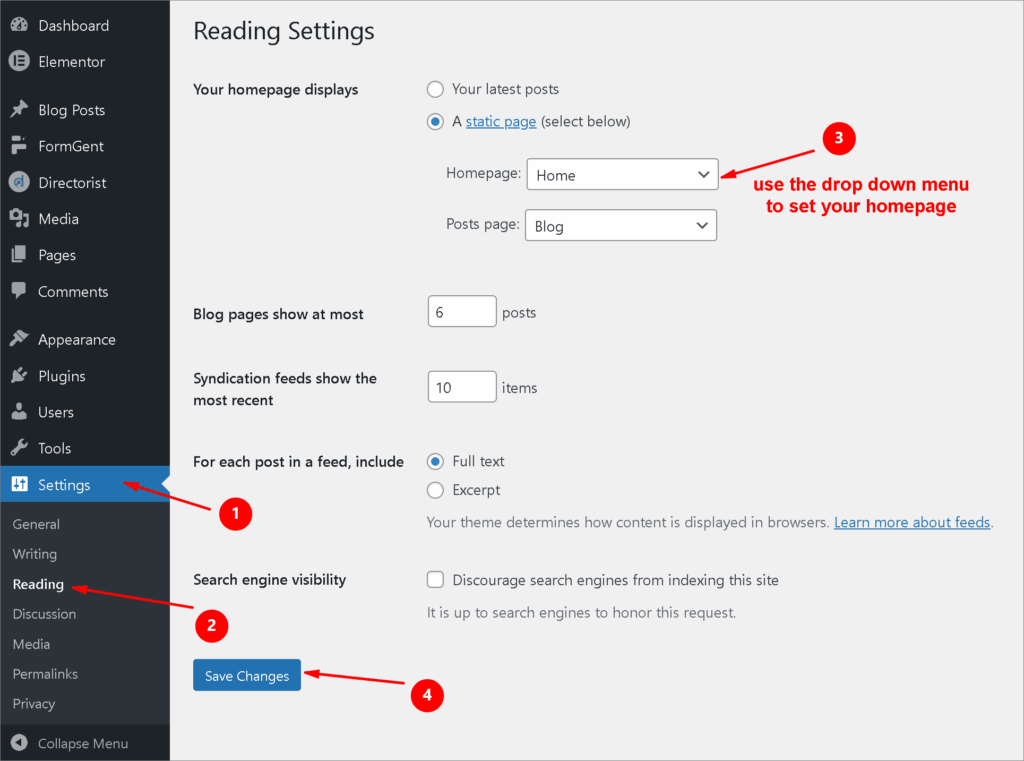
Step-8: Set Up Your Homepage
Your homepage is the place where visitors gets the first impression. Make sure to customize it as per your brand guideline. dClassified supports both Gutenberg and Elementor page builder so that you can customize your theme without touching any code.
Set up your homepage from WP Dashboard > Settings > Reading > A Static Page > Homepage > Save Changes
As the theme already offers a default classified template hope that you don’t need major changes without some little tweaks like text, logo, fonts, colors and images. You can make all these tweaks from WP Dashboard > Appearance > Customize.
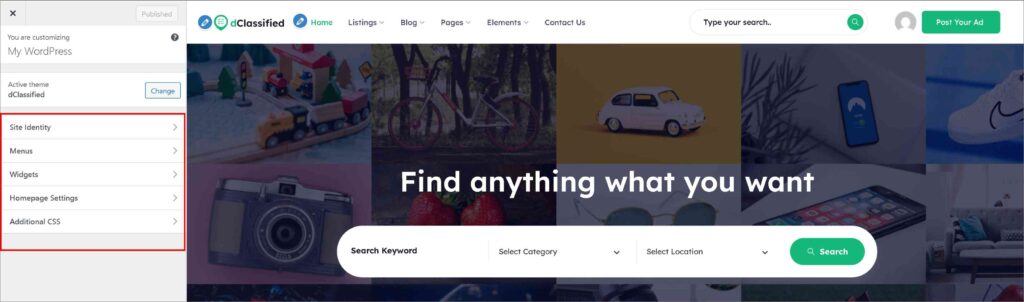
However, if you need to add any additional page as your homepage or any, you can add it from Pages > Add New Page.

Along with default Gutenberg blocks, you can customize your page more quickly with Directorist’s blocks. To know about more how to set up homepage, you can follow this official tutorial from WordPress.
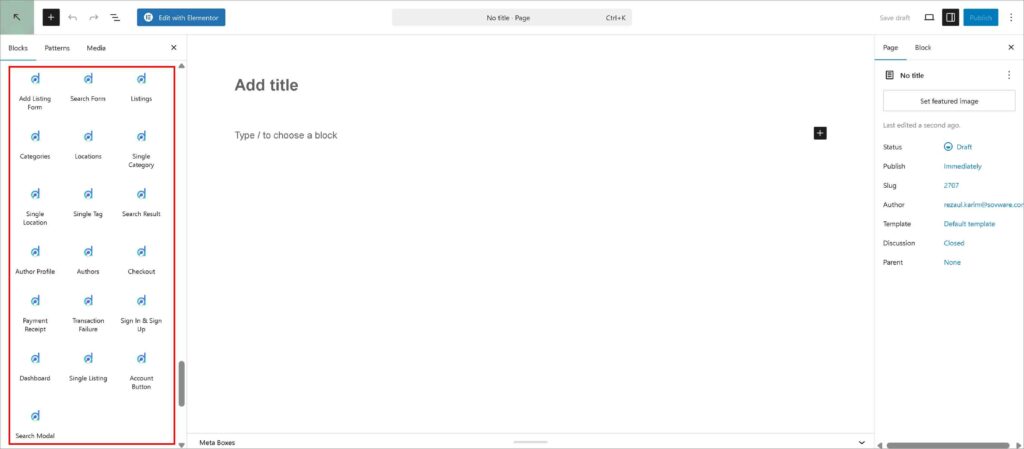
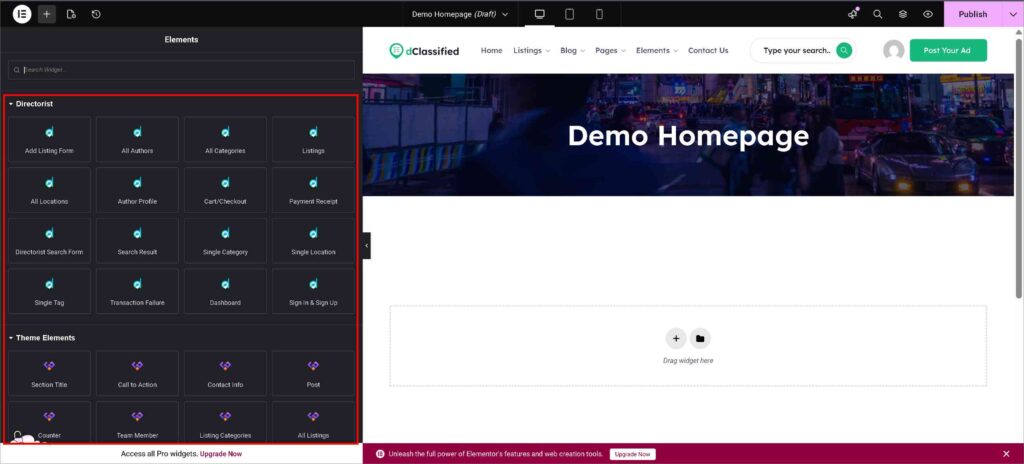
Elementor is a popular website builder. You can also enjoy the drag-and-drop feature with the dClassified theme. Just click the “Edit with Elementor” option, and you’ll be redirected to the editor page. While enjoying drag-and-drop, the dedicated blocks from dClassified make your website-building experience more exciting.
Step-9: Add Form for Submitting Classified Ads & Ad Submission
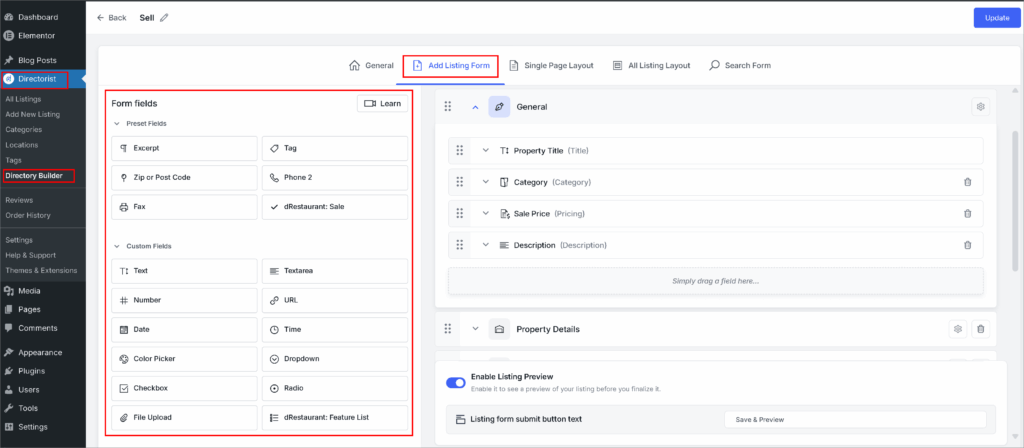
To create submission form, Directorist > Directory Builder > Add Listing Form. Use “Form Fields” to customize your form.
Now it’s your visitor’s turn to add classified ads. When a user lands on your website, s/he would see a navigation bar where the user can add the classified ads from. Generally, the user needs to click on the “Post Your Add” button to submit his or her ad.

In this case, the user must sign up and confirm the email address before s/he can submit the listings or classified ads. But this is a great way to lose many customers. Because customers are too lazy to submit the registration form. So why not enable a way that does not require signing up before posting classified ads?
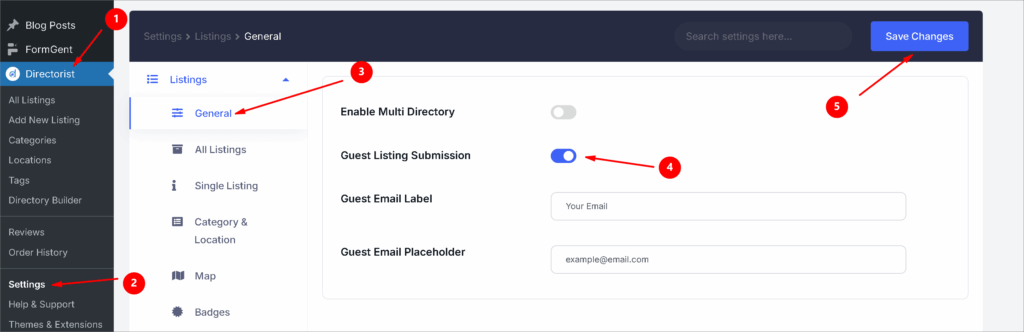
Surprisingly, Directorist has a special feature of guest submission which means you can let your users submit the ads even if they are not signed up or logged in to the website. You can enable this feature from the following settings: Directorist > Settings > Listings > General > Enable “Guest Listing Submission” > Save Changes
Now, as you have enabled the “Guest Listing Submission” feature, the visitor will get the add listing form to submit his/her classified ads after s/he clicks on the “Post Yout Ad” option and fill up the submission form with required information.

Finally, the user needs to hit the “Save & Preview” button to preview the ad s/he is going to submit. Next up, s/he will have to hit the continue to finalize the process.
Finally, the user will be able to see the confirmation message once the user submits the ad. See the attached video to get the clear picture how the whole process work.
Step-10: Review & Publish the classified ad listings
Now, if you are on how to create a classified website, you must look for a method to review & publish the ad listings. In this regard, Directorist boasts of this feature which you can avail yourself of in the WordPress admin dashboard right away.
Hope that you’ve already discoverd the process of review and publishing from the attached video on step 9. Let’s recap it and show some additional features.
To review & publish an ad, navigate to Directorist > All Listings > Hover over the Pending Listing > Hit the ‘Publish’ button.

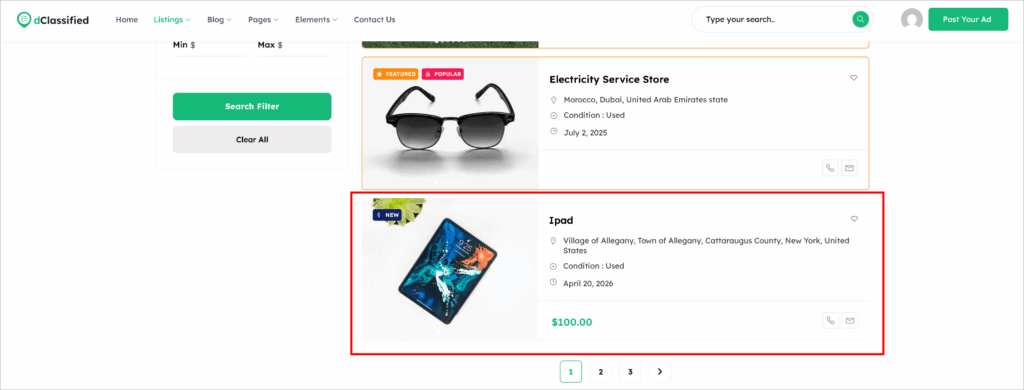
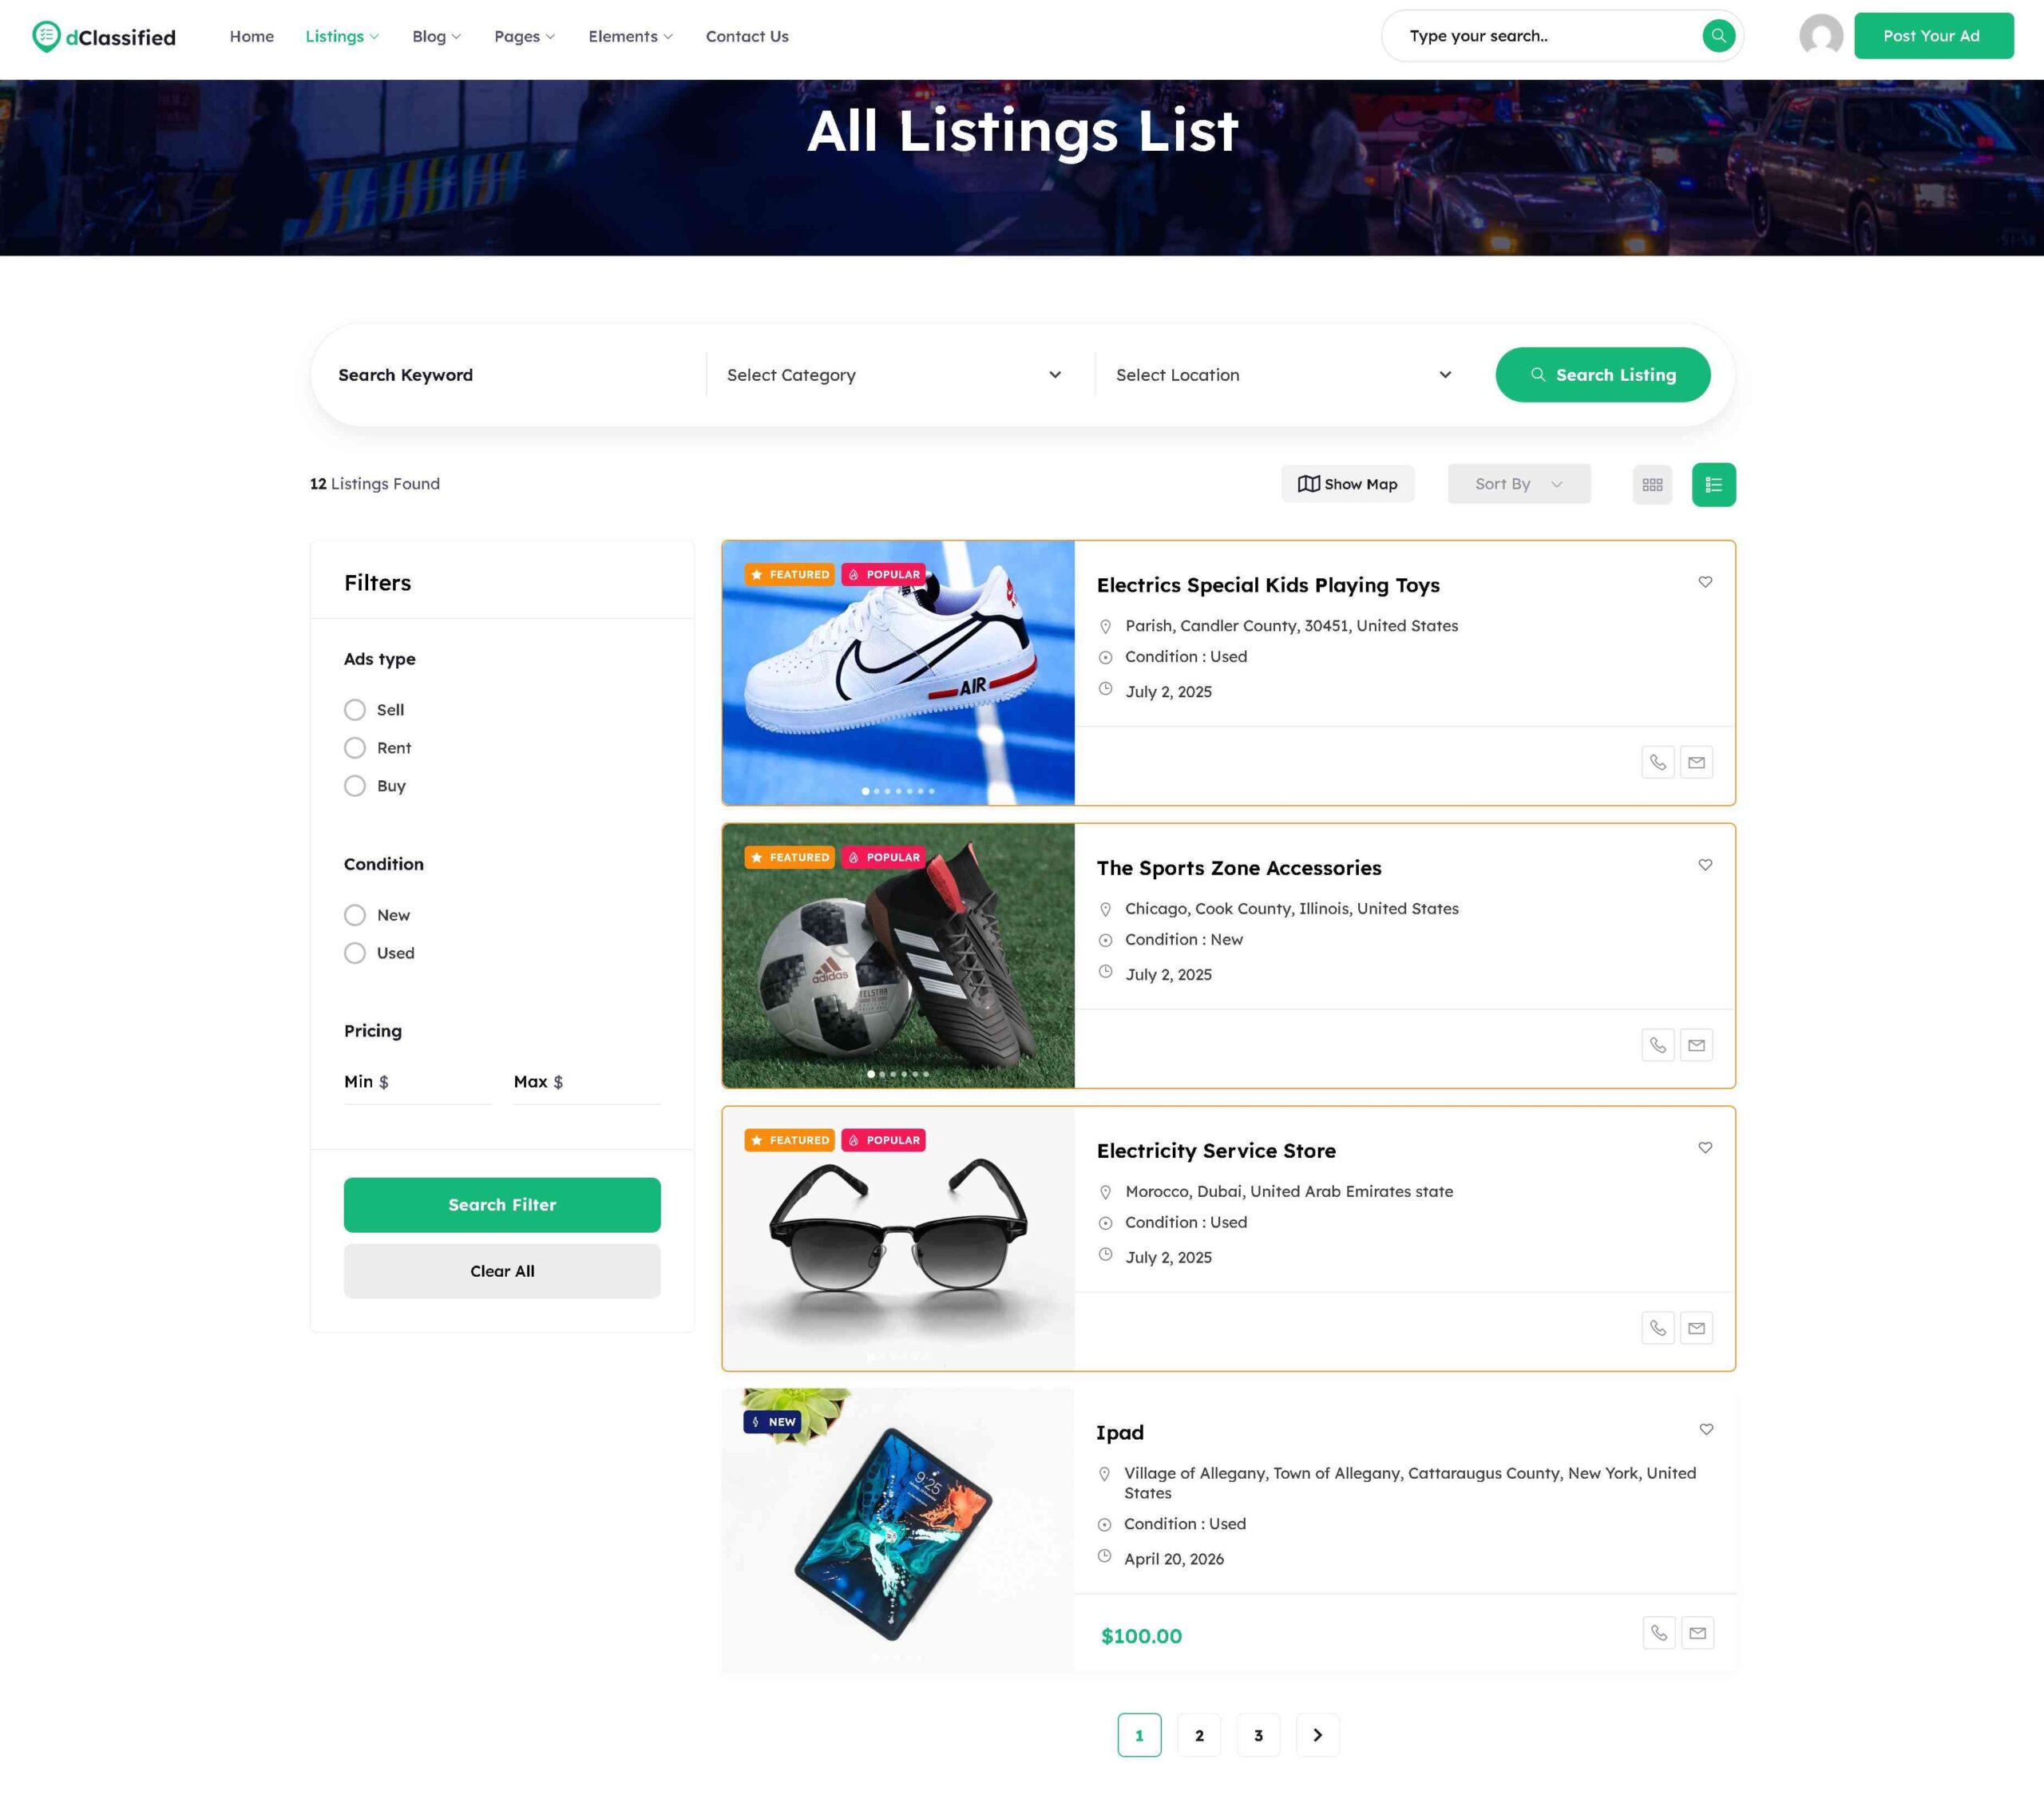
After you publish the listings, they will appear like the below on the All Listings page:
However, you can allow the user to publish the classified ad directly, without review or manual publication, if it is free or not related to any financial transaction. But the submitted listing will neither be published nor featured without review, as an inappropriate listing can ruin your business’s reputation. For that, we recommend predefining the default status to ‘pending‘ in the Directory Builder.
To keep the listing status pending while a user submits an ad, you can go to Directorist > Directory Builder > General > Default listing status > Change to ‘Publish’ from ‘Pending’.
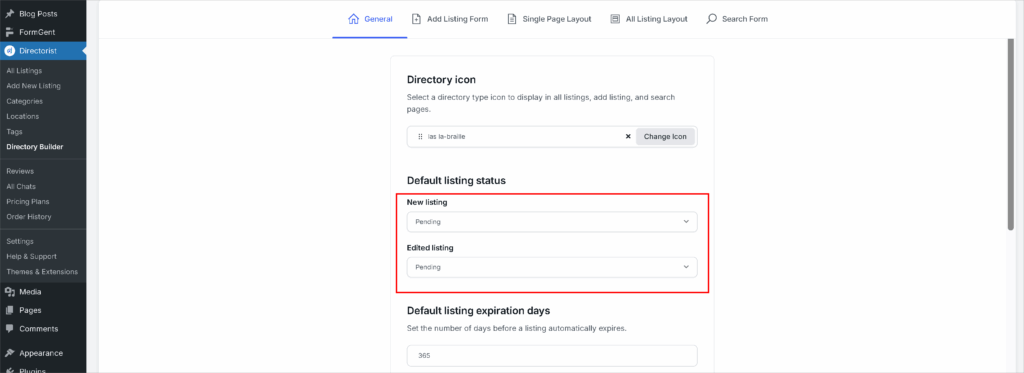
The good news is you can even control an edited listing’s default status. That means you can make an already published listing’s status ‘pending‘ whenever the owner edits it with the “Edited Listing Default Status” option as shown in the above screenshot.
Bonus Tips: Change the Default View of the Classified Ads
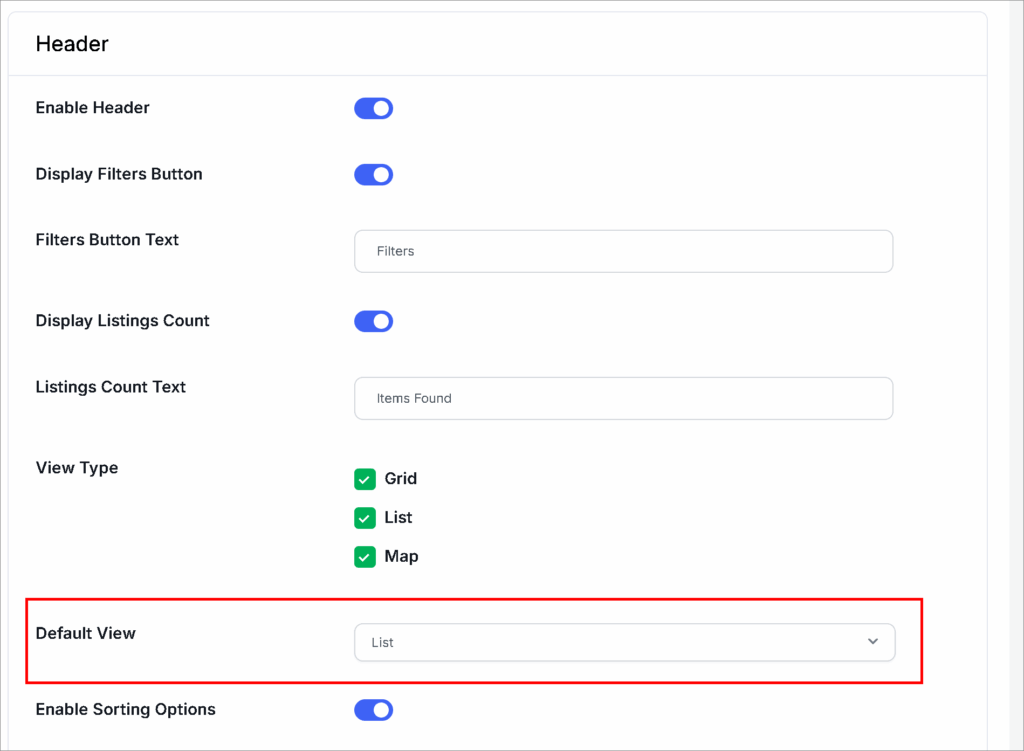
If you don’t like the default grid view of the listings or classified ads, then you can change it to the listing view. You can do it very easily from Directorist > Settings > All Listings > Default View > List.
Note that this setting will be applied globally. To keep the individual view across pages, make sure to adjust the page builder settings.
Now, every time the users visit the default view will be list just like below:
Wrapping up on How to Build a Classifieds Website
That’s all there is to it! We hope this tutorial will help you set up a classified ad site with great efficiency that will save your time, effort, and above all hard-earned money. Once you start to play around with Directorist while creating the website, you will get the hang of it. Finally, don’t hesitate to ask questions in the comment section below so that we can come up with a helping hand.
Frequent Asked Questions
1. What is the best platform to build a classified website in 2026?
For scalability and ease of use, WordPress paired with a dedicated WordPress Classifieds Plugin (like Directorist) remains the top choice.
2. How do I monetize a classified website effectively?
Beyond traditional banner ads, the most effective revenue streams include featured listings, membership subscriptions for power sellers, pay-per-post models, and integrating lead generation forms for high-value categories like real estate or automobiles.
3. How can I protect my classified site from scammers and spam?
To ensure security, implement OTP-based phone verification, use AI-driven moderation tools to flag suspicious keywords, and enable SSL encryption. For payments, always integrate a secure Escrow system to protect both buyers and sellers during transactions.
4.What features are essential for a modern classified platform?
Key features include an advanced search with multi-criteria filters, a user-friendly frontend dashboard, location-based (geolocation) search, an internal messaging system, and a mobile-optimized responsive design to cater to smartphone users.
5. Is it necessary to have a mobile app for my classified business?
While a mobile-responsive website is mandatory for SEO, a dedicated mobile app (Android/iOS) significantly improves user retention through push notifications and a smoother UI, which is crucial for high-engagement platforms like marketplaces.
6. How can I improve the SEO ranking of my classified website?
Focus on Technical SEO by implementing proper FAQ and Product Schema markup. Additionally, optimize for local SEO by using location-specific landing pages and ensure your site has a fast loading time (Core Web Vitals) to rank higher in AI-driven search results.
7. How do I manage thousands of listings without slowing down the site?
Use optimized database indexing and a reliable hosting provider with CDN support. Choosing a lightweight, well-coded plugin or framework is vital to handle large databases of images and text without compromising the user experience.
8. Can I use AI to automate listing descriptions?
Yes, many modern classified plugins now offer AI integration that allows users to generate professional, SEO-optimized descriptions and titles automatically based on a few keywords, saving time and improving content quality.
More helpful resource:
- How to Make Your Classified Site SEO-Friendly?
- How to Promote Classified Ads Websites?
- Classified Ads Listing Business Model: A Comprehensive Guide for Entrepreneurs and Investors
- How to Monetize Classified Websites – 7 Actionable Strategies to Follow
- What Makes a Niche Classified Ads Site Successful?
- The Psychology of Pricing in Classified Ads
- How to Optimize Your Classified Ad for Mobile Users
- How can I Control Spam Ads on a Classifieds Site?
- Best Ways to Increase Classified Site Traffic

Editorial Staff
Directorist Editorial Staff is a team of WordPress geeks that provides quality content for WordPress users. Primarily the team works for all the ingredients needed for establishing a directory listing website in WordPress. Moreover, you will get numerous web content related to the WordPress blog, Digital marketing stuff, social post, text documentation, visual guides, and so on.
Related Articles

1 Comment
Leave a Reply
You must be logged in to post a comment.
Stacy Paul
February 8, 2022Yes it is good article.