The Directory Builder in Directorist lets you fully configure and customize your directory’s structure, forms, and layouts. You can access it from your WordPress dashboard by navigating to Directory Listings > Directory Builder.
3.1. General #
In the General tab, you can set up some essential preferences for your directory:
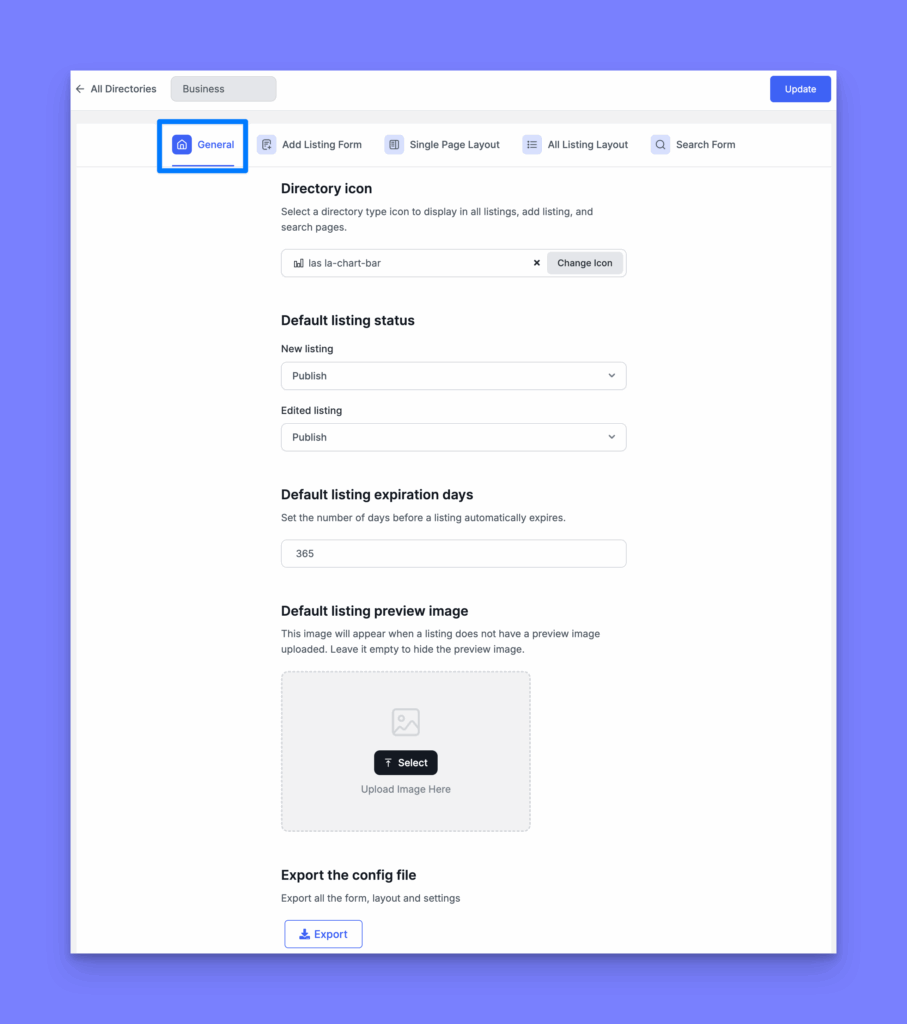
- Directory Icon: Upload or choose an icon that visually represents the directory. This icon is often used in multi-directory interfaces or where directory identifiers are required.
- Default Listing Status: Select the default publication status for newly submitted listings. Options usually include Published, Pending, or Draft.
- Default Listing Expiration Days: Define how long a listing will remain active before expiring automatically. This is useful for keeping your directory up-to-date.
- Default Listing Preview Image: Set a fallback image that will be shown for listings that don’t include any image during submission.
- Export the Config File: Allows you to export the current configuration of the directory (form structure, layout, and field data) as a JSON file. This is helpful for backup or reusing the setup in another directory instance.
3.2. Add Listing Form #
The Add Listing Form tab enables you to build the listing submission form that your users will interact with.
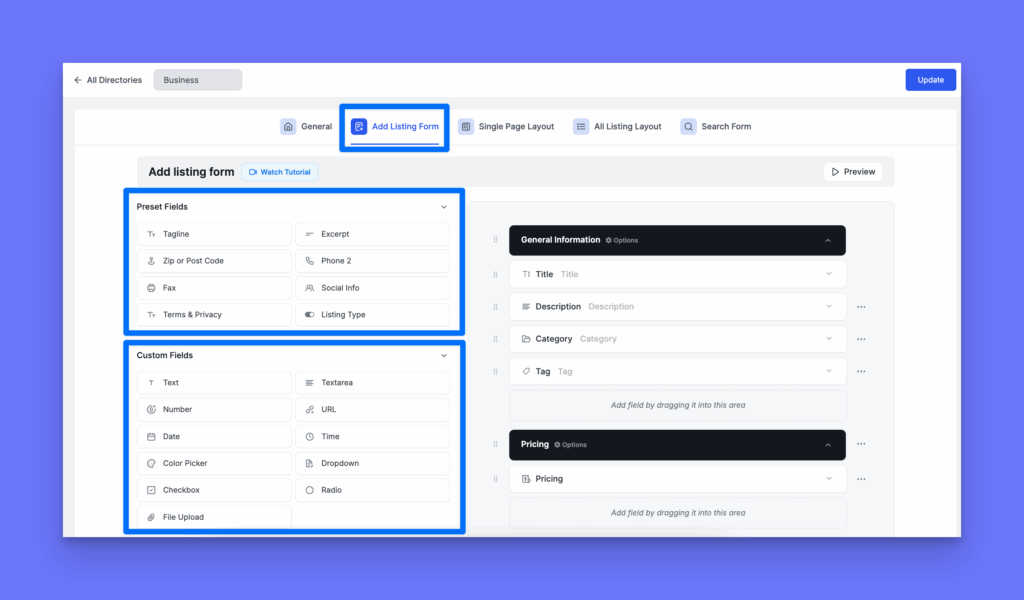
Field Panel (Left Side)
The left side of the Add Listing Form contains all the preset fields and your custom fields.
- Preset Fields: Preset fields are the basic predefined fields that are available by default and can be used only once per form.
- Custom Fields: The custom fields (like Text, Number, Select, Checkbox, etc.) can be used multiple times and are ideal for extended or niche data collection.
Field Settings
To configure an individual field, you need to click on the arrow down (˅)
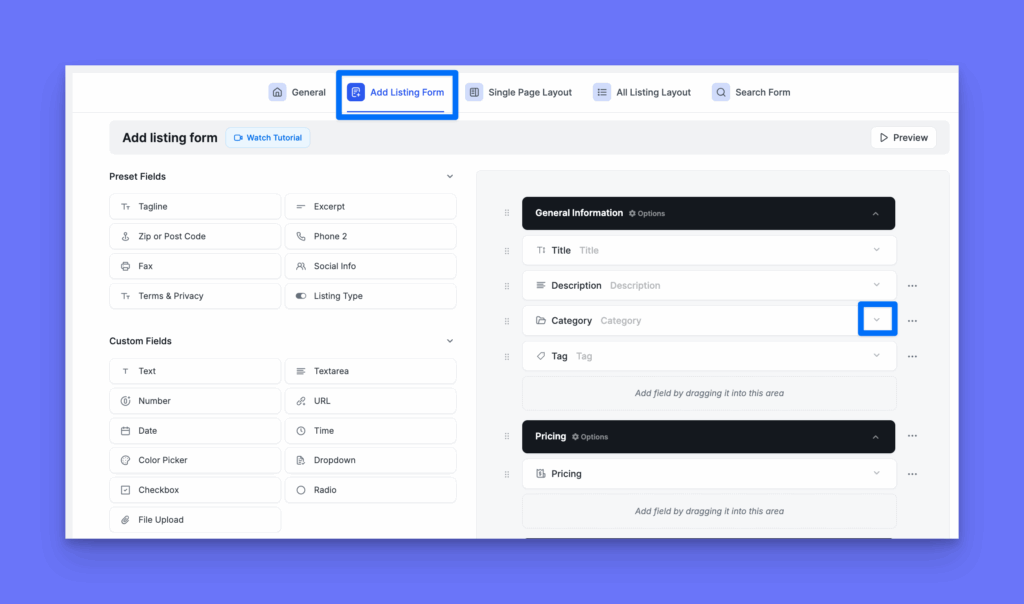
Clicking on the arrow down ˅ will reveal all the relevant field settings, likewise the screenshot below.
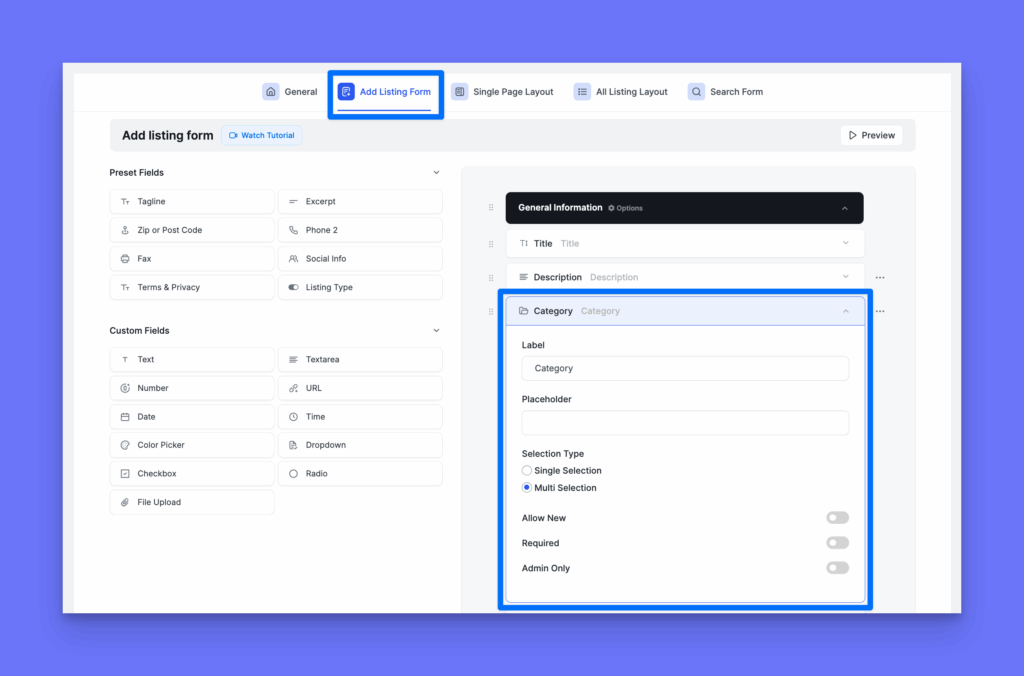
You can define the field label, placeholder text, and adjust additional configurations within the individual field settings.
Form Canvas (Right Side)
- This is where you design the actual structure of the form.
- You can create multiple sections to logically group different sets of fields.
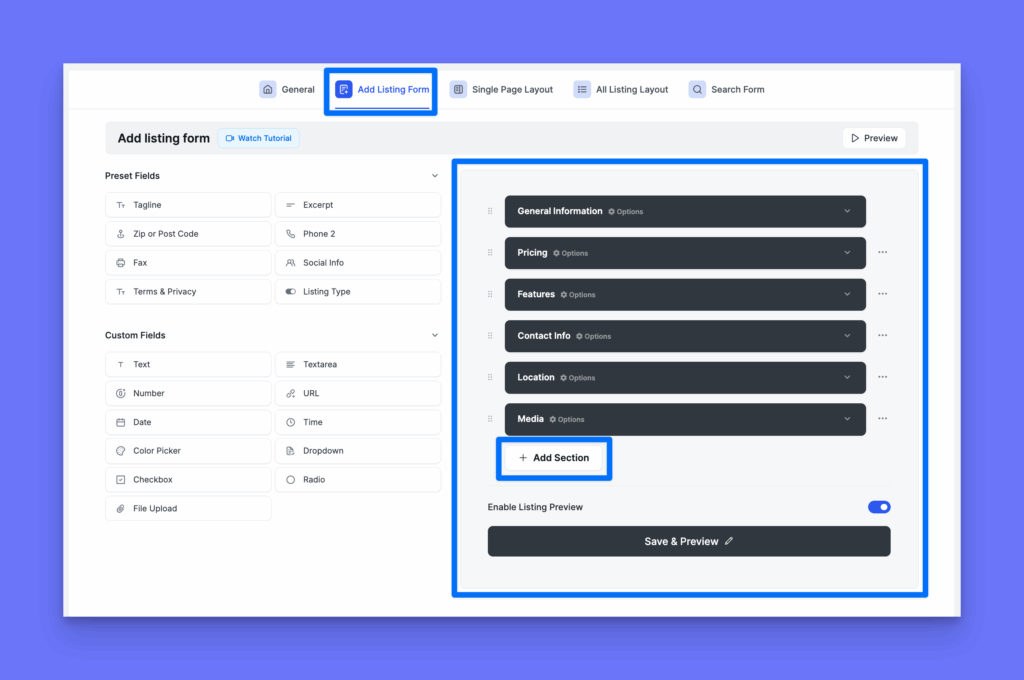
Example Sections:
- Contact Info: Include fields like Email, Phone Number, and Website.
- Location: Group fields like Address, Map, City, and Country.
- Media: Add fields such as Images, Gallery, Video, or File Upload.
Each section acts as a visual block or tab, making the form more organized and easier for users to fill out.
At the bottom of the right-side panel, there is an important toggle:
- Enable Listing Preview: Turn this ON if you want users to be able to preview their listings before submitting them.
3.3. Single Page Layout #
The Single Listing Page is the detailed view of a directory listing that users are taken to when they click on a listing from any archive page—such as All Listings, Search Results, or Category Archives.
This page is enabled by default and displays all relevant information about a listing, including descriptions, media, contact details, and more. However, Directorist gives you full flexibility to customize or even disable the single listing view entirely, turning your directory into a simple catalog-style display if needed.
The Single Page Layout settings allow you to control how this page looks and what elements are shown—ranging from the header image and title placement to badges, filters, and custom content areas. Whether you want a sleek, minimalist layout or a feature-rich detailed page, this section helps you configure the perfect presentation for your listings.
There are three main parts to configure:
- Listing Header – Customize the top section, including title, images, and action buttons.
- Contents – Manage the layout and order of listing details like description, tags, media, and custom fields.
- Custom Single Listing Page (optional) – To replace the default layout with a custom-designed page using shortcodes or page builders.
3.3.1. Listing Header #
The Listing Header section lets you design the topmost portion of the single listing page. It gives you full control over what appears visually before users scroll into the main content.
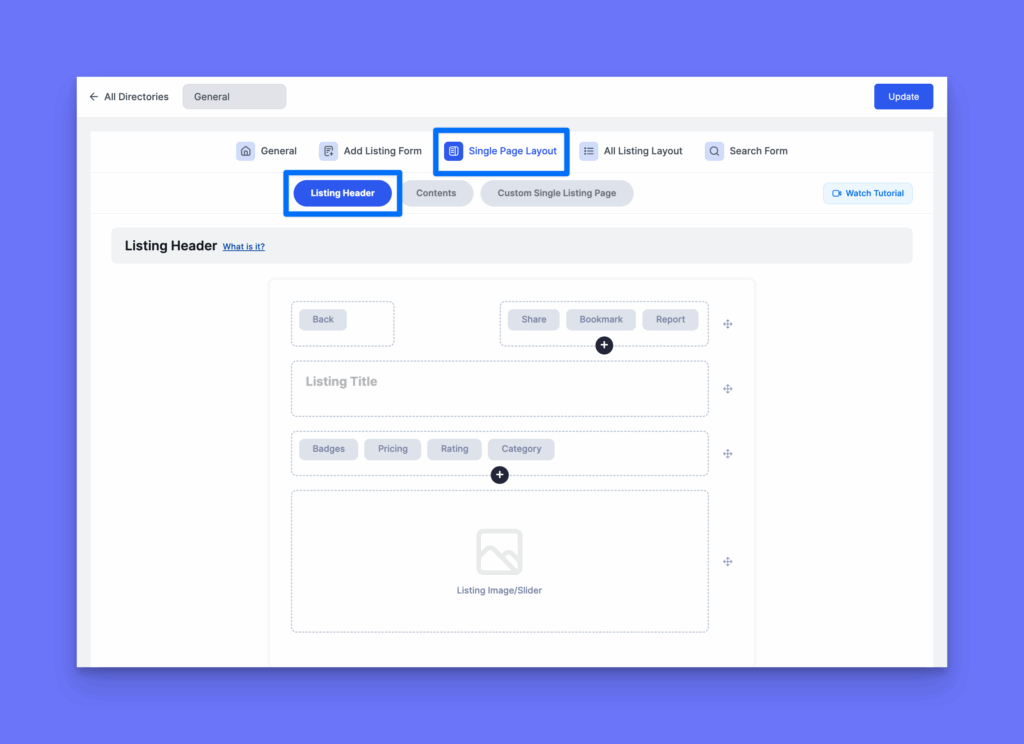
You can:
- Enable or disable the image/slider.
- Reorder elements like the Title, Subtitle (Tagline).
- Choose whether header content appears on top of the image or below the image.
- Add filters and metadata fields such as Category, Pricing, Ratings, Badges, and Location.
- Top Left Area: Optionally enable a Back button.
- Top Right Area: Add buttons like Share, Bookmark, or Report Listing.
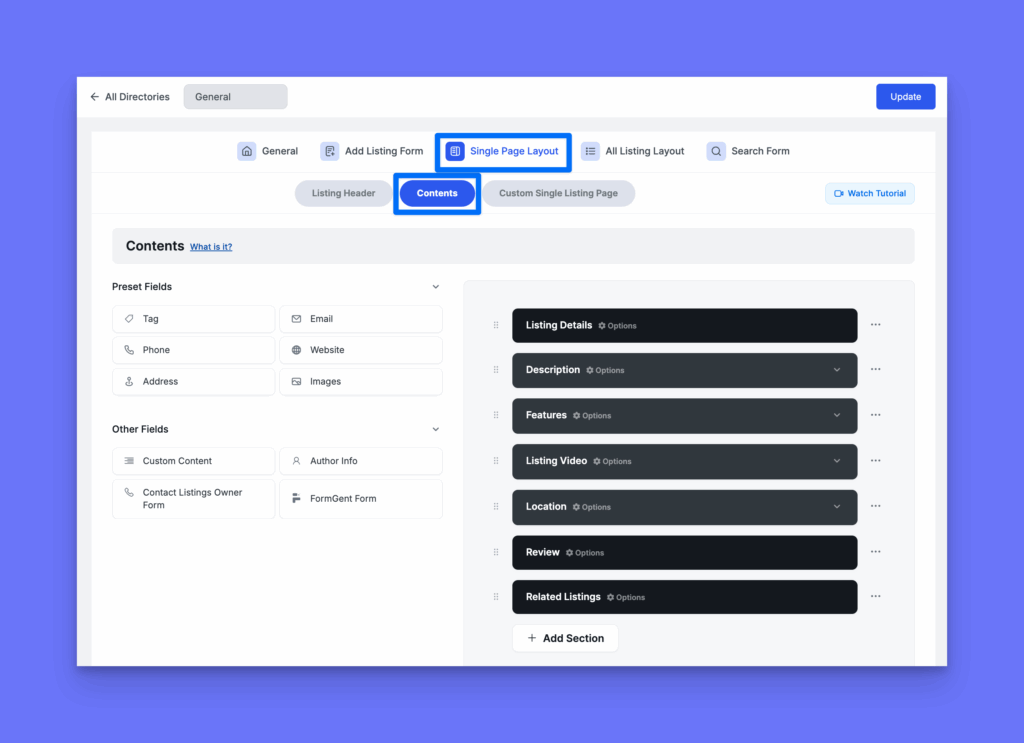
3.3.2. Contents #
The Contents tab lets you design the main area of the single listing detail page, where all the key information about a listing is shown.
Using this tab, you can easily reorder, add, remove, or modify sections using the visual builder. All the fields you created in the Add Listing Form will appear here. Simply drag fields from the left panel and drop them into the layout area on the right to customize how your listing details are displayed.