

Overview #
The Claim Listing feature is a powerful tool that allows business owners to claim ownership of their listings, granting them full control and management rights. Once a claim is approved, the listing will display a Claimed Badge, signifying verified ownership. This feature also offers an opportunity for directory website owners to generate revenue by offering claimable listings as a paid service. Setting up and configuring the Directorist Claim Listing add-on is straightforward. Follow this detailed guide to understand every aspect of its setup, functionality, and management.
Key Features #
- You can let users claim an existing listing either for free, a default fixed fee or a pricing plan (required the Pricing Plan/WooCommerce Pricing Plan extension).
- You/Admin can moderate all claims for listings very easily using a simple interface. For example, you can approve/reject, even delete any listing claim from the dashboard very easily.
- Any users can claim for a listing.
- You can enable/disable sending email notifications to the admin and the claimer when a claim is made, approved or rejected.
- Dynamic Email Notification Templates and you can customize the email templates very easily from the dashboard.
- You can charge a user using a default fixed price.
- You can charge a user using a pricing plan (the Pricing Plan add-on required).
- It is fully compatible with the WooCommerce Pricing Plan.
- It is compatible with many gateways including PayPal, Stripe, Offline Bank Payment etc. You can charge business owners using as many gateways as WooCommerce supports with the Directorist WooCommerce Pricing add-on.
Installation & Configuration #
- Navigate to Directory Listings > Themes & Extensions
- Find “Claim Listing” and click Install and then Activate.
- Navigate to Directory Listings > Settings > Extensions > Extension General
Settings Reference
| Setting | What it controls | Notes |
| Claim Widget Title | This is the main title of the Claim | Example: “Is this your business?”. |
| Description | Text shown for Claim description. | Example: “Closed Now”. |
| Method of Charging | Is it free or paid to Claim? | Action: “Dropdown” |
| Claim Fee in USD | Set a claim fee in a number. | Number input field. |
| Claim Now Button | Text shown for Claim Button. | Button text |
| Allow Claim on Admin Listings Only | Enable this to limit claiming to admin-created listings only. | Action “Toggle” |
| Display Claimed Badge | Timezone used for time calculations and badges. | Action “Toggle” |
| Verified Text | Text shown after Claim a listing. | Text input field. |
A brief explanation of the above settings.
- Claim Widget Title: This controls how the title will appear in the claim listing widget. (see the image below)
- Description: This controls the description of the claim listing widget.
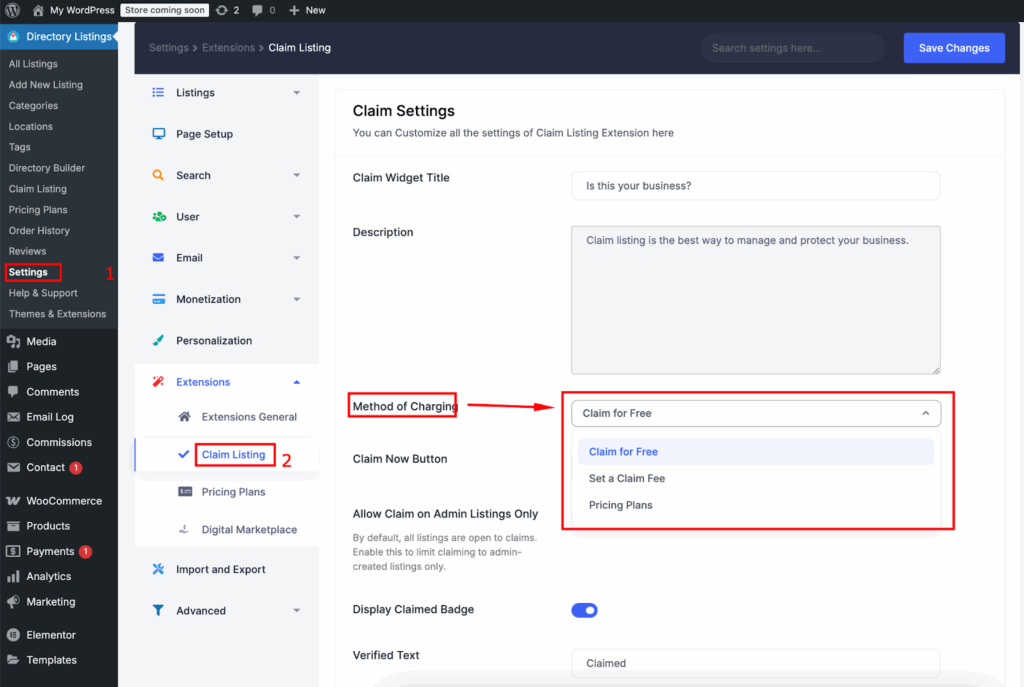
- Method of Charging: This is probably the most important control of claim listing. This control lets you set the global method of charging a claimer of a listing. What it means is that, you can also set the method of charging a claimer on each listing edit screen and if you do not set the method of charging for a claim on each listing, then this setting will be used, this is why it is called global charging method of a claim.
- Claim Now Button: Customize the text of the claim button using this option.
- Display Claim Now Button on Listing Details: Admin can show Claim Now button in single listing by using this option.(Default is Disable)
- Display Claimed Badge: If you set this option to ‘Yes’ then a badge will be displayed beside the listing title. It is useful because it distinguishes between claimed/verified listings and unclaimed/unverified listings.(see the image below)
- Verified Text: You can customize the text for the claimed badge using this option. For example: claimed or verified etc. It depends on the “Display Claimed Badge” option. (see the image below)

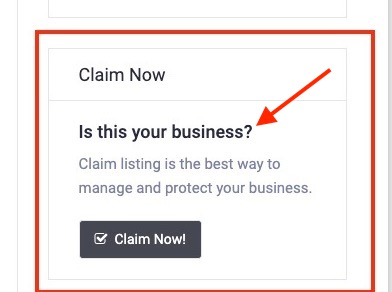
Image: Claim Listing Widget
Popular feature: There are 3 options for this option “Method of Charging”.
- Claim for Free: This is free to claim a listing.
- Set a Claim fee: Admin can set a claim fee here.
- Pricing Plan: A flexible pricing option is available with our plans. To know more about Directorist – Pricing Plan, you can visit here.
Permalinks & Default Pages
You need to refresh permalinks after activating the directorist claim listing add-on and make sure all the required pages are correctly set.
Refreshing Permalinks
It is important to refresh the permalink settings after installing claim listings add-on. Refreshing permalink is very easy. You just need to go to WordPress Dashboard > Settings > Permalinks and hit the save changes button. You may choose a permalink like Post Name but it is not required. Just opening the page and saving the existing options will do the trick.
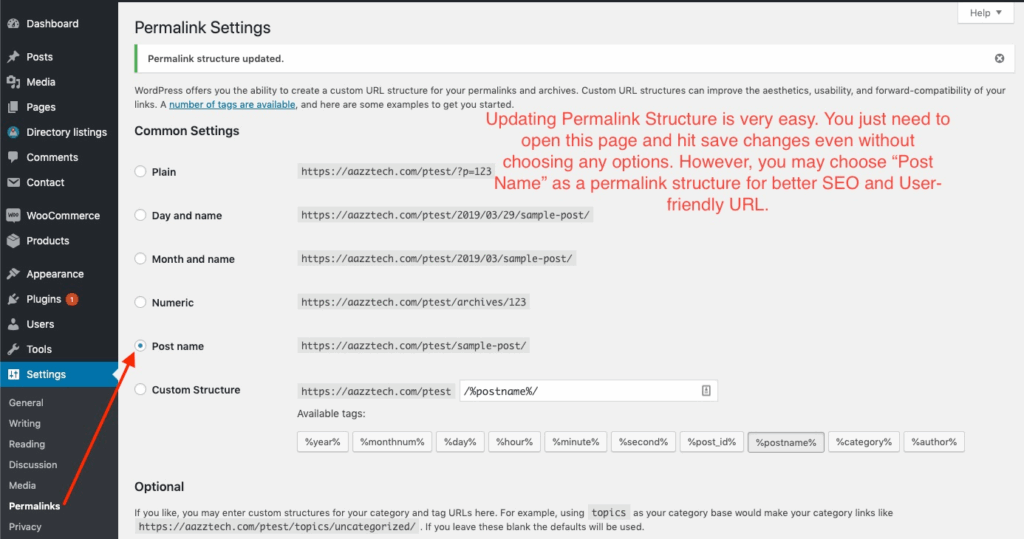
Image: Refreshing Permalink
Setting up required pages
Directorist plugin and the claim listing add-on uses different pages with some specific shortcodes to function properly. You need to make sure all the pages are set properly in the settings. The directorist plugin and this add-on should create all the required pages automatically for you and you just need to assign them to the settings if they are not already assigned. However, if the page is not created/you have deleted before, then do not worry. You can create those pages manually and put the shortcode inside each page. All required shortcodes and other information are clearly mentioned in the settings page. Please go to Directory Settings > Pages, Links & Views Page. And make sure the following pages are set properly. You need to assign those pages for charging your users/business owners for claiming a listing.
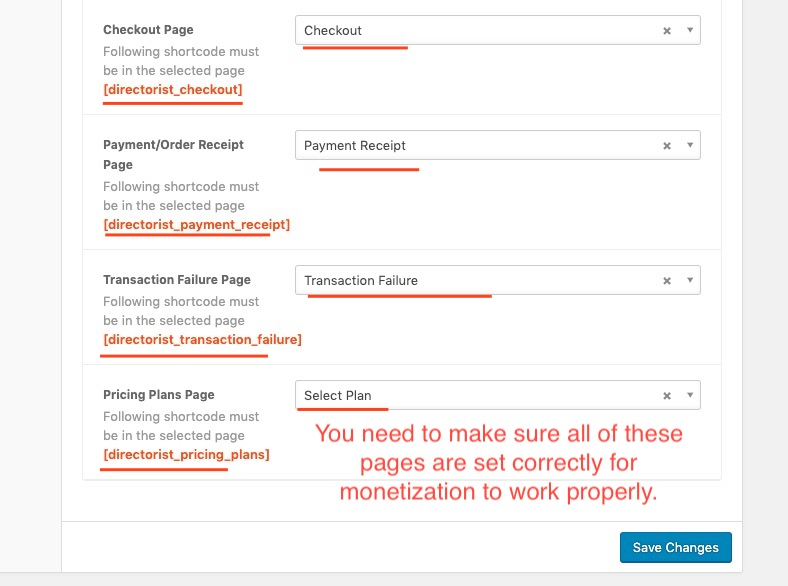
- A page with the content [directorist_checkout] should be assigned to the Checkout Page option. Claim listing will show checkout information using this page.
- A page with the content [directorist_payment_receipt] should be assigned to the Payment/Order Receipt Page option. Claim listing will show Order Receipt to the user using this page.
- A page with the content [directorist_transaction_failure] should be assigned to the Transaction Failure Page option. Claim listing will show transaction failure message to the user using this page.
- A page with the content [directorist_pricing_plans] should be assigned to the Pricing Plans Page option. Claim listing will show pricing plans to the user using this page during making a claim. (You need to have either directorist pricing plan/directorist WooCommerce pricing plan add-on installed for this option to work). If you use fixed fee for the listing claim, then you do not need to use this option.
Monetization & Gateways #
Monetization
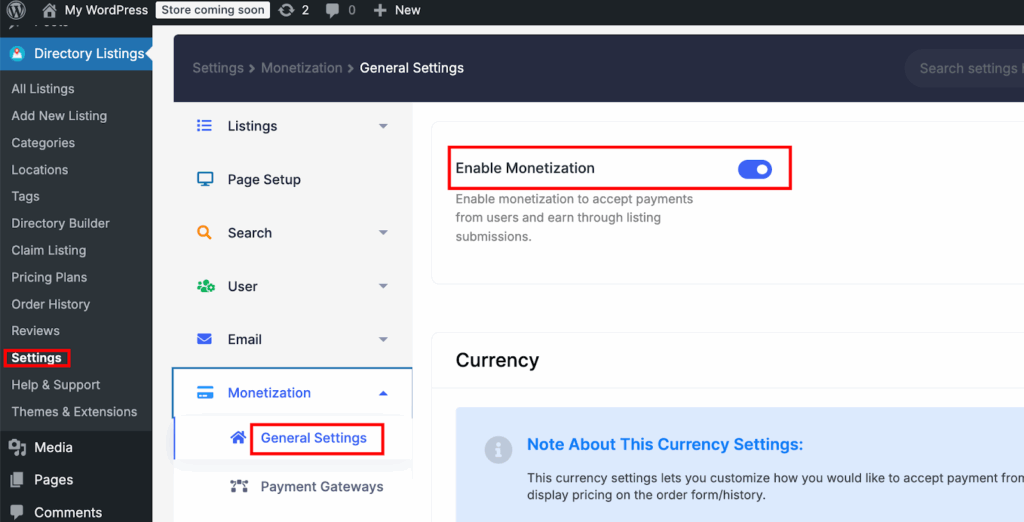
A claim for a listing can be either for free or paid. In order to enable paid listing and pricing plan etc. to work, you need to enable monetization first. Go to Directory Settings > Monetization Settings and Set ‘Enable Monetization Feature’ to Yes.
Payment Gateways
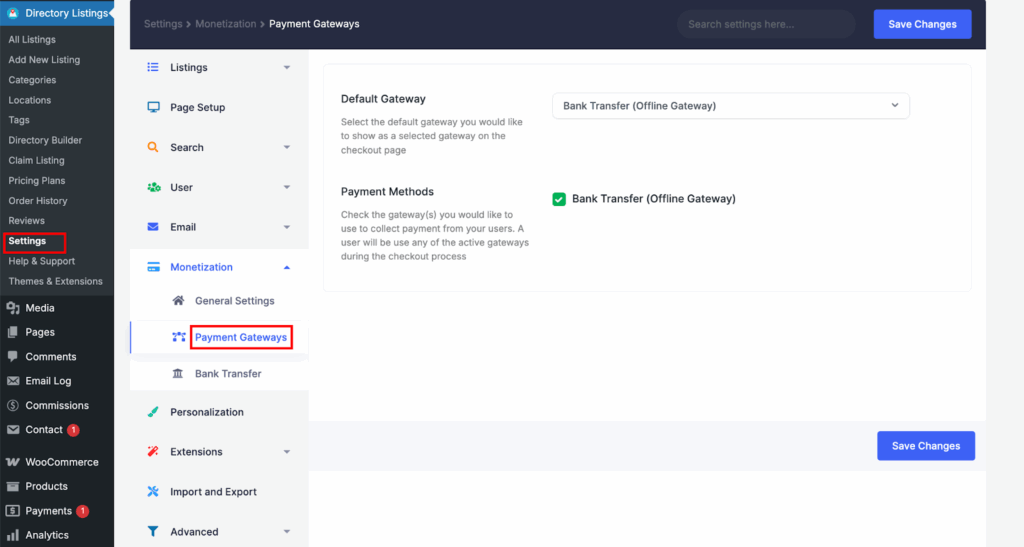
You need to set up at least one gateway to process payments from your user. Directorist Claim listing add-on is compatible with all payment gateways that the Directorist plugin supports. You can process payments using an offline gateway like bank transfer or an online gateway like PayPal* or Stripe*. You can also use multiple payment gateways on your site simultaneously. Go to Directory Settings > Monetization Settings > Gateways Settings and customize the settings according to your need. All settings have detailed descriptions. Please see the screenshot and the description of each gateway settings below. To know the details settings of PayPal and Stripe Gateways, please check out their documentation.
(PayPal Documentation & Stripe Documentation)
Display of Claim Listing #
Directorist Claim Listing will create a widget called Directorist – Claim Listings for displaying information about claim listings. Follow the steps to display the claim listing.
- Go to Appearance > Widgets.
- Drag and drop the Directorist – Claim Listing widget to the “Listing Righ
- Sidebar” area.
- Visit a listing and you will see a claim listing widget has been placed.
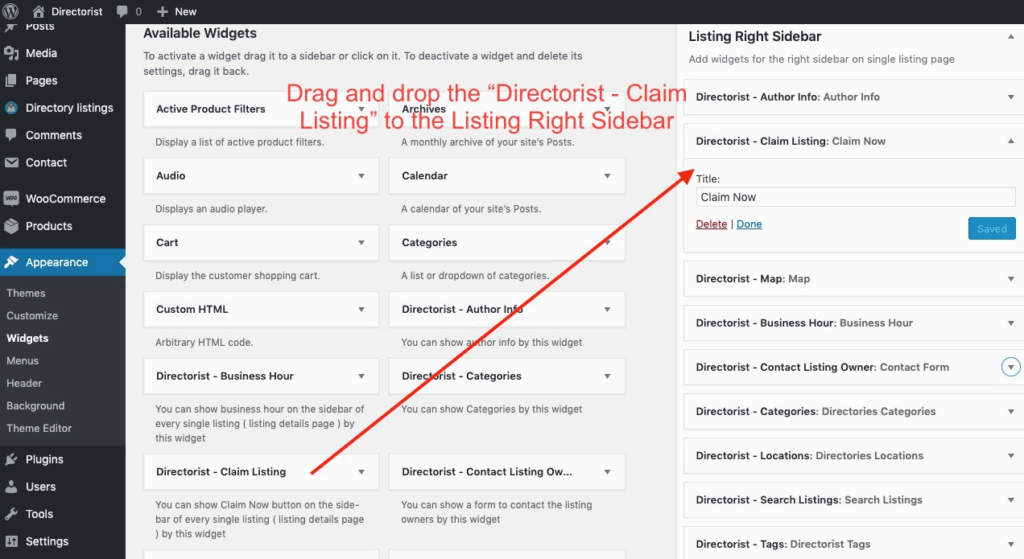
Adding Claim Listing Widget (Click on the image to view it in full size )
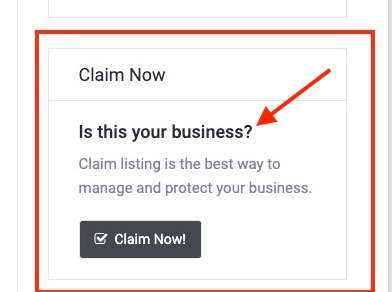
Claim Listing Widget: Business Owner will be able to claim the ownership of a listing/business by clicking the ‘claim now’ button. A nice form will show in a pop-up modal when a user clicks on the claim now button. Optionally, you can test the claim listing functionality by clicking the ‘claim now’ button.
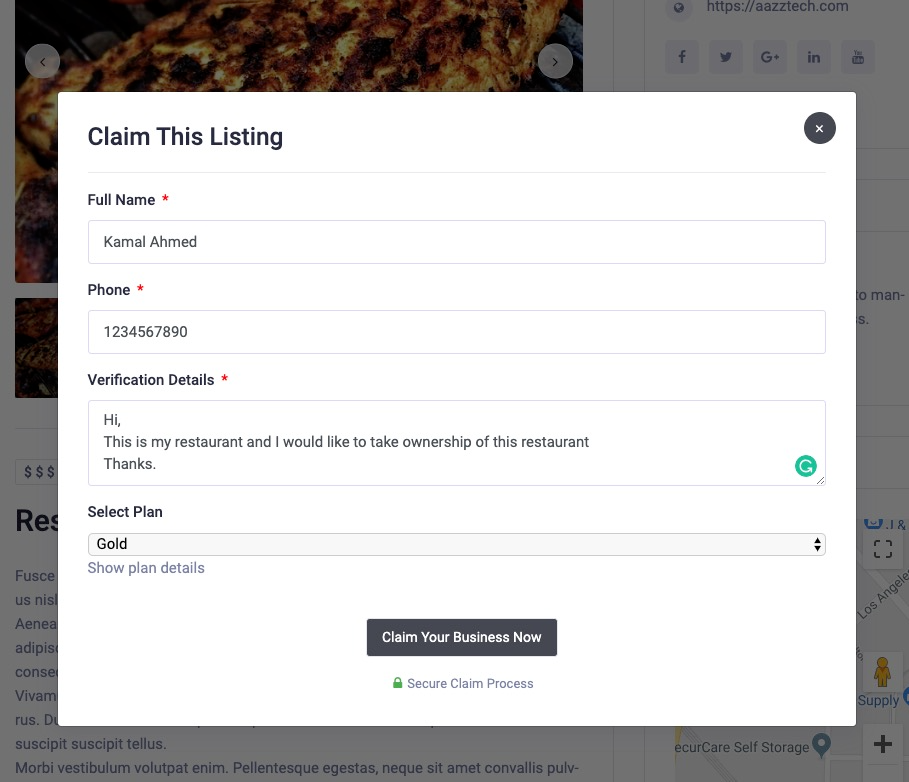
Claim Modal Form on front-end user will be required to fill up all the fields in the claim form. if you have assigned a pricing plan as a method of charge for a claim for this listing then business owner will be able to choose a plan before claiming his business. The next step is to moderate the claims received from a business owner.
Moderating Claims #
You can moderate claims very easily from a simple user interface. You will see all the claims received from different business owners on the Directory Listings > Claim Listings page.
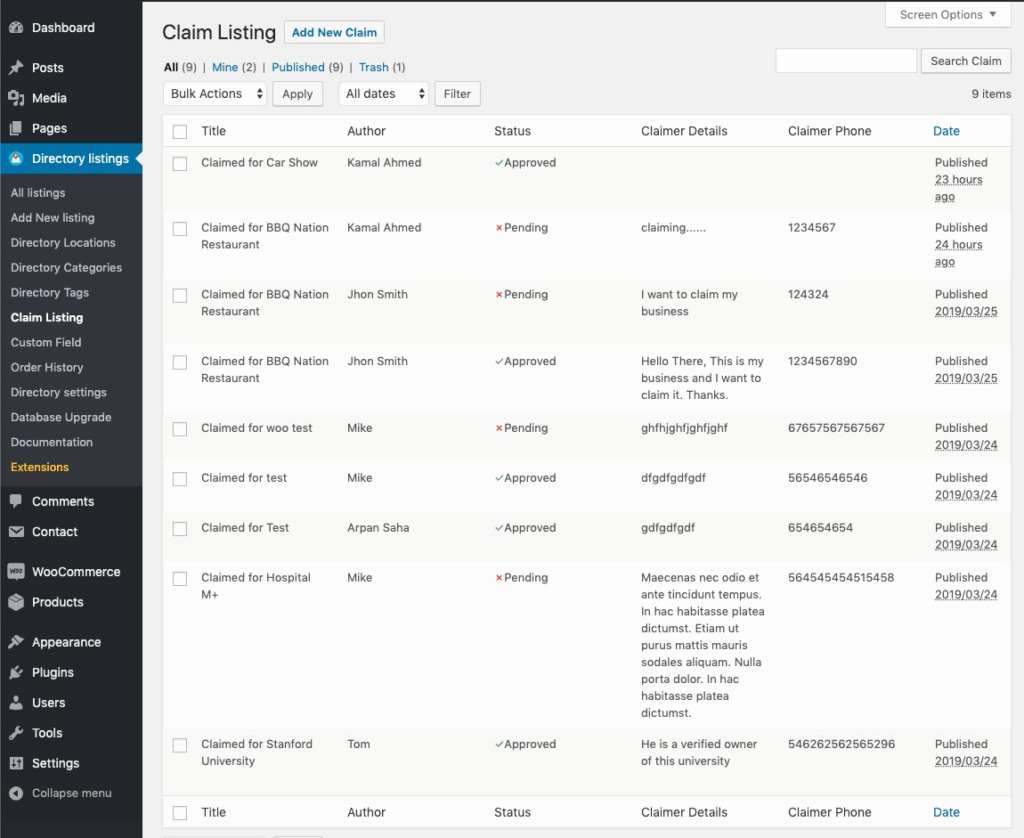
Claim Status:
There are three statuses in claim listings:
- Approved
- Pending
- Declined
- Approved: When you have verified a user and received payments, you should set the claim status to approved. An approved claim will add a nice badge to the claimed listing/business. You can also modify the claimed badge text from the claim listing extension’s settings page. Here is what happens when you approve a claim.
A) Claimer of the listing will be the new owner of the listing. He will be able to modify the information of the listing.
B) No one can claim this listing again once its claim from an owner is approved. Claim Listing widget for this listing will be hidden. C) A nice badge will be displayed beside the title of the claimed listing. The text of the badge is customizable. This will distinguish between claimed and unclaimed listings. - Pending: When a new claim is made, it will have a pending status. It means the admin has not reviewed the claim yet.
- Declined: When an admin does not approve a claim, he/she will reject that claim and it will have a declined status.
Moderating a claim:
Go to Directory Listings > Claim Listings and hover on any claim and click on the edit link. You will see the edit claim page like below.
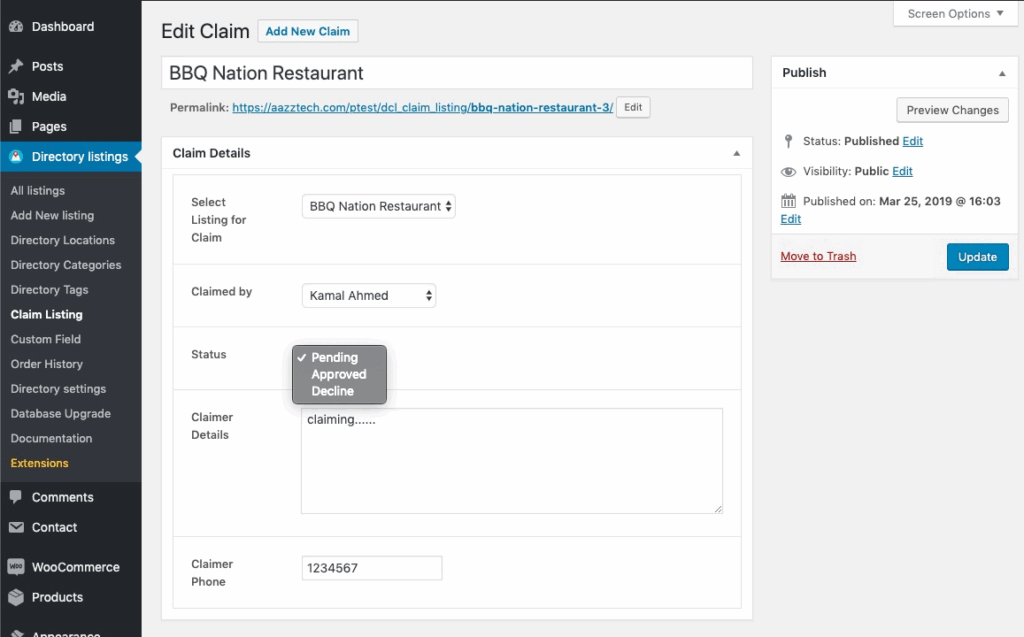
Claim View or Moderation UI Review the claim details and choose a listing status eg. approved or decline and update the claim. Both admin and claimer will get a notification of the claim’s status via email. If you approve the claim, claimer will be the new owner of the listing and a new badge will be added to the listing. See the images below for some visual ideas how claim status works and how it affects a listing. Before a claim is approved for the following listing.
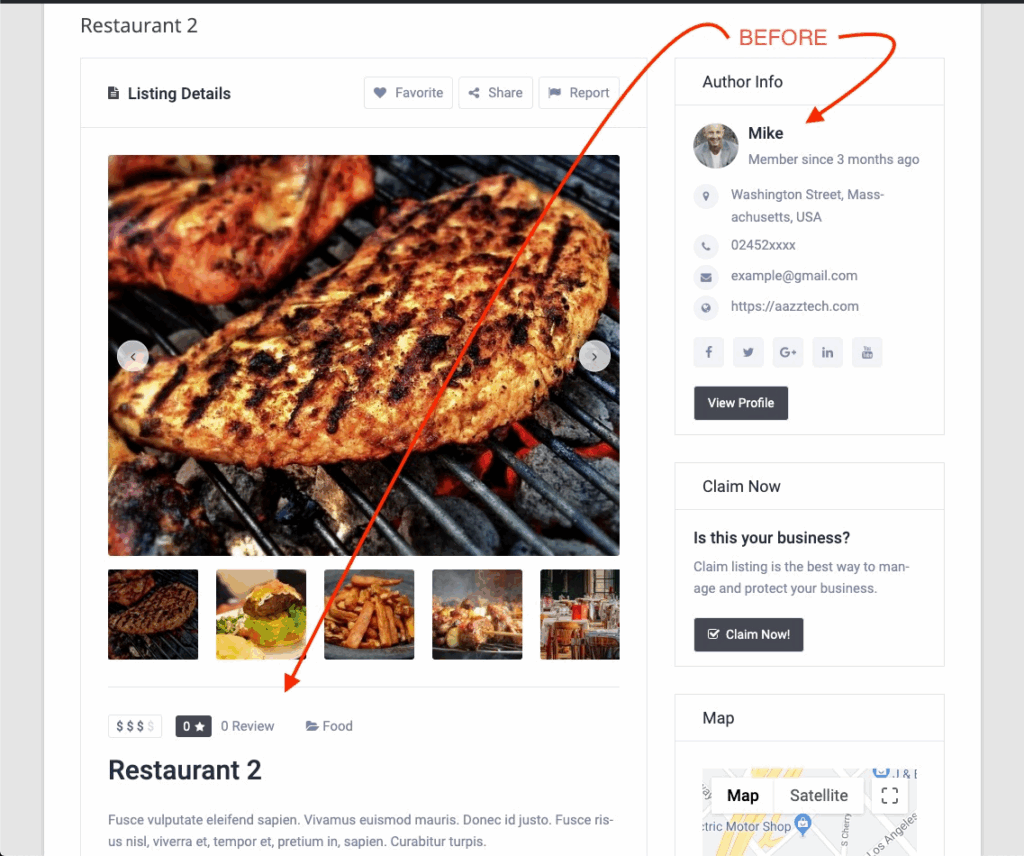
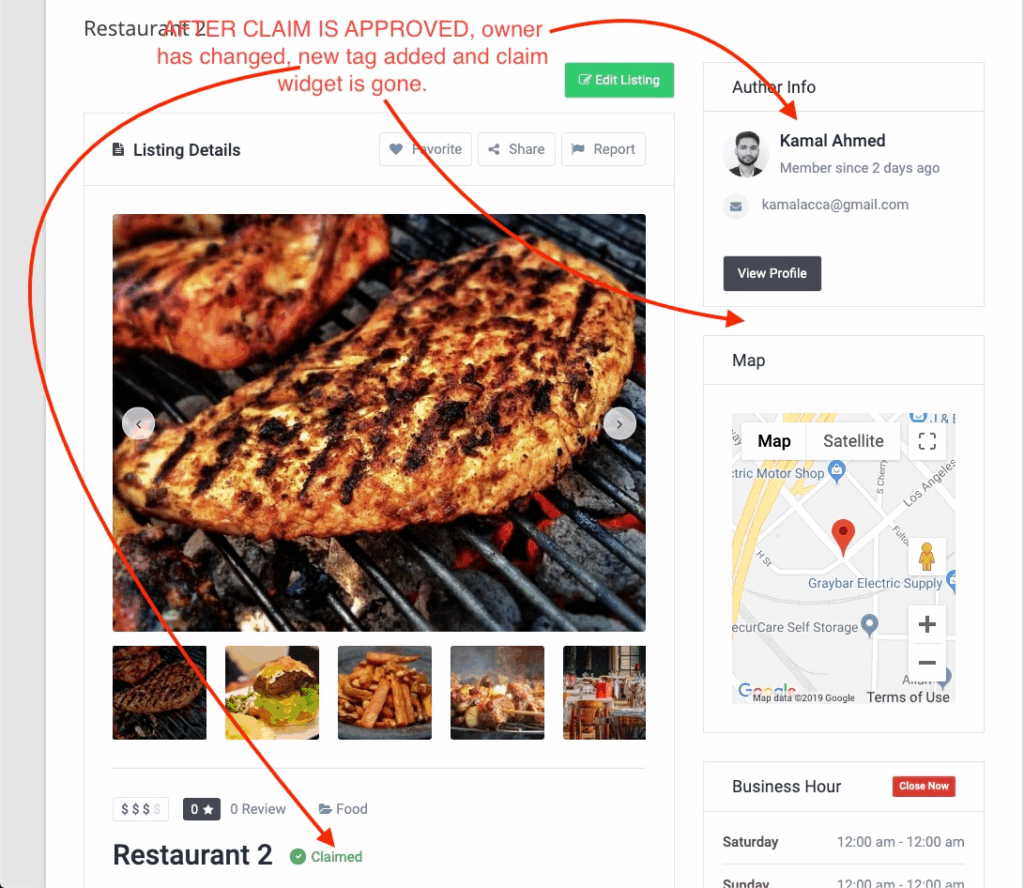
After a claim is made and approved owner changes, new badge is added and claim widget disappears.
Notification Settings #
When a claim is made or a claim status changes, both the admin and the claimer receive notifications. You can edit those notifications very easily. Please go to Directory Settings > Email Settings. You can customize the general settings of email notification under the “Email General” tab.
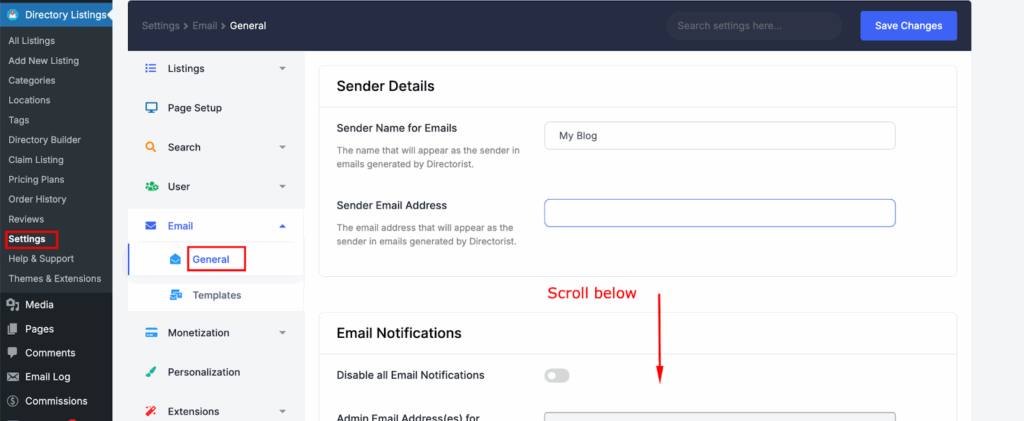
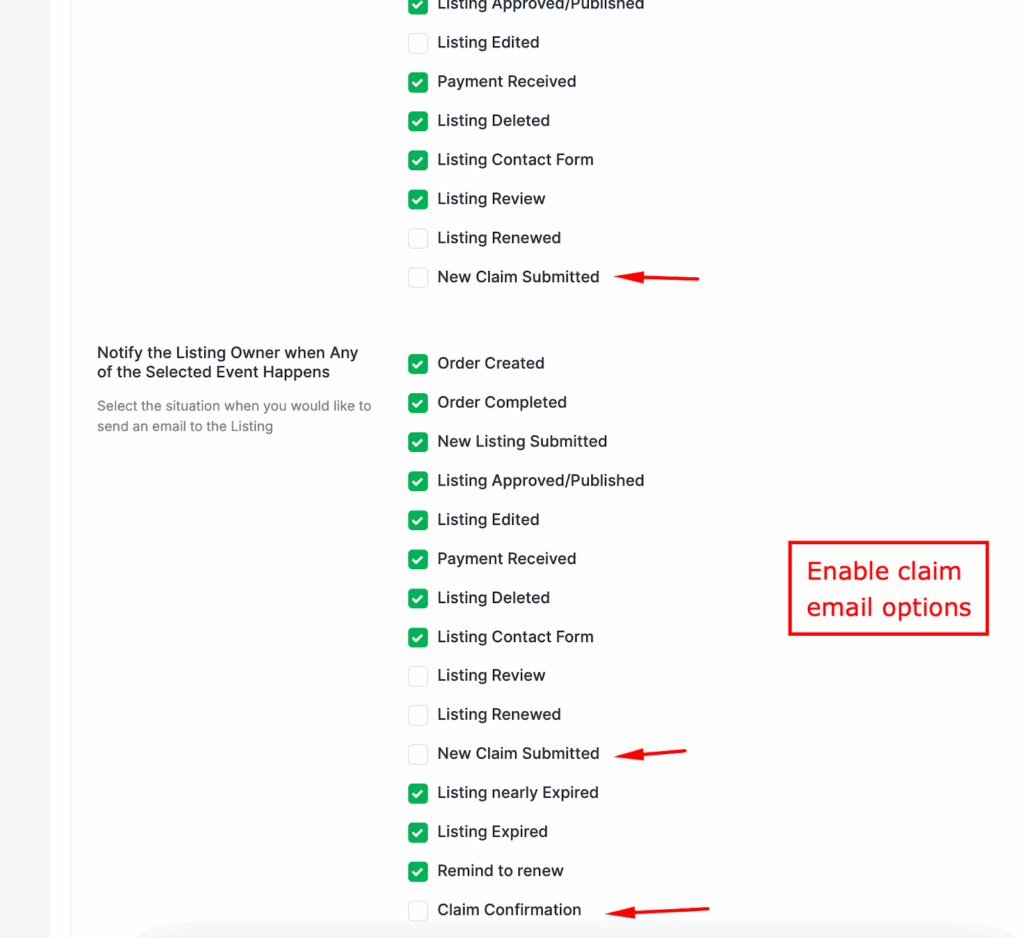
Image: Email General setting
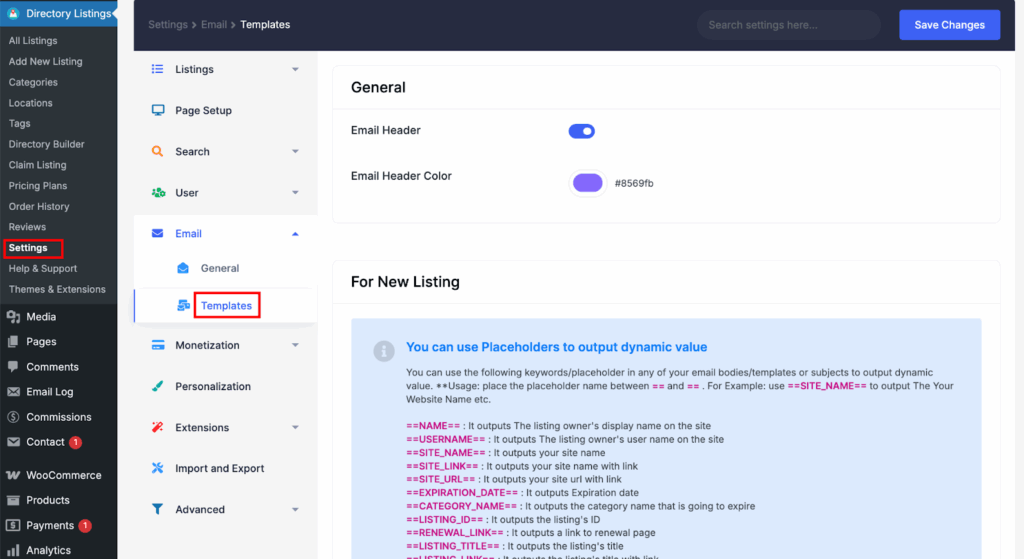
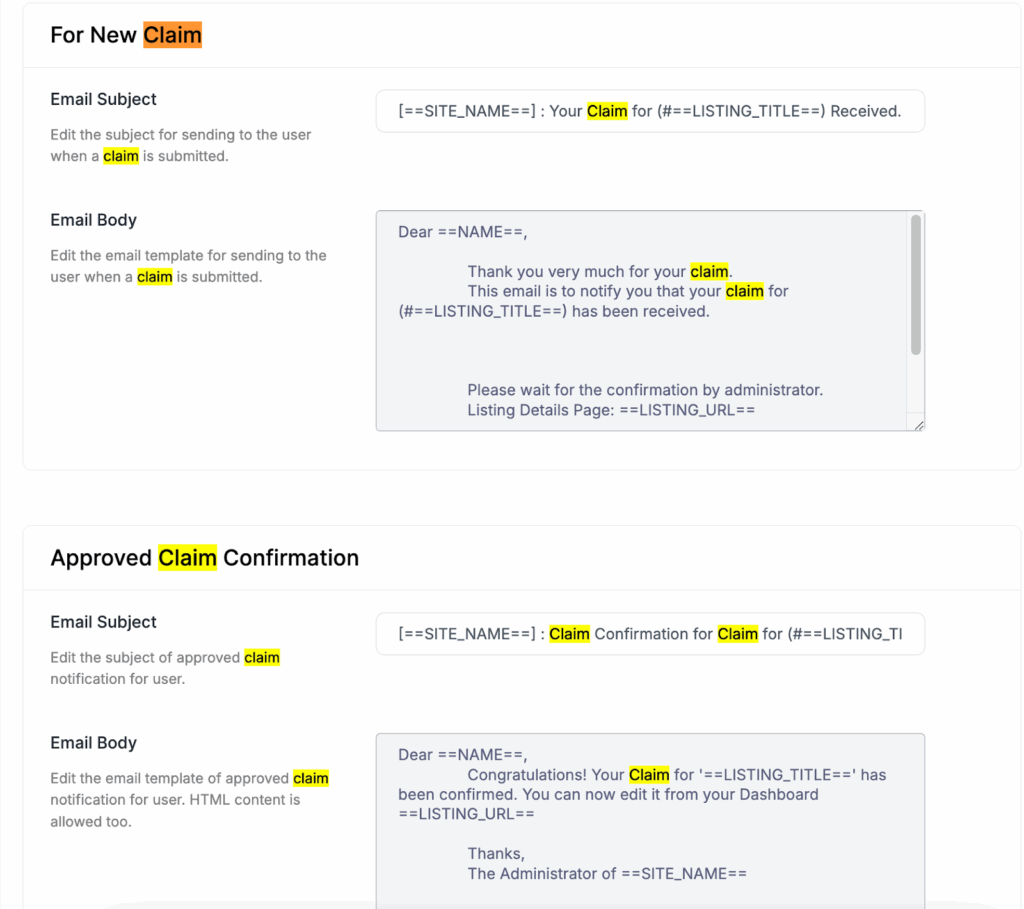
You can customize the message of all notifications under the “Email Templates” tab. You can customize notifications for a new claim, an approved claim, and a declined claim under the Email Templates. See the screenshot below.
Know more about Email Template customization:


