 Up to 35% Off!

After activating the Pricing Plans extension, you must complete a migration process before using the new system. Follow the easy steps for migrating.
Setting Up Pricing Plans for the First Time #
When you activate the Pricing Plans extension for the first time, Directorist will prompt you to assign a pricing plan to each directory type on your site before you can proceed.
You will see the following notice on your dashboard:
Directorist Notice: There are [X] directory types that need plan assignment. Assign them now?
Follow the steps below to complete the setup.
Step 1 — Open the Plan Assignment Window

Click the Assign Plans button in the notice. A pop-up window will appear listing all the directory types currently on your site.
When the pricing plan is activated it checks if there are any published listings which do not belong to any plan. Ex: Listing 1 is published but it’s not assigned to any plan. In this case Pricing Plans lets site admin to assign plans to those orphan listings.
Pricing Plans lets you assign plans directory wise, so if “Listing 1” is from “General” directory then admin will assign plan for the “General” directory.
If admin select order status to be paid then the user will not have to pay for the plan, the plan will be automatically activated for the user. Otherwise users have to pay for the order. Users will find the pending order from the “Order History” menu in the User Dashboard.
Step 2 — Select a Pricing Plan
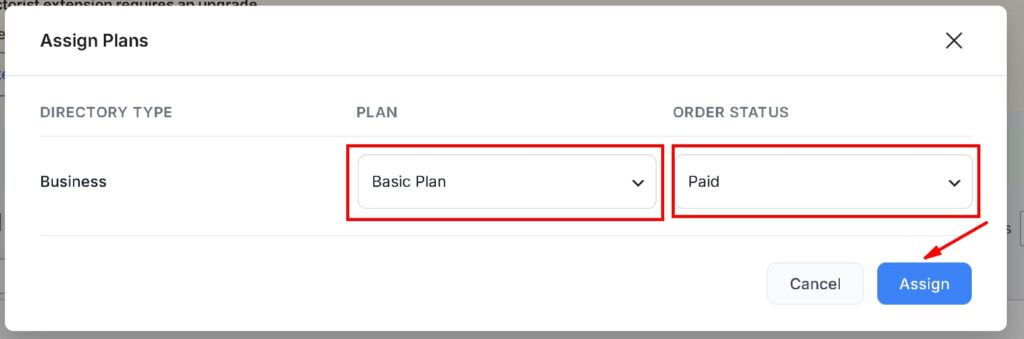
For each directory type, choose a pricing plan from the available options. For example, you can select the Basic Plan if you are just getting started.
Step 3 — Set the Order Status
After selecting a plan, set the Order Status for that directory. For example, set it to Paid if the plan requires a payment.
Step 4 — Confirm the Assignment

Once you have configured all directory types, click the Assign button to save and apply your selections.
Your initial setup is now complete. You can return to the Pricing Plan settings at any time to create new plans or make changes to existing ones.
Setting Up Pricing Plans for the Existing Users #
If your site already has existing pricing plans, orders, user packages, demo data, or listings imported via the Directorist Listing Importer, you will see a different notice like “Directorist Pricing Plan: Old pricing plan data needs to be migrated to the new format.”
Click the Migrate Now button.

Directorist will automatically handle the migration.

Once complete, you will see a confirmation message.
If you run into any issues during migration, reach out to the Directorist support team for assistance.


