

Introduction
The Directorist Stripe Payment Gateway extension allows you to Elevate your directory website with the seamless integration of the Stripe payment gateway, allowing you to accept online payments with utmost convenience and security. With a wide array of features, such as support for over 135+ currencies worldwide, 3D Secure payments, low transaction fees, and even recurring payment options, you can rest assured that your users will experience a smooth and trustworthy payment process. Embrace this incredible extension and offer your users a truly exceptional payment solution for their needs.
Setting Up the Stripe Payment Gateway
Step 1: Sign up for a Stripe Account
To use the Directorist Stripe Payment Gateway extension, you need to have the plugin installed and activated on your WordPress website.
Before you can start using the Stripe Payment Gateway with Directorist, you must have a Stripe account. If you don’t have one yet, follow these steps to sign up:
- Go to the Stripe website (https://stripe.com) and click on the “Sign Up” button.
- Fill in the required details, including your email address and password, to create an account.
- Follow the account setup process, providing the necessary information about your business and bank account.
Step 2: Obtain Stripe API Credentials
After signing up for a Stripe account, you’ll need to obtain the API credentials to connect your Stripe account with Directorist. Here’s how you can do it:
- Log in to your Stripe account.
- In the Dashboard, navigate to “Developers” > “API keys.”
- You will find your “Publishable Key” and “Secret Key”. Keep these credentials safe, as you’ll need them in the next step.
Step 3: Configure Stripe in Directorist
Now that you have your Stripe API credentials, you can configure the Stripe Payment Gateway in Directorist:
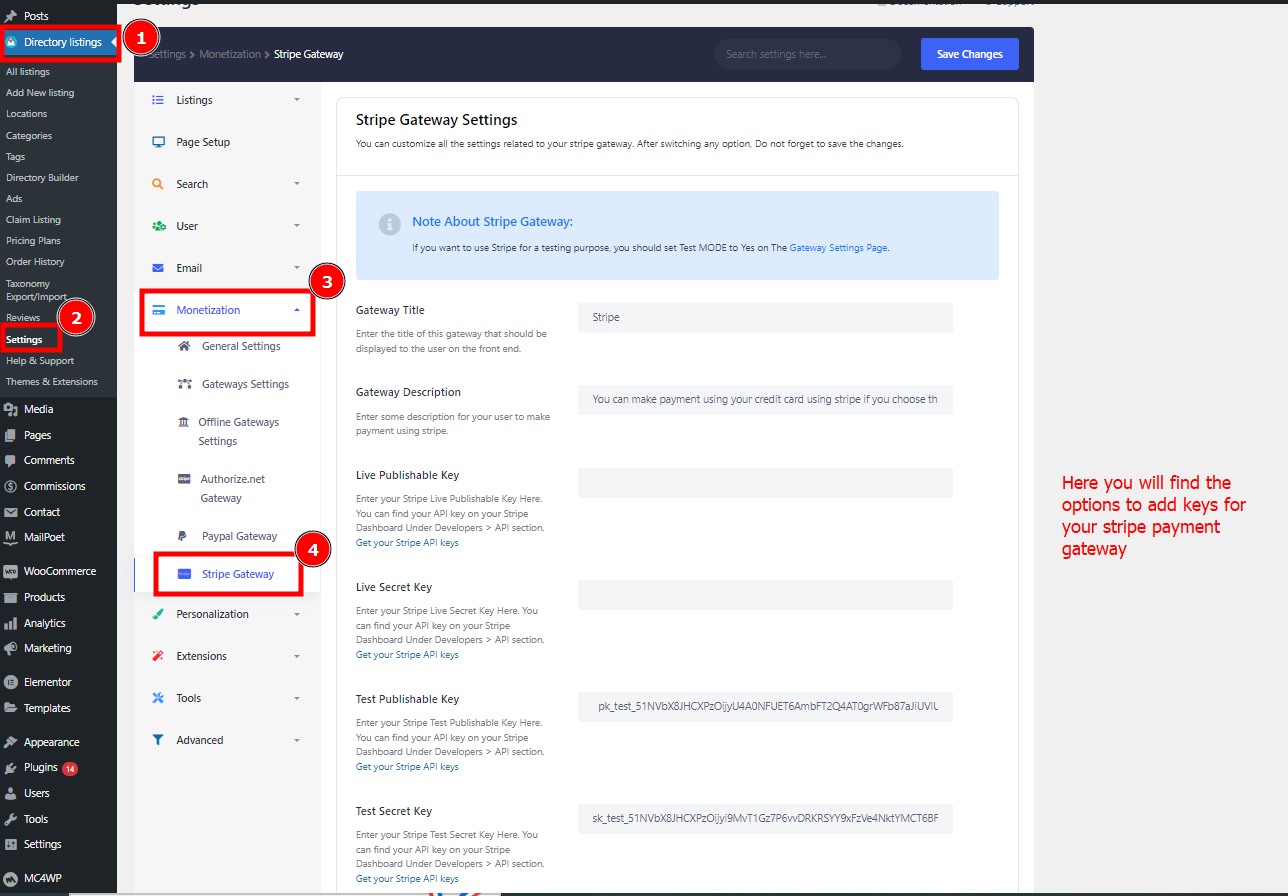
In your WordPress admin dashboard, go to “Directorist” > “Settings” > “Monetization” > “Stripe Gateway”. Here you will find the options to add a stripe Live publishable key and Live secret key. Also, you can have the option to add a Test publishable key and a Test secret key for testing purposes.
During the process of adding listings, users will encounter the convenient option of making payments through Stripe on the checkout page. To get a visual understanding of how this payment experience unfolds and how all elements appear, please refer to the attachment. With Stripe seamlessly integrated, users can enjoy a smooth and secure payment process while adding their listings, enhancing their overall experience on the platform.
Accepting Payments with Directorist Stripe Gateway
Supported Currencies
Directorist Stripe Payment Gateway supports processing payments in over 135+ currencies, allowing you to accept payments from users all around the world. This wide range of supported currencies ensures that you can capture the attention of a global audience and enable users from various countries to make payments seamlessly.
Wide Range of Supported Payment Types
Users can make payments using various methods, including credit cards, debit cards, international cards, Amex Checkout, Masterpass by MasterCard, Visa Checkout, WeChat Pay, AliPay, Apple Pay, Google Pay, ACH credit and debit, SEPA direct debit, and more.
3D Secure Payments
The Stripe Payment Gateway supports 3D Secure payments, adding an extra layer of security for online transactions. 3D Secure helps prevent fraudulent transactions and provides reassurance to both you and your customers during the payment process.
Low Transaction Fees
With the Directorist Stripe Payment Gateway, you can benefit from low transaction fees. Stripe offers competitive rates, enabling you to keep more of your earnings from each transaction.
Global Coverage
As Stripe supports a wide range of countries and currencies, you can accept payments from users all around the world. This global coverage maximizes your reach and allows you to cater to an international audience.
Recurring Payments
The Directorist Stripe Payment Gateway supports recurring payments, giving you the option to charge your users on every recurrence of a chosen duration. This feature is particularly useful for subscription-based services, allowing you to generate consistent revenue and maximize earnings throughout the year.
PCI and International Security Standard Compliance
Directorist Stripe Payment Gateway Extension adheres to the latest PCI standard and international security standards, ensuring that all payment transactions are secure and protected.
The Directorist Stripe Payment Gateway extension provides a robust and feature-rich solution for processing online payments on your directory website. With support for 135+ currencies, 3D Secure payments, low transaction fees, and the ability to offer multiple payment options, this extension enables you to provide a seamless payment experience to your users worldwide. Additionally, the support for recurring payments allows you to generate steady revenue and enhance your directory’s earning potential.


