


The Directorist WooCommerce Pricing Plans extension bridges Directorist directory listings with WooCommerce’s e-commerce system. Instead of using the built-in Directorist payment flow, this extension lets you sell listing packages as WooCommerce products — giving you access to any WooCommerce-compatible payment gateway, advanced checkout options, and the full WooCommerce order management interface.
| Note: Do not use the standard Directorist Pricing Plans extension and the WooCommerce Pricing Plans extension at the same time on the same directory. Choose one or the other. |
When to Use This Extension #
| Default Pricing Plans | WooCommerce Pricing Plans |
| Simple and easy checkout with multiple payment gateways | Access to multiple payment gateways (Stripe, PayPal, and dozens of others) |
| Quick setup for directory websites | Advanced checkout flows and WooCommerce order management |
| Limited to 3 built-in gateways (PayPal, Stripe, Authorize.net) | Full compatibility with WooCommerce extensions and third-party plugins |
| Suitable for most directory website’s use cases | Ideal if you already run a WooCommerce store alongside your directory |
Requirements #
Before installing the WooCommerce Pricing Plans extension, make sure the following plugins are installed and activated on your WordPress site:
- Directorist (core plugin) — the base directory plugin.
- WooCommerce — handles checkout and payment processing.
- Directorist WooCommerce Pricing Plans extension.
| Important: Always install and activate WooCommerce before activating the WooCommerce Pricing Plans extension. The extension will not function correctly if WooCommerce is missing or inactive. |
Installation #
To install the Directorist WooCommerce Pricing Plans extension:
- Log in to your WordPress Dashboard.
- Go to Plugins → Add New → Upload Plugin.
- Upload the extension ZIP file and click Install Now.
- After installation completes, click Activate Plugin.
You can also install it from your plan by navigating WP Dashboard → Directorist → Themes & Extensions.
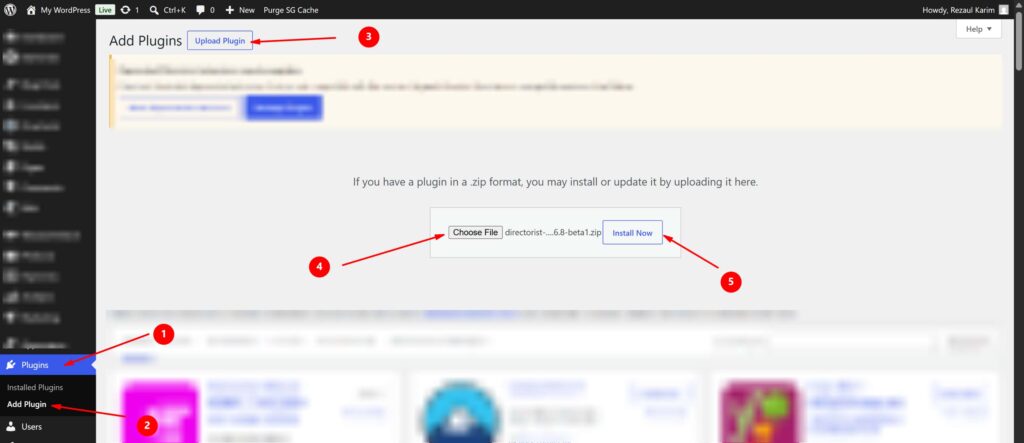
| 📷 Screenshot: WordPress Dashboard → Plugins → Add New → Upload Plugin |
Once activated, the extension automatically integrates with WooCommerce and adds the Listing Pricing Plan product type to your WooCommerce Products.
Creating a Pricing Plan #
Creating a WooCommerce pricing plan is the same as creating a WooCommerce product. The extension adds a new product type called Listing Pricing Plan inside WooCommerce Products.
Step-by-Step Instructions #
- Go to WordPress Dashboard → Products and click Add New.
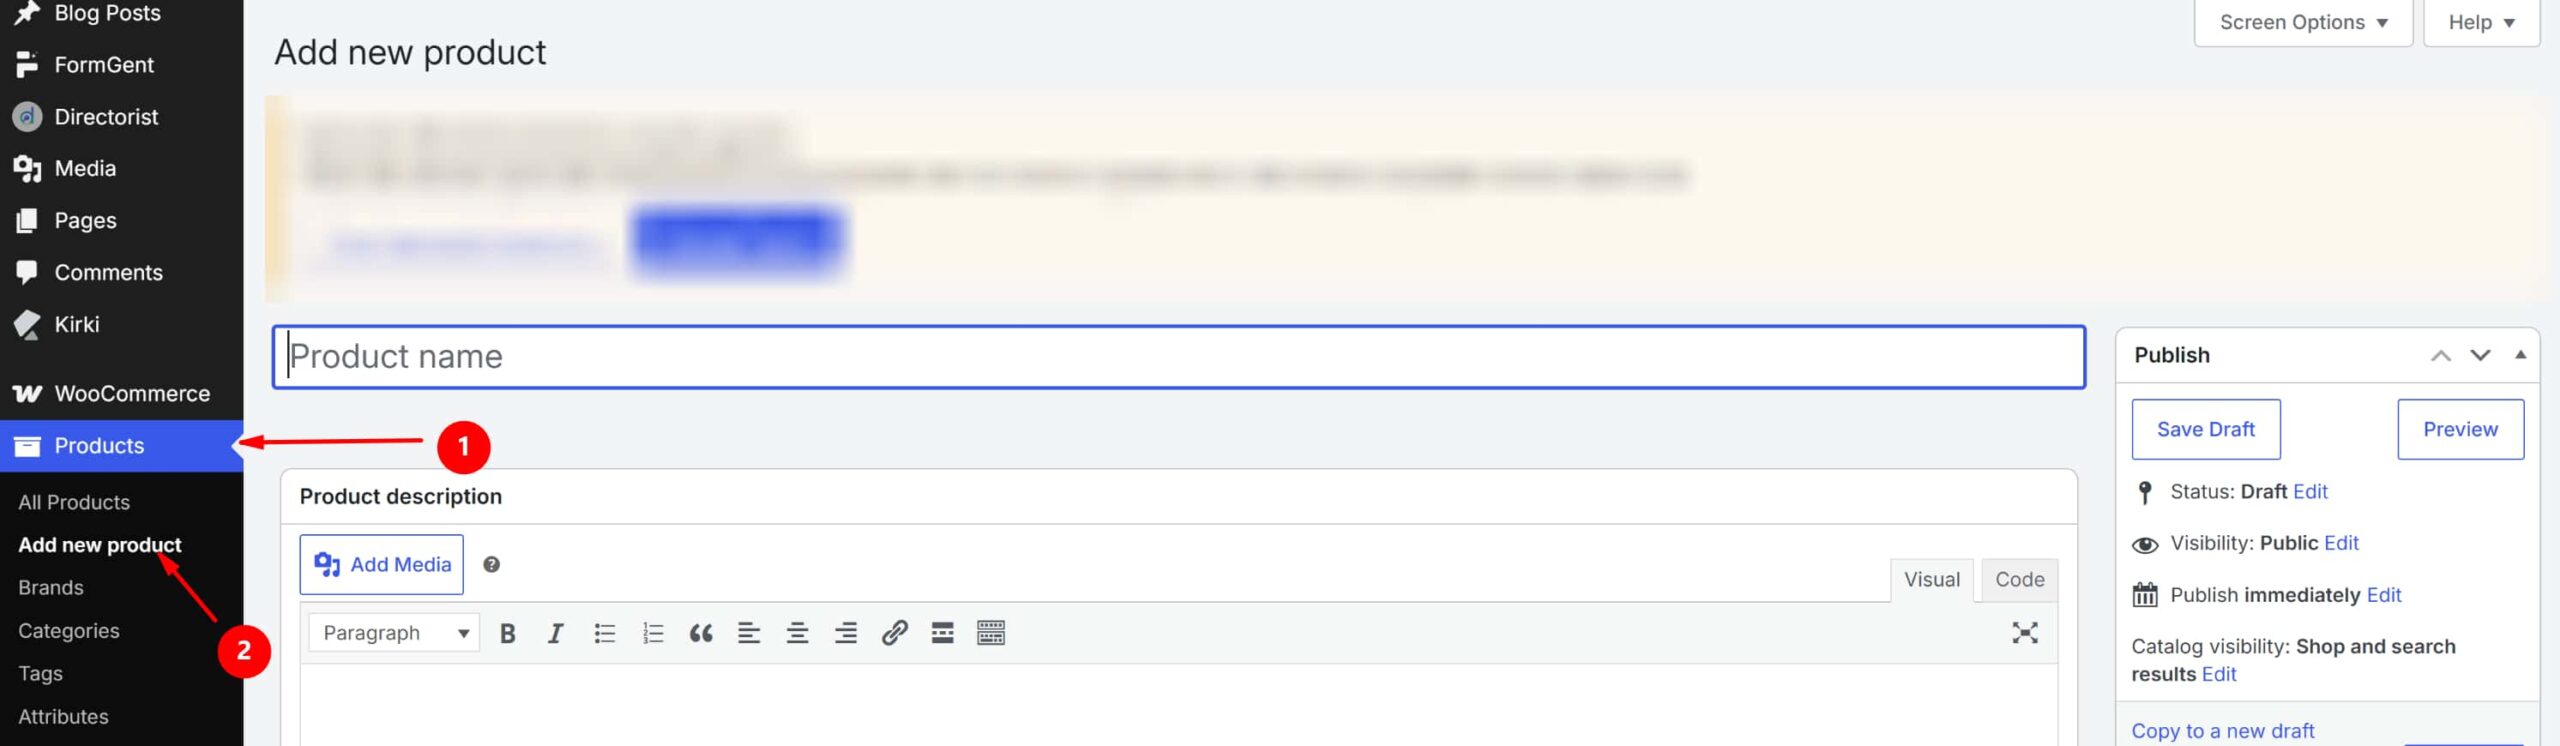
| 📷 Screenshot: Products → Add New |
- Enter a Product Name (e.g., “Basic Plan”, “Pro Plan”, “Real Estate Pro”).
- Optionally add a Product Description. This is shown to users on the plan selection page. You can leave it blank.
- Scroll down to the Product Data section and select Listing Pricing Plan from the product type dropdown.
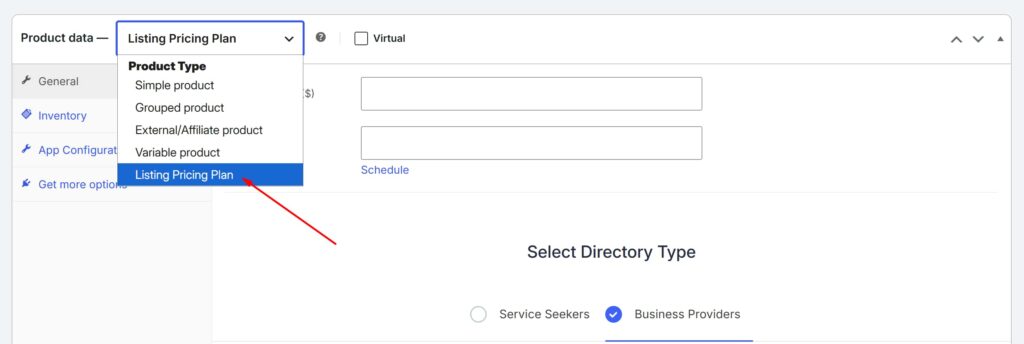
| 📷 Screenshot: Product Data dropdown → Listing Pricing Plan selected |
- Configure the plan fields as described in the Field Reference section below.
- When all fields are configured, click Publish. Your plan is now live and will appear to users when they submit a listing.
| 📷 Screenshot: Fully configured Listing Pricing Plan product, ready to publish |
Plan Field Reference #
The fields below appear in the Product Data section after selecting Listing Pricing Plan as the product type.
Pricing #
| Field | Description |
| Regular Price | The standard price charged for this plan. Always set this field. |
| Sale Price | An optional discounted price. If set, users are charged the sale price instead of the regular price. WooCommerce also lets you schedule a sale price for a specific date range. |
Basic Configuration #
| Field | Description |
| Directory Type | Select which directory this plan applies to. If you have multiple directory types (e.g., Real Estate, Business), create a separate plan for each one. |
| Listing Duration (days) | How many days a submitted listing will remain live. After this period, the listing expires. |
| Plan Type | Choose between Pay Per Listing or Package (see below for details). |
| Number of Listings | Package plans only. The total number of regular listings the user can submit under this package. |
| Number of Featured Listings | Package plans only. The number of featured listings included in this package. |
Plan Types #
Pay Per Listing — The user is charged once for each listing they submit. Use this for individual, one-off listing submissions.
Package — The user pays once for a bundle that includes a set number of listings (regular and/or featured). Once purchased, the user can submit listings up to the defined limits without paying again per listing.
| Example: A “Real Estate Pro” package might include 30 regular listings and 10 featured listings for $20. The user pays once and can submit up to those limits. |
Listing Features #
The following settings control what features are available to users submitting listings under this plan. These carry over from the standard Directorist Pricing Plans extension.
| Field | Description |
| Featured Listing | Pay Per Listing only. Check this to allow the user to submit a featured listing under this plan. |
| Listing Slider Image Limit | Enable image uploads for listings. Set a limit or allow unlimited images. |
| Allow Tag and Set Limit | Allow users to add tags to their listing. Optionally cap the number of tags. |
| Allow Price and Set Limit | Allow users to set a price on their listing. Optionally cap the maximum price. |
| Price Range | Allow users to choose an expense range ($$$$, $$$, $$, $) instead of a specific price. |
| Business Hours | Allow users to add business hours. Requires the Directorist Business Hours extension. |
| Image Gallery | Allow users to upload an image gallery. Requires the Directorist Image Gallery extension. Set a gallery image limit or allow unlimited. |
| Video | Allow users to upload a video to their listing. |
| Contact Listing Owner | Enable contact information fields on the listing. Enabling this unlocks the sub-options below. |
| Email Address | Allow users to add an email address. Requires Contact Listing Owner to be enabled. |
| Phone Number | Allow users to add a phone number. Requires Contact Listing Owner to be enabled. |
| Website Link | Allow users to add a website URL. Requires Contact Listing Owner to be enabled. |
| Social Media Links | Allow users to add social media profile links. Requires Contact Listing Owner to be enabled. |
| Customer Reviews | Enable the reviews feature so other users can post reviews on listings submitted under this plan. |
| FAQs | Allow users to add an FAQ section to their listing. Requires the Directorist Listing FAQs extension. |
| Custom Fields | Allow users to fill in admin-created custom fields when submitting a listing. |
| Exclude Categories | Select categories that users cannot choose when submitting a listing under this plan. |
| Recommend this Plan | Highlight this plan as recommended on the plan selection page. |
| Hide from Pricing Plan Page | Check this to hide the plan from the front-end plan selection page (useful for private or restricted plans). |
Individual Plan Shortcode #
At the bottom of the product page, you will find a shortcode for displaying this specific plan individually — for example, on a custom landing page or inside a page builder like Elementor, Gutenberg, or Divi (Upcoming).
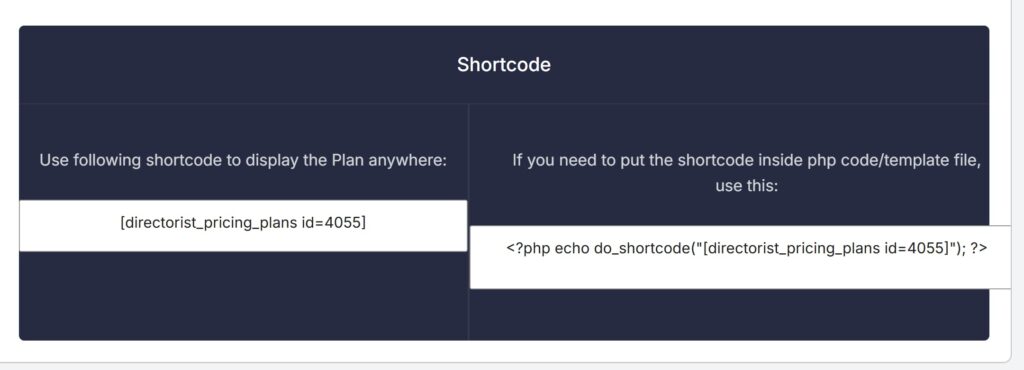
| 📷 Screenshot: Individual plan shortcode at the bottom of the product page |
Extension Settings #
After installation, additional settings are available under Directorist → Settings → Extensions → WooCommerce Pricing Plans.
| Field | Description |
| Skip Plan Page for Paid Users | If a user already has an active purchased plan, they bypass the plan selection page and land directly on the Add Listing form. |
| Direct Plan Purchase | By default, the user flow is: select plan → fill in listing form → pay. Enabling Direct Plan Purchase reverses this: users pay first, then fill in the listing form. |
| Restrict Listing Deletion | Prevents listing owners from deleting listings that are already assigned to a plan from the user dashboard. |
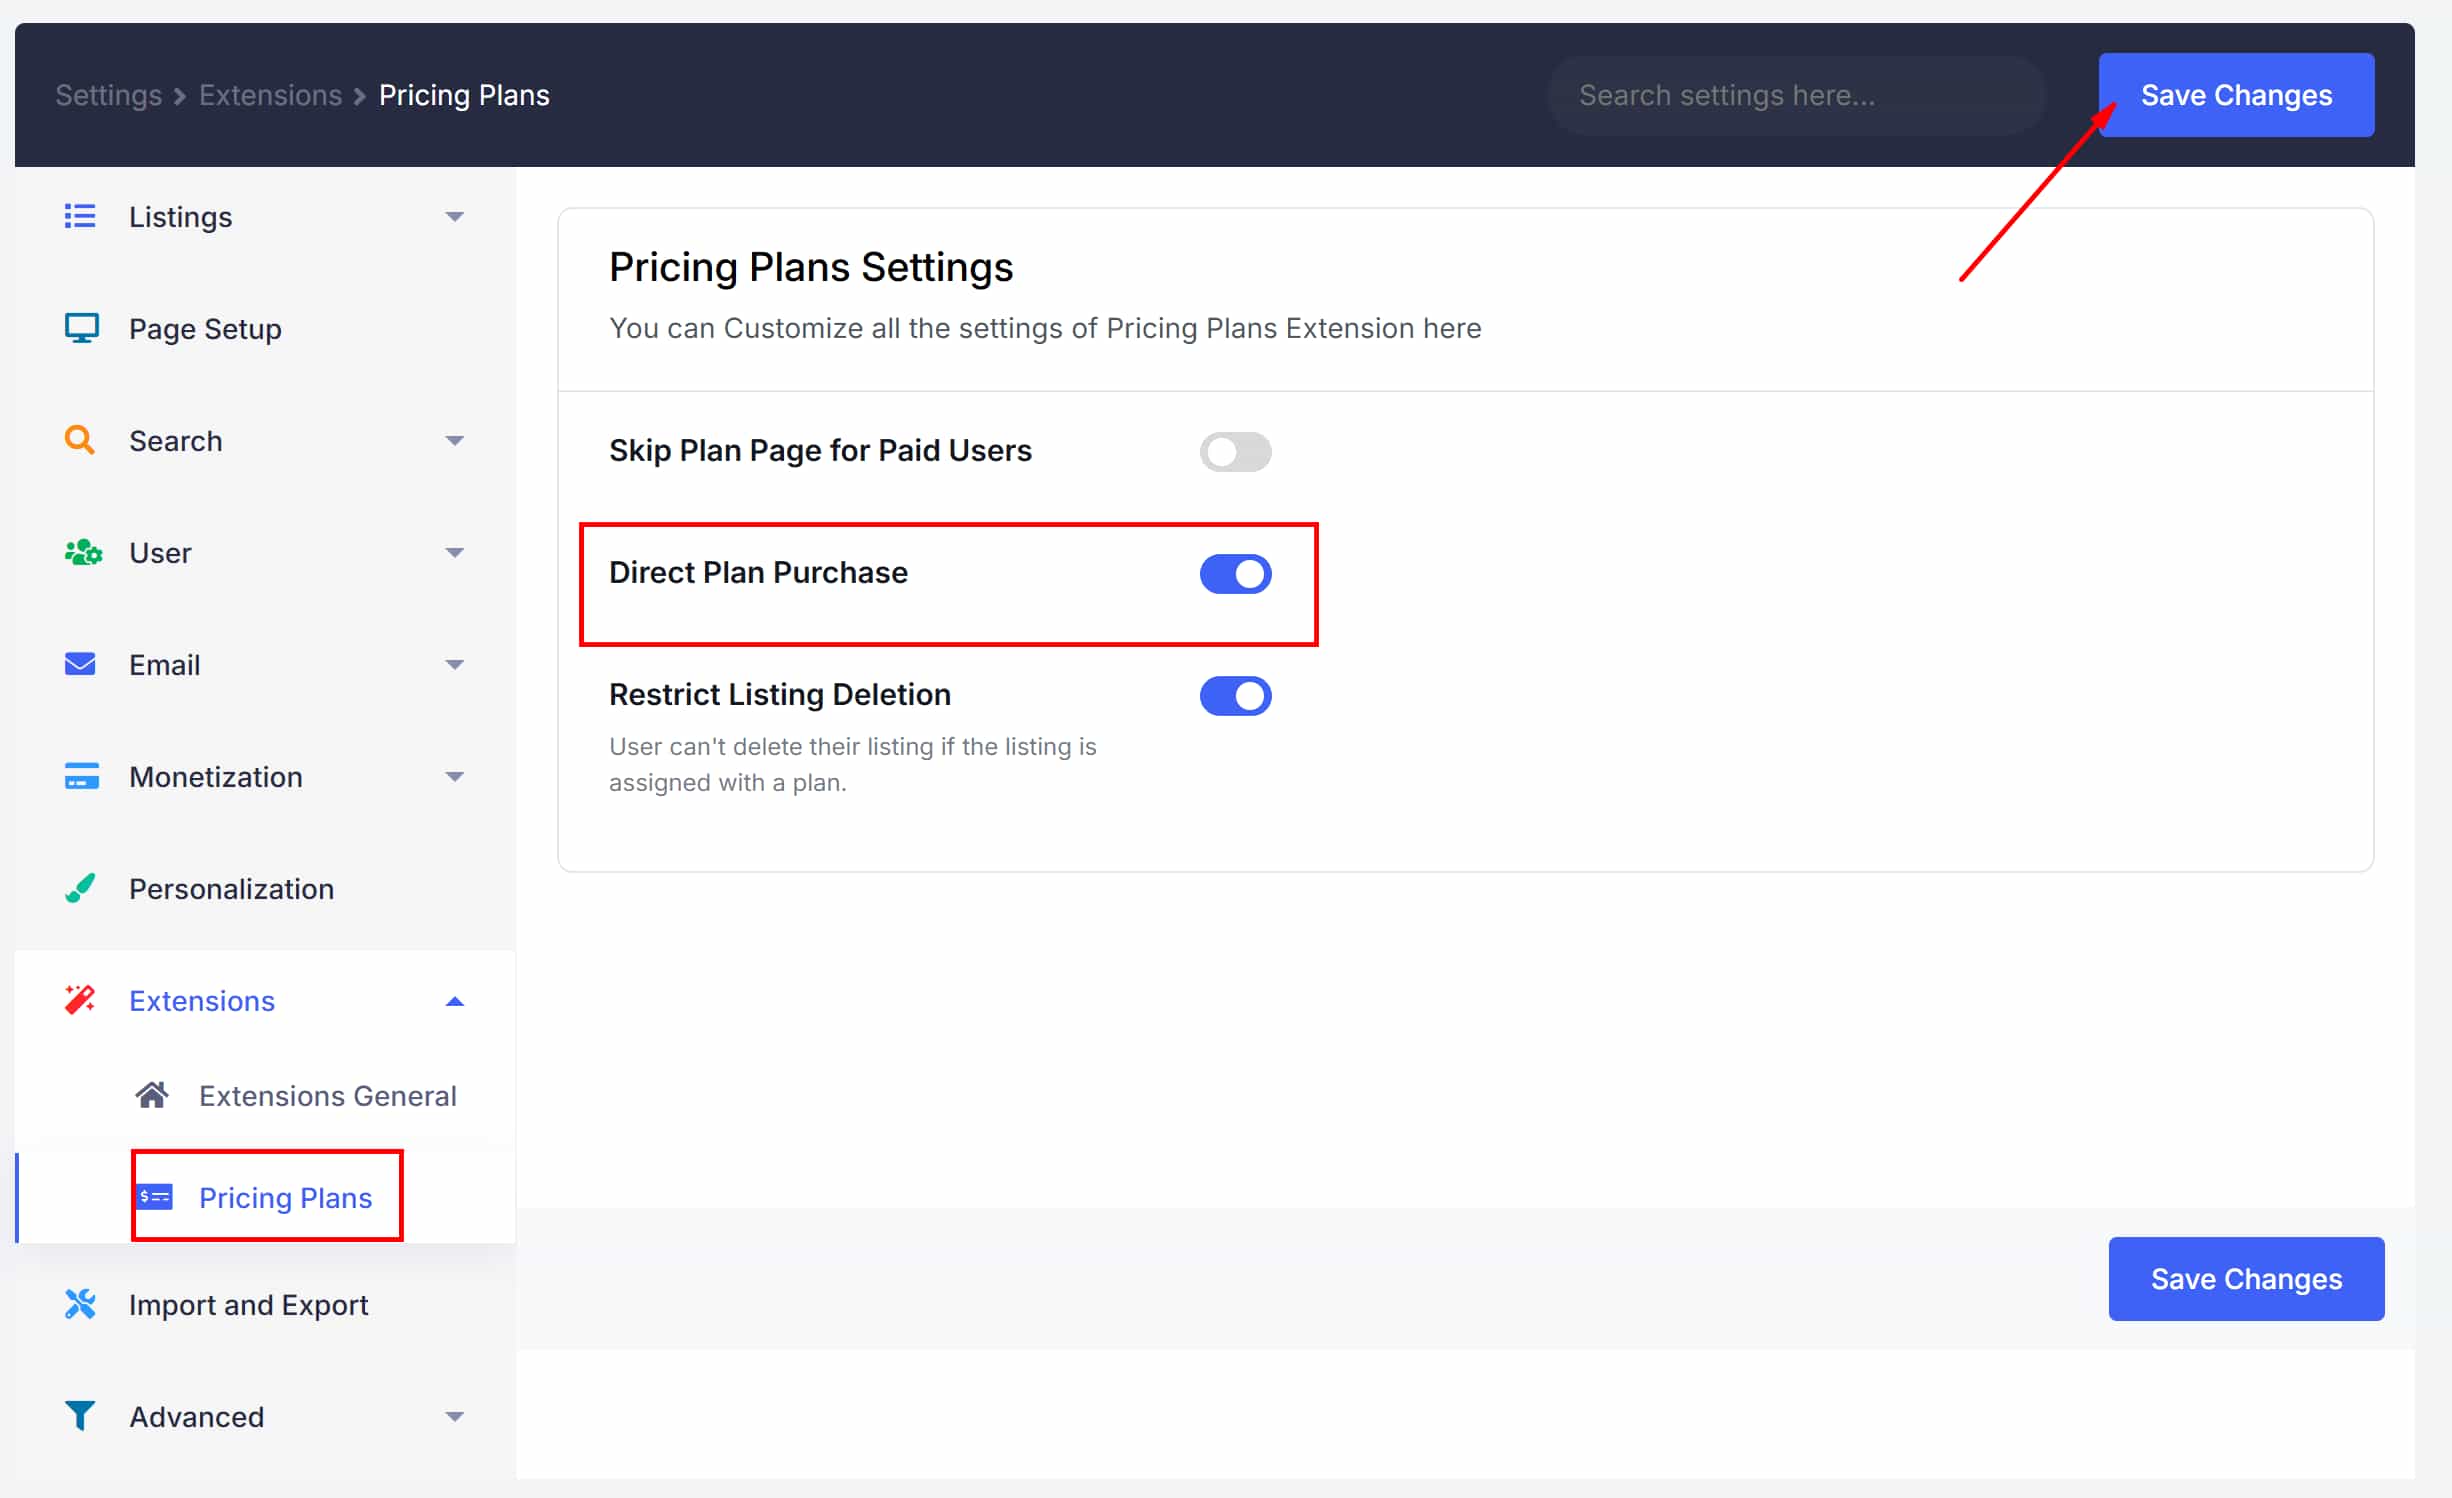
| 📷 Screenshot: Directorist → Settings → Extensions → Pricing Plans settings |
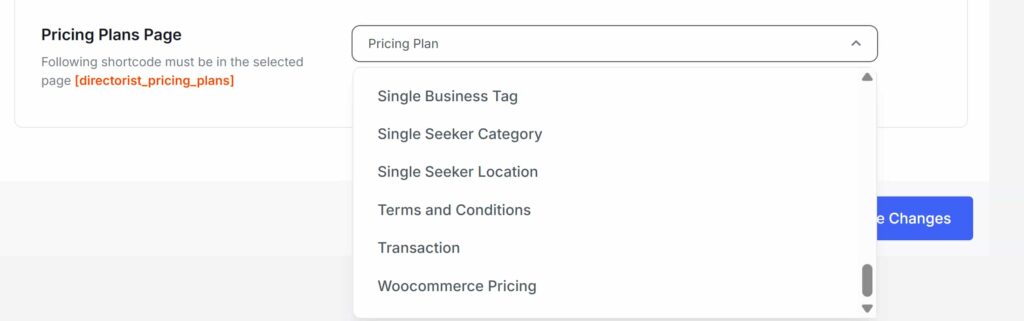
Pricing Plan Page Setup #
You must assign a page to display all pricing plans. Navigate to Directorist → Settings → Page Setup and select or create the page where plans should appear.
Add the shortcode [directorist_pricing_plans] to that page. Directorist will use this page automatically to show all plans when a user tries to submit a listing.
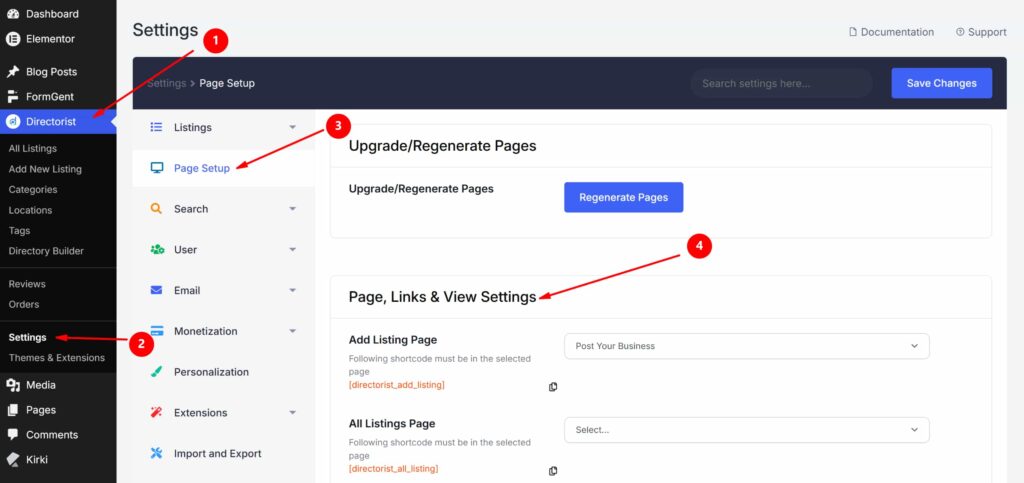
| 📷 Screenshot: Directorist→ Settings → Page Setup → Pricing Plan page assignment |
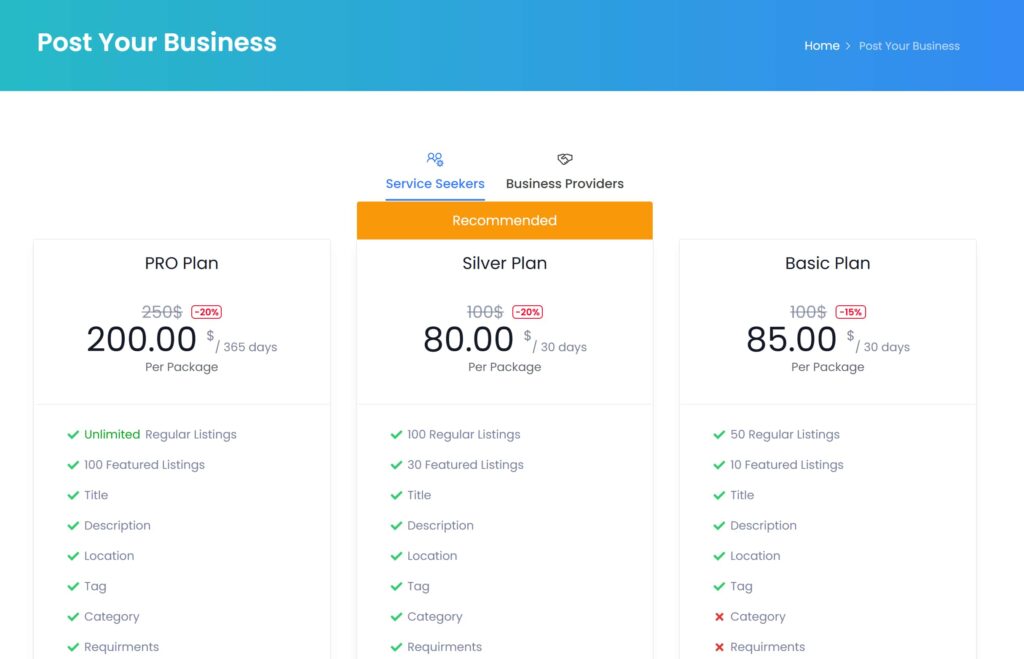
| 📷 Screenshot: Front-end pricing plan selection page showing available plans |
How the Purchase Flow Works #
This section describes what users experience when submitting a listing using a WooCommerce pricing plan.
Default Flow (Direct Plan Purchase disabled) #
- The user clicks Add Listing on the front end.
- If multiple directory types exist, the user selects the directory they want to list in.
- The available pricing plans for that directory are displayed. The user selects a plan and clicks Continue.
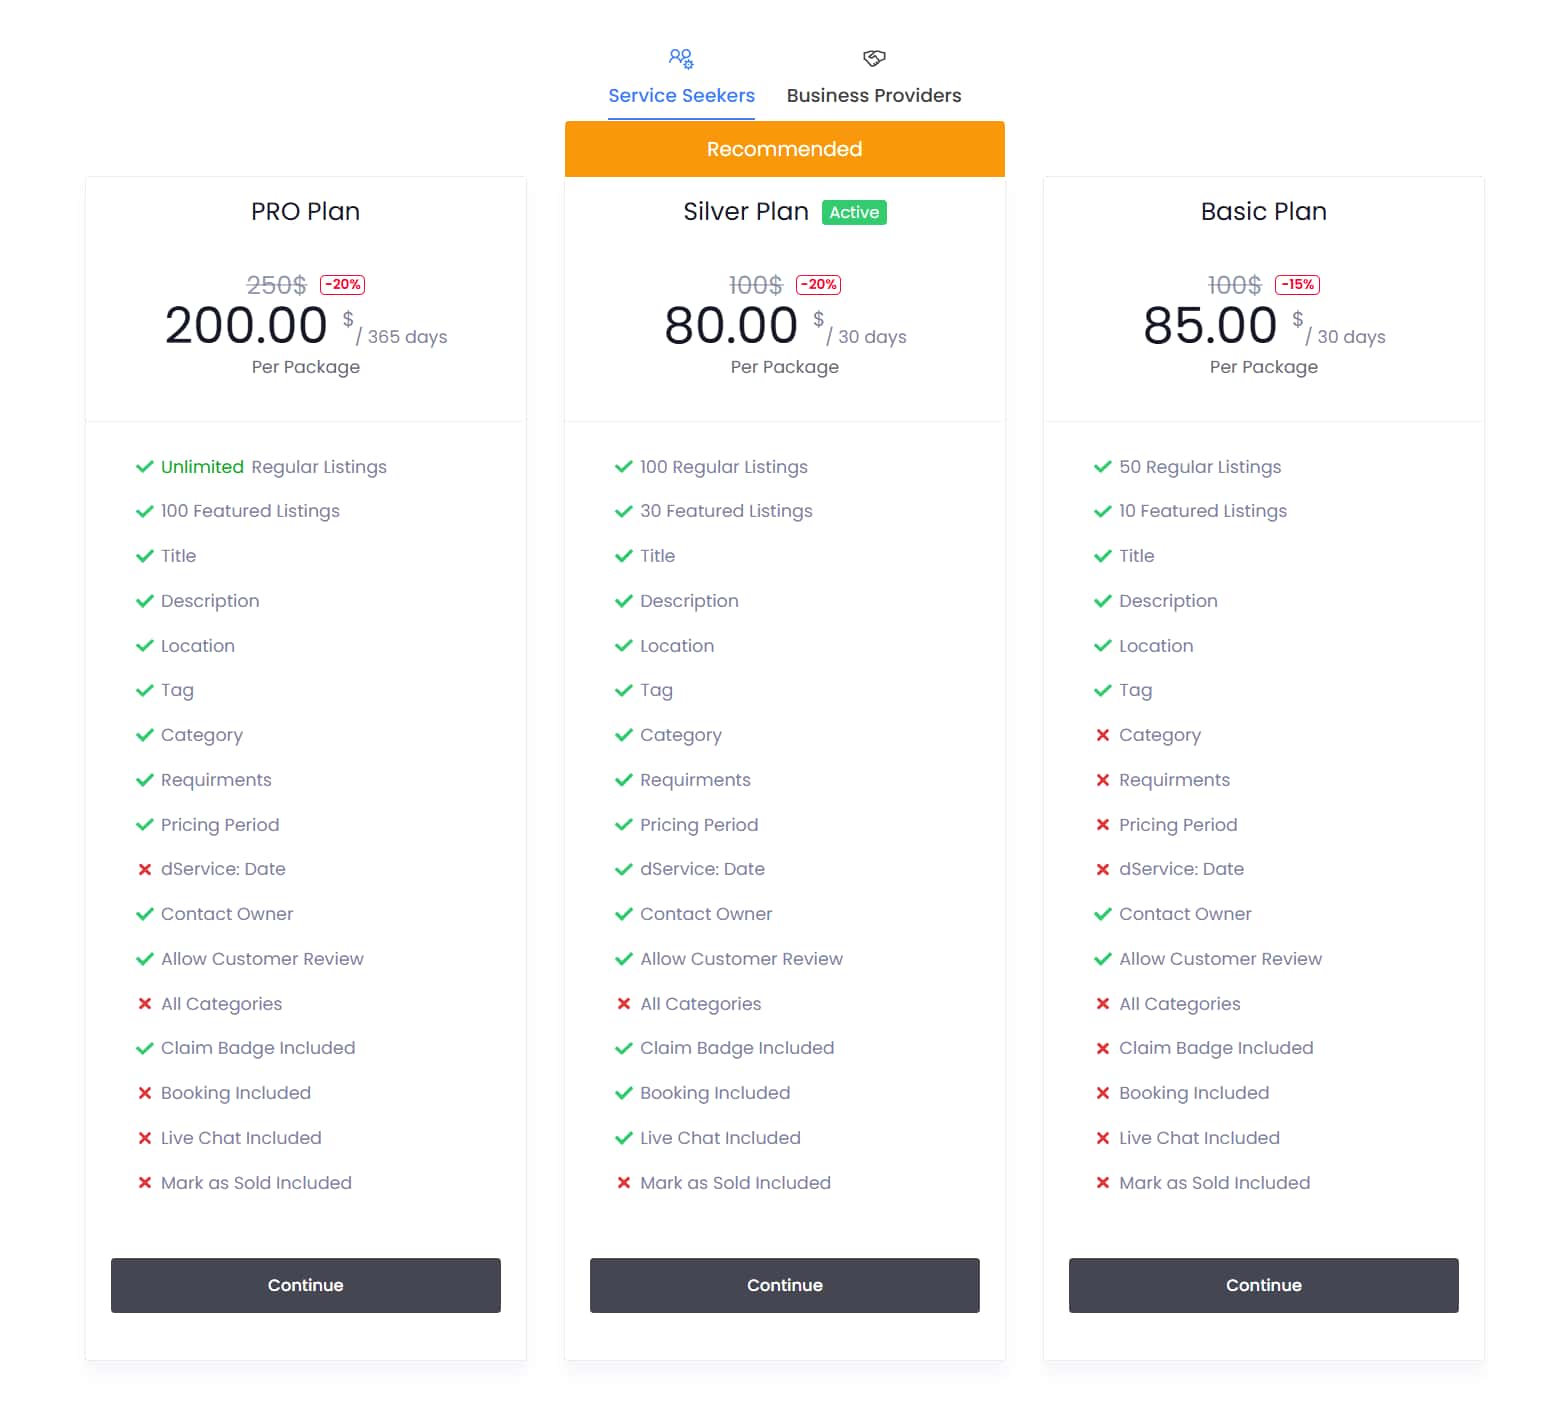
| 📷 Screenshot: Front-end plan selection page — user selects a plan |
- The user fills in the listing form fields.
- After completing the form, the user is redirected to the WooCommerce checkout page.
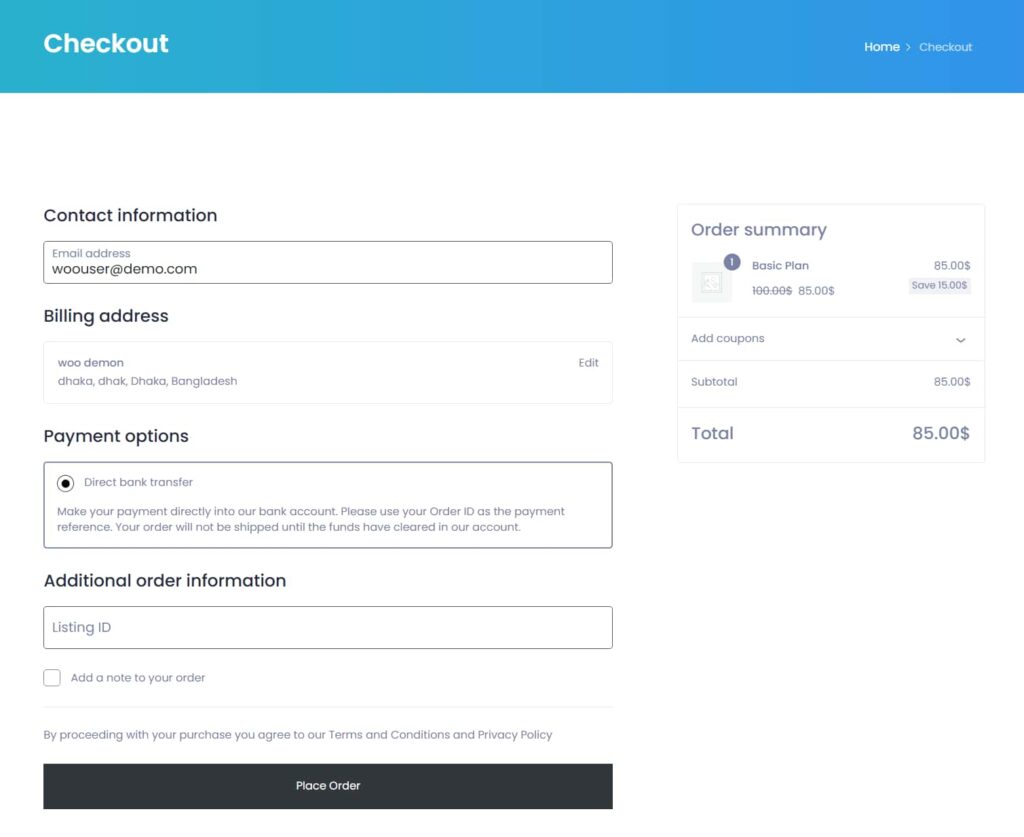
| 📷 Screenshot: WooCommerce checkout page after plan selection |
- The user completes the checkout and clicks Place Order.
- After successful payment, the listing submission is finalized. The listing is only submitted after payment is confirmed.
Direct Plan Purchase Flow (Direct Plan Purchase enabled) #
When Direct Plan Purchase is enabled in the extension settings, the payment step is moved to the beginning:
- The user selects a plan and is immediately redirected to the WooCommerce checkout page.
- After paying, the user is taken to the listing form to fill in their listing details.
| Tip: Direct Plan Purchase is useful if you want to ensure payment before the user invests time filling in listing details. |
User Dashboard #

After purchasing a plan, users can manage their listings from the dashboard page (created automatically during Directorist installation). From the dashboard, users can:
- View submitted listings and their status.
- Track remaining listing allowances from active packages.
- View order history and purchased plans.
- Change or upgrade their pricing plan by navigating to Edit → Pay Now on any listing.
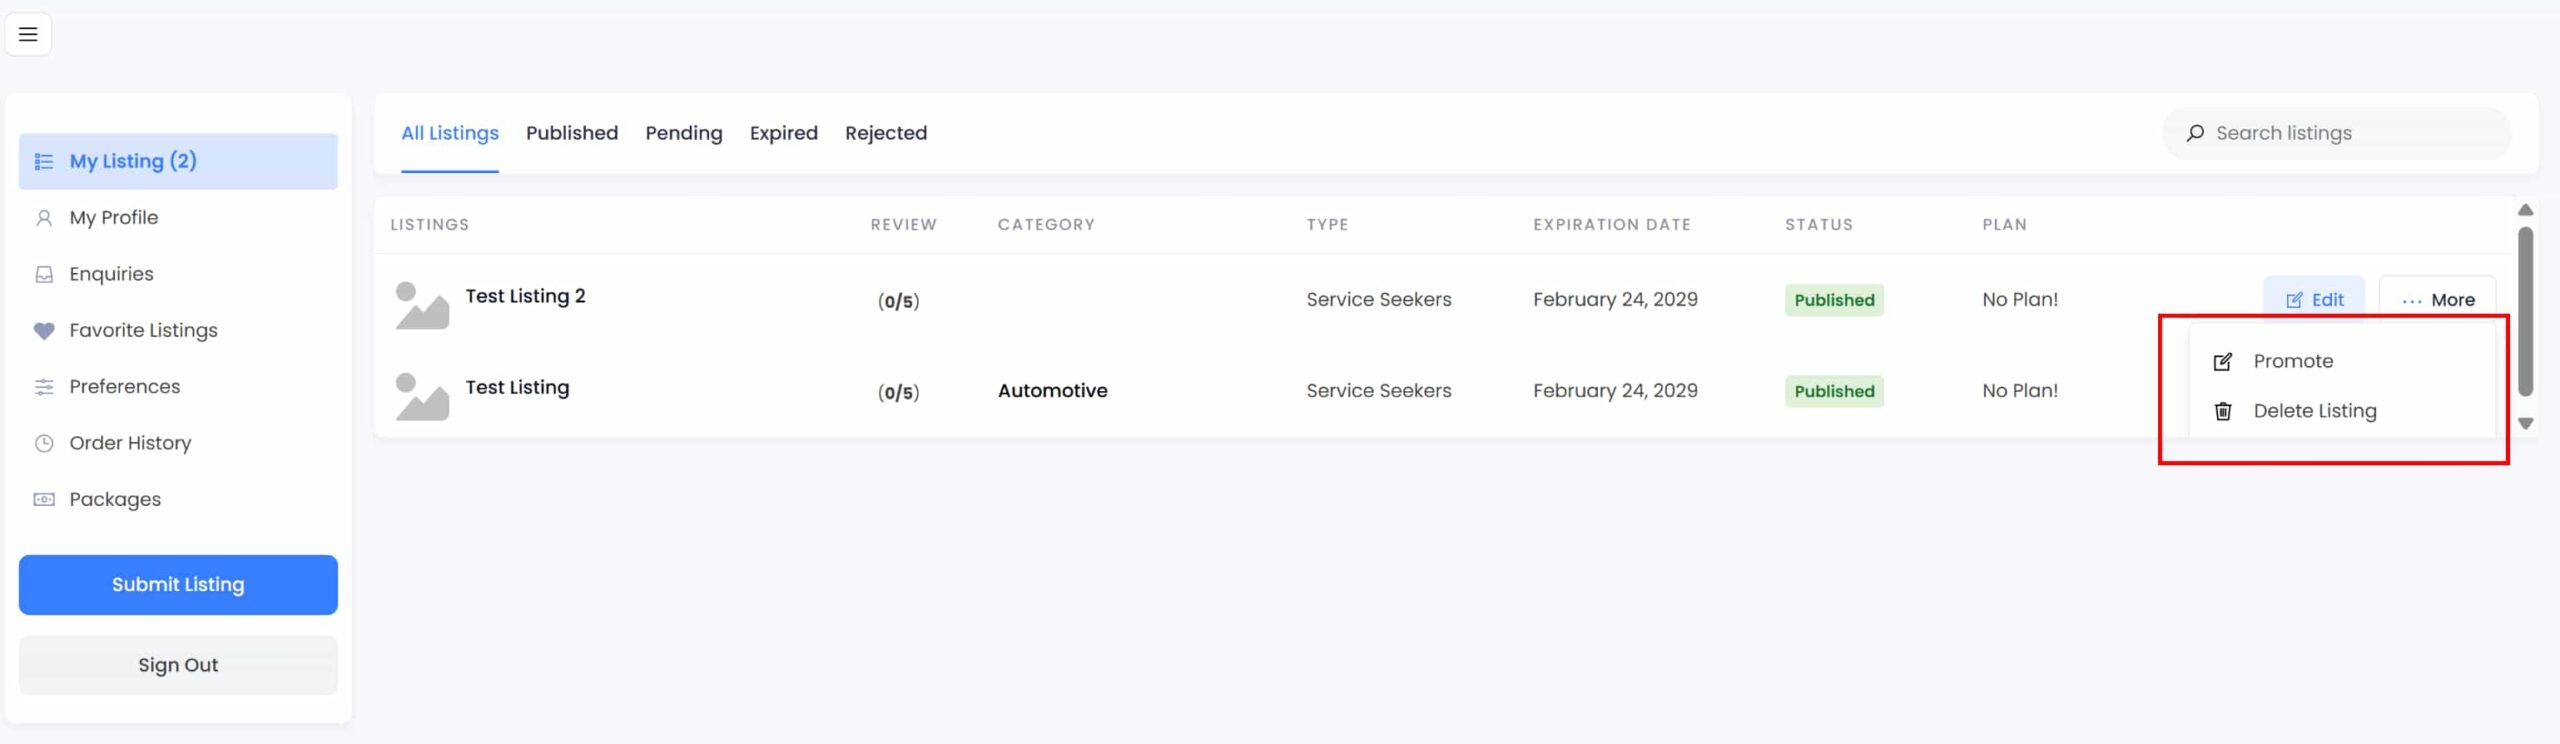
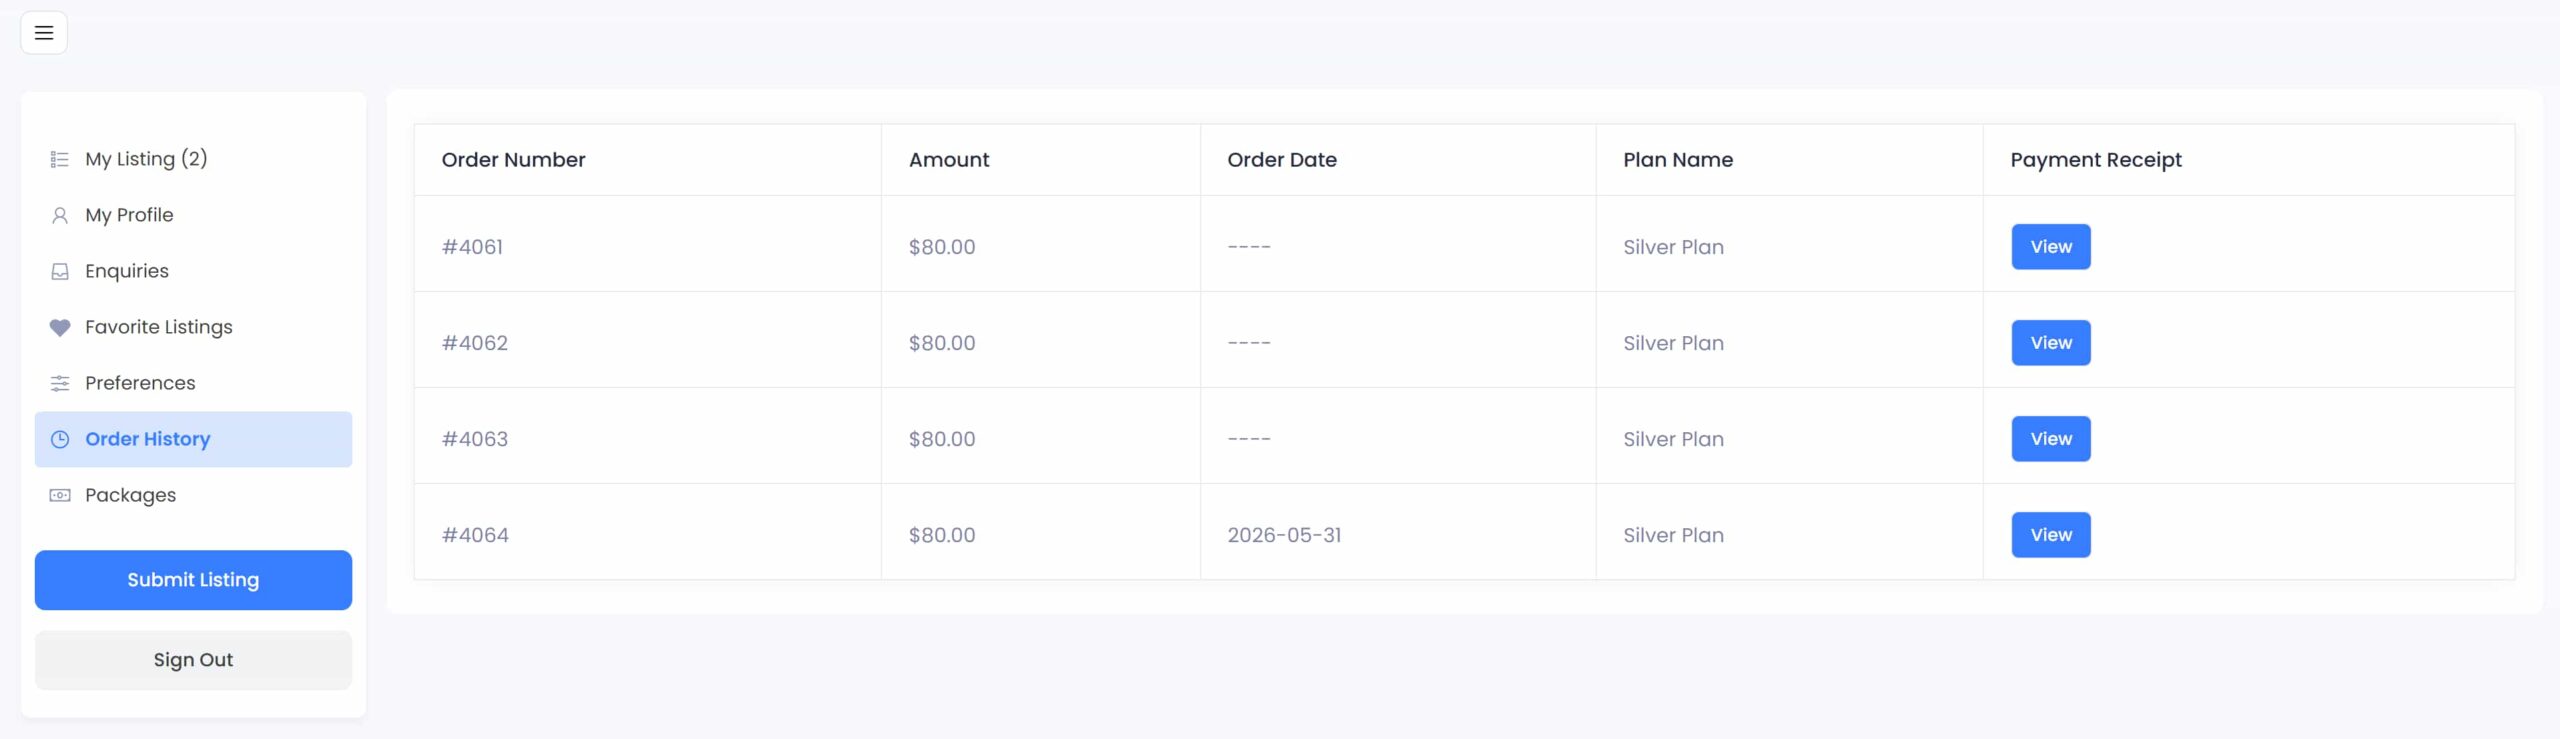
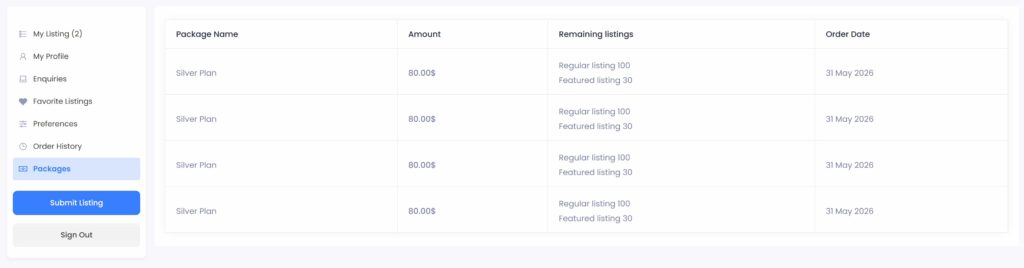
| 📷 Screenshot: User dashboard showing active plan, remaining listings, and order history |
Managing Orders #

All purchases made through WooCommerce Pricing Plans are recorded as WooCommerce orders — not in Directorist’s own order history. Navigate to:
WordPress Dashboard → WooCommerce → Orders
From the Orders page you can:
- View all customer purchases and payment status.
- Open individual orders to see plan details and customer information.
- Update order status (e.g., mark as Completed, Processing, Refunded).
Updating Order Status #
- Go to WooCommerce → Orders.
- Select the checkbox next to one or more orders.
- From the Bulk Actions dropdown, choose Change status to Completed (or another status as needed).
- Click Apply.

| 📷 Screenshot: WooCommerce → Orders page with bulk action to set status to Completed |
| Note: WooCommerce Pricing Plan orders do not appear in Directorist Listings → Order History. Always check WooCommerce → Orders for purchases made through this extension. |
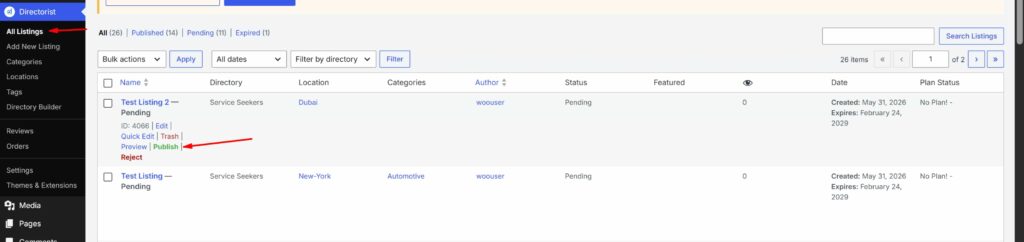
Listing Approval #
If your directory is configured to require admin approval, submitted listings will appear as Pending in Directorist → All Listings. You must approve them manually after verifying the associated order in WooCommerce.
To configure listing approval requirements, go to Directorist → Directory Builder → General → Listing Status and set it to Pending or Published.
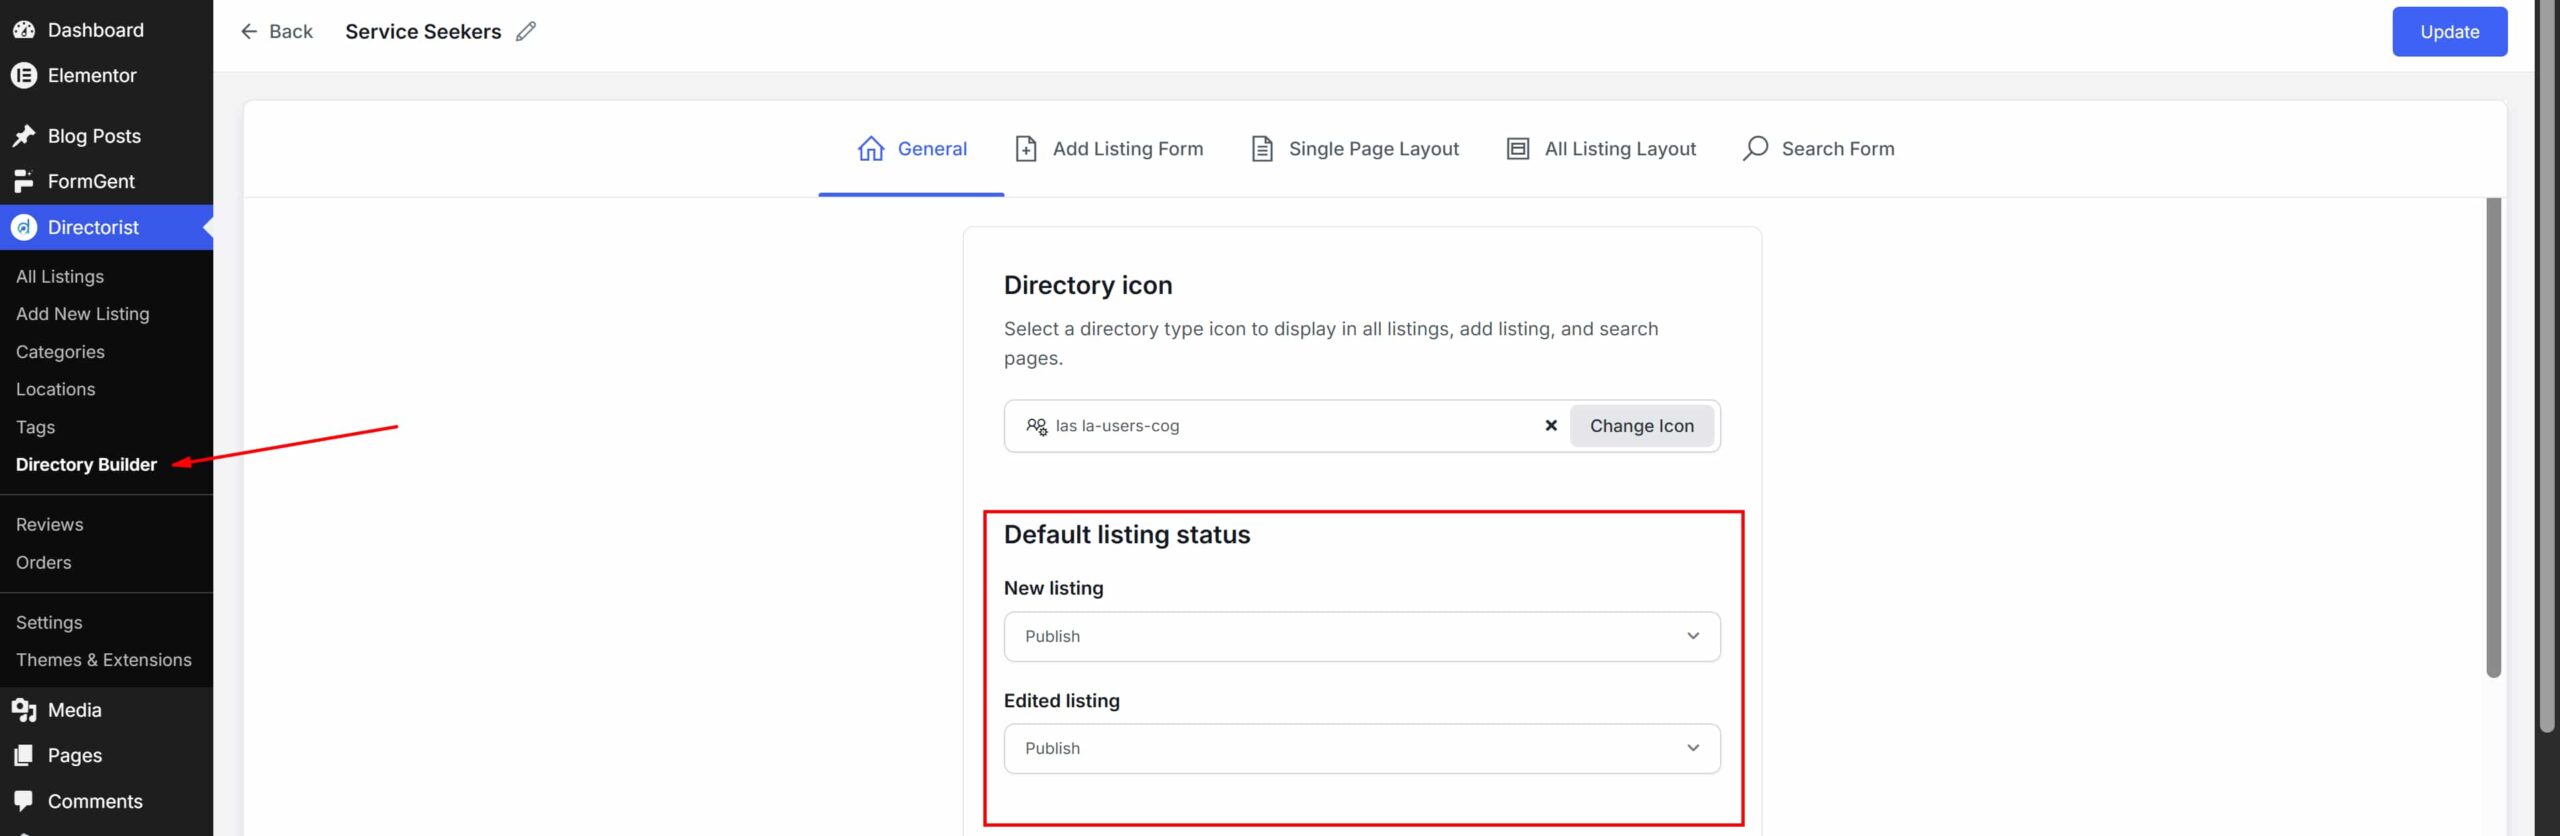
| 📷 Screenshot: Directorist → Directory Builder → General → Listing Status setting |
Setup Tips & Best Practices #
- Install WooCommerce before activating the extension. The extension depends on WooCommerce being present at activation time.
- Set the correct product price. Always verify the Regular Price (and Sale Price if applicable) before publishing a plan. Users will be charged exactly what is set here.
- Configure a payment gateway. Go to WooCommerce → Settings → Payments and enable at least one gateway before testing checkout.
- Test the full checkout flow before going live. Select a plan as a test user, complete the WooCommerce checkout, and confirm the order appears in WooCommerce → Orders. Verify that the listing is accessible after payment.
- Create one plan per directory type. If your site has multiple directory types, each plan is tied to one directory type. Create separate plans for each directory.
- Don’t mix the two pricing plan extensions. Using both the standard Directorist Pricing Plans and the WooCommerce Pricing Plans extension on the same directory is not supported.
- Use Direct Plan Purchase for upfront payment workflows. If you want users to pay before filling in listing details, enable Direct Plan Purchase in extension settings.
Frequently Asked Questions #
Should I use both the Directorist Pricing Plans and the WooCommerce Pricing Plans extensions together? #
No. Use only one at a time. Running both on the same directory can cause conflicts.
Where do I register pricing plan packages? #
Plans are registered as WooCommerce products. Go to Products → Add New and select Listing Pricing Plan as the product type.
Where do I find orders from purchased plans? #
All orders appear under WooCommerce → Orders. They do not appear in Directorist’s built-in Order History.
Can I offer a free plan? #
Yes. Set the Regular Price to $0 and leave Sale Price blank. Users can select the plan and proceed through checkout for free.
Can I display a single plan on a specific page? #
Yes. Each Listing Pricing Plan product has an individual shortcode displayed at the bottom of the product edit page. Use that shortcode on any page or post to show only that plan.


