
Building a directory from scratch is one of the hardest parts of launching a directory website. You set everything up – categories, layout, designand then realize you have no listings. Without listings, visitors have nothing to find, and the directory feels empty no matter how polished it looks.
The Directorist Listing Importer solves this. It is a premium extension that lets you pull real listings from two public sources:
- Google Maps (via the Google Places API) — search for local businesses and import their name, address, phone, website, photos, ratings, and reviews.
- RSS or Atom Feeds — connect any standard feed URL and import listings from it, either once or on an automatic sync schedule.
This guide walks you through every step.
Requirements #
Before you start, make sure you have the following:
- Directorist core plugin installed and activated
- Directorist Listing Importer extension installed and activated
- A Google Places API key (for Google Business imports only)
- A valid RSS or Atom feed URL (for RSS/Feed imports only)
Installation #
If you are on a Directorist bundle subscription, go to Directorist > Themes & Extensions in your WordPress dashboard, find the Listing Importer, and click Install, then Activate.
Once activated, Listing Importer appears as a menu item inside the Directorist section of your WordPress sidebar. Click it to open the extension.
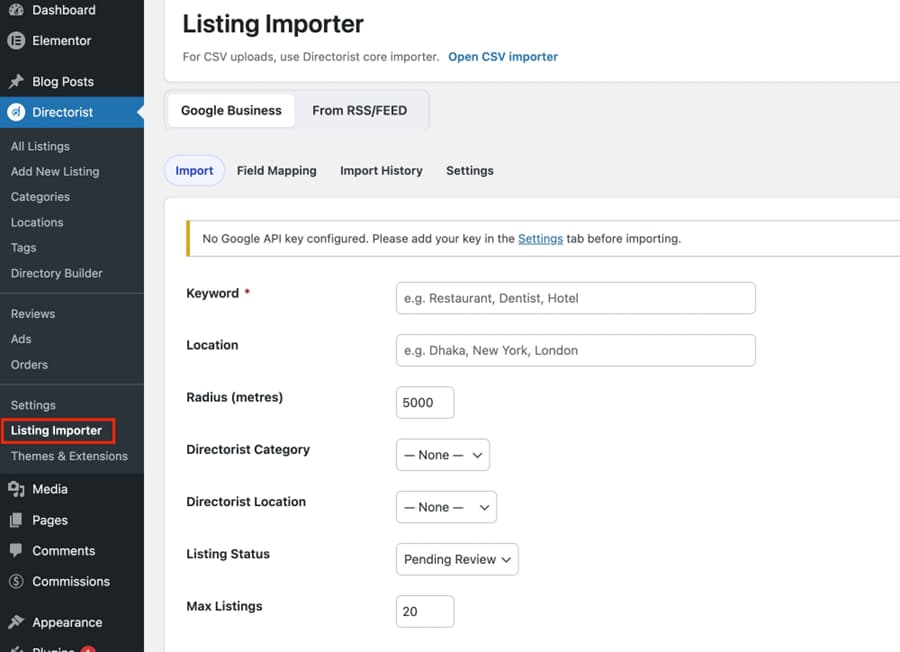
Note: For CSV-based bulk imports, use the Directorist core importer. The link to it appears at the top of the Listing Importer screen. The Listing Importer is specifically for Google Maps and RSS/Feed sources.
Part 1: Importing from Google Business #
The Google Business tab imports real local business data directly from Google Maps. It is ideal for local business directories, city guides, restaurant directories, healthcare directories, and any niche where Google Maps has good coverage.
There are four sub-tabs inside Google Business:
- Import — where you run searches and bring in listings
- Field Mapping — controls how Google data maps to your Directorist fields
- Import History — a log of every import you have run
- Settings — where you configure your API key and default options
Always configure Settings first before running your first import.
Step 1 — Configure Settings #
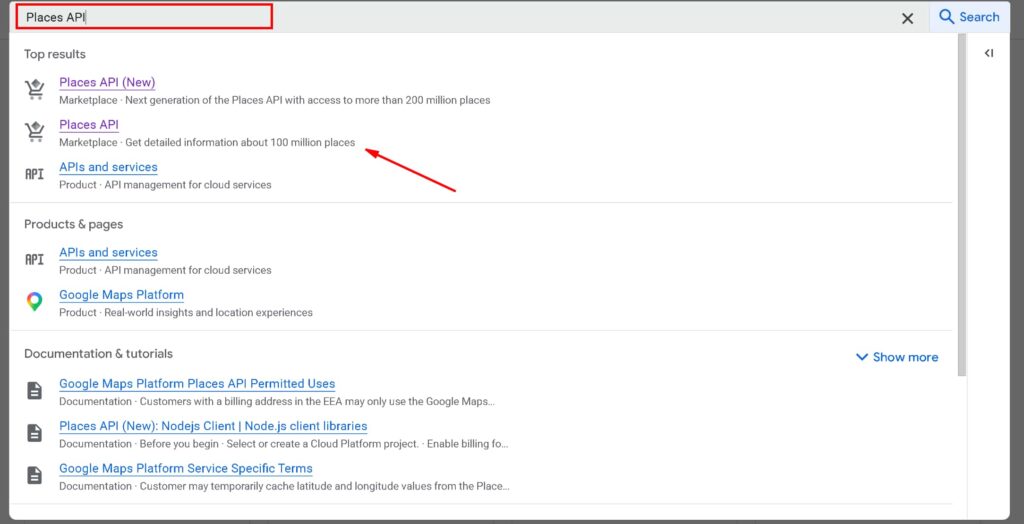
Click the Settings tab inside the Google Business section. The page includes a link to Google Cloud Console where you can generate a key. You must enable the Places API on that key for imports to work. .
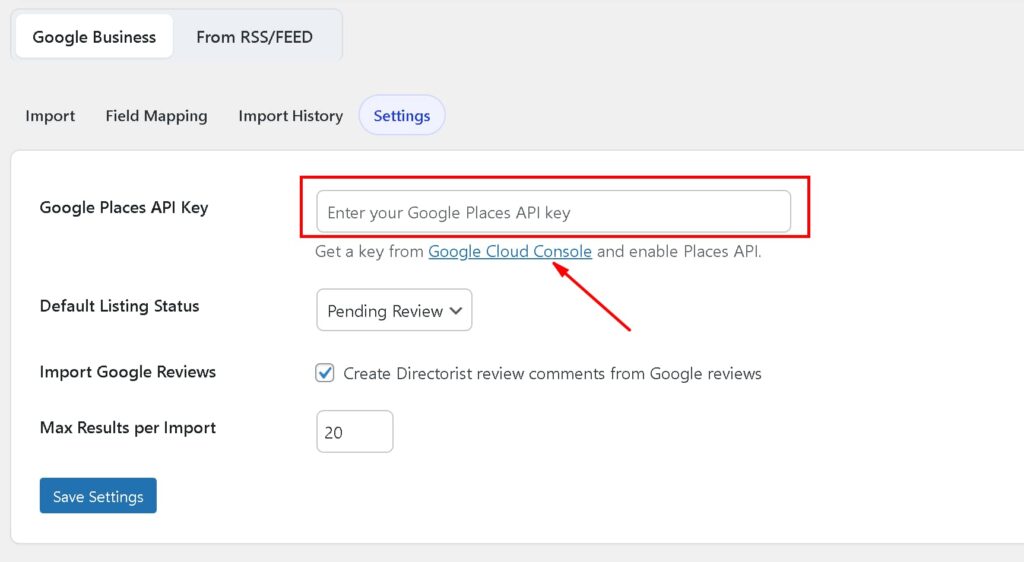
Enable “Places API” and Collect your API Key. Do not share this key with others.

Connect your “Listing Importer” with verifying the API key. Paste your Google Places API key into this field.
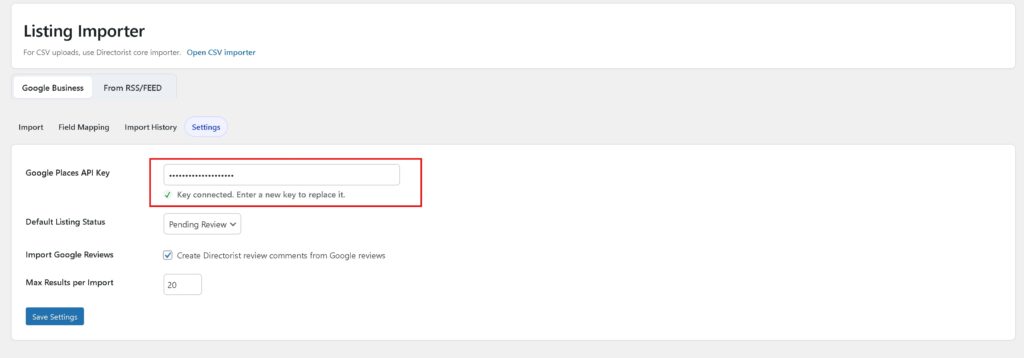
Important: If no API key is configured, the Import tab will show a warning and will not allow you to run any searches. Always save your key in Settings before switching to the Import tab.
Default Listing Status #
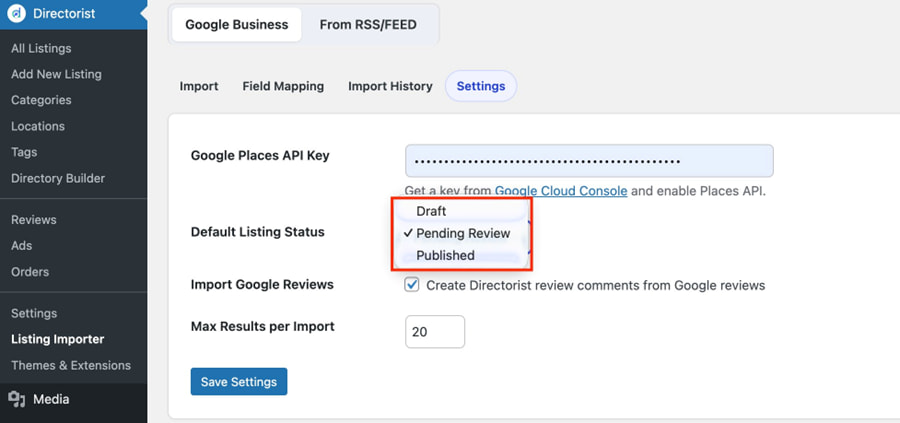
This controls what status imported listings receive automatically. Three options are available:
Draft: Listings are saved but not visible to the public or in the admin listing list unless you filter for drafts.
Pending Review: Listings are held for your approval before going live. This is the recommended setting for most directory owners.
Published: Listings go live immediately. Only use this when you are confident in the quality of the import source.
Import Google Reviews #
When this checkbox is enabled, Google reviews for each imported business are pulled in as Directorist review comments. This gives your imported listings immediate social proof — especially valuable on a new directory where organic reviews have not yet built up.
Max Result Per Import #
This sets the maximum number of listings returned per search. The default is 20. Start here while you are testing. The importer supports up to 60 per run, though larger imports take longer.
Step 2 — Filed Mapping #
Before start importing, it is wise to organize by tweaking “Field Mapping”. Here you will find option to map Google Places data into the Directorist destination. Select the destination carefully so that the listing information shows correctly.
At the top of the screen, select your Directory Type. This loads the submission form fields for that directory type, including any custom fields you have created in Directory Builder.
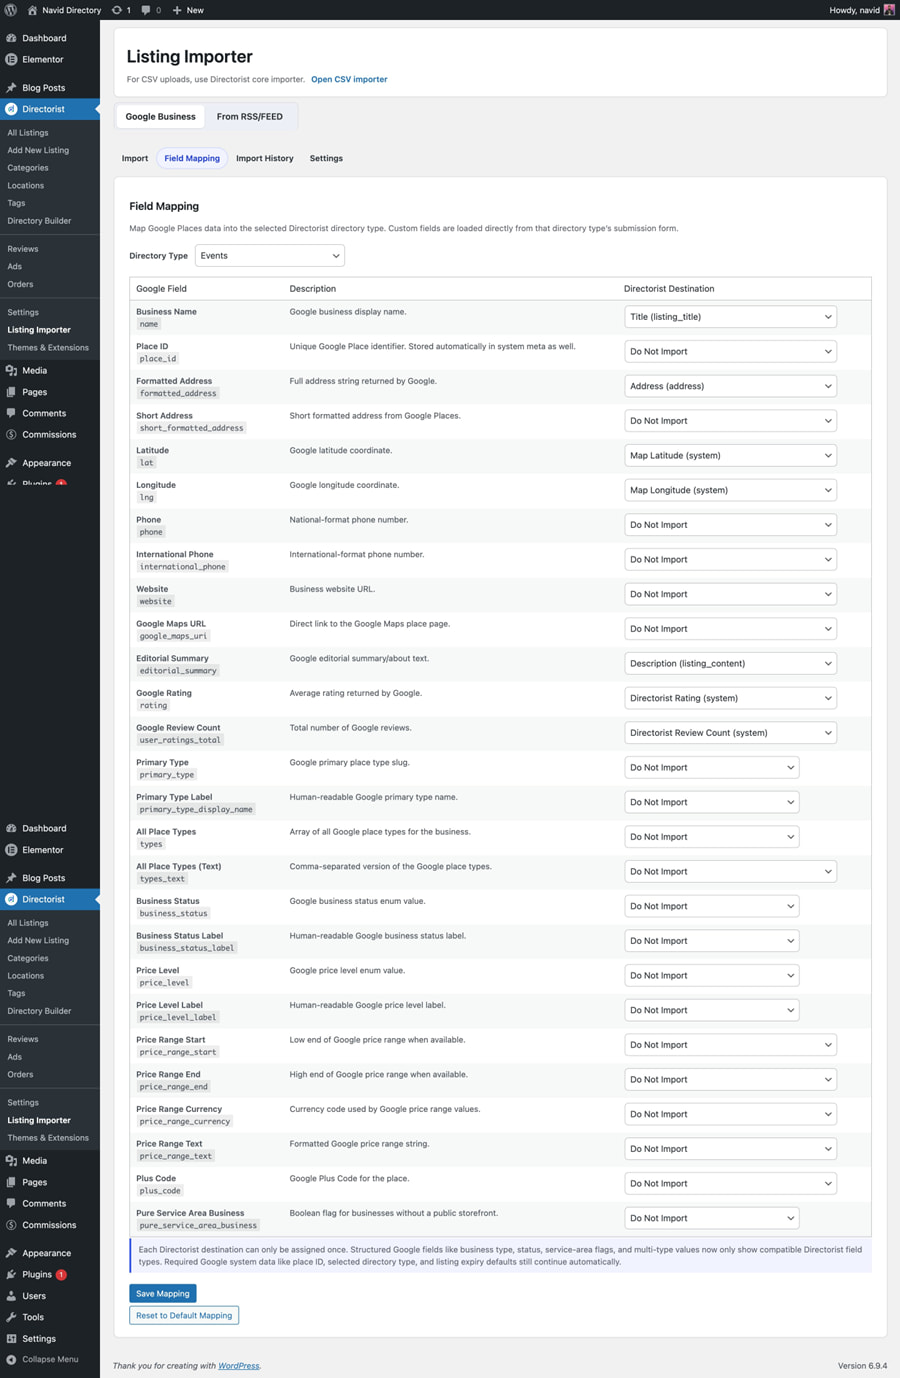
The mapping table has three columns:
| Column | What it shows |
| Google Field | The field name as returned by the Google Places API |
| Description | A plain-language explanation of what the field contains |
| Directorist Destination | The Directorist field this data maps to, or ‘Do Not Import’ |
Use the dropdown in the Directorist Destination column to map each Google field to the corresponding field on your site. Set any fields you do not need to Do Not Import.
| Important: Each Directorist destination field can only be assigned once. If you try to assign the same field twice, the second assignment will not be available in the dropdown. |
Click Save Mapping when done. Click Reset to Default Mapping to restore the original defaults.
Step 3 — Run an Import #
Switch to the Import tab. Complete the search form to tell the importer what businesses to look for and where.
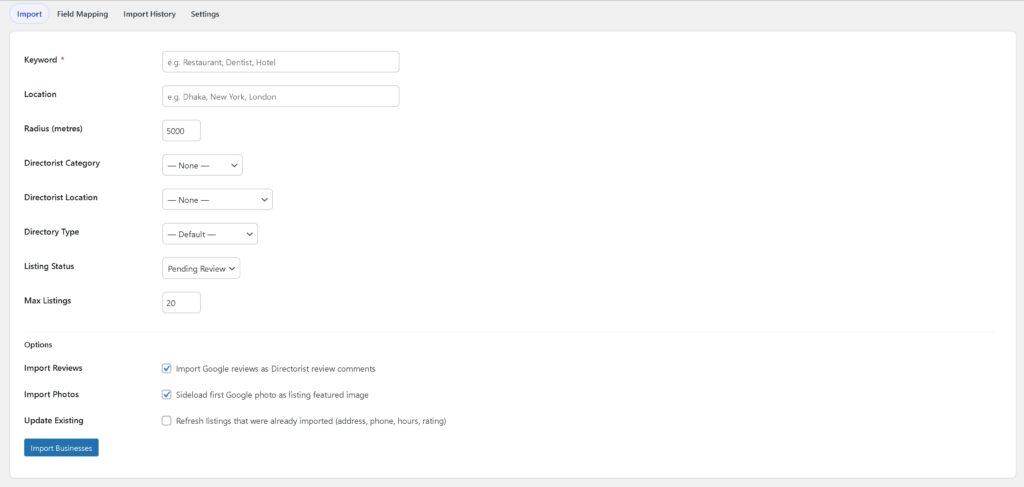
| Field | What to enter |
| Keyword (required) | The type of business — e.g. Restaurant, Dentist, Hotel, Yoga Studio. Use specific terms for better results. |
| Location | The city or area to search — e.g. Dhaka, New York, London. Leave blank if the keyword already includes a location. |
| Radius (metres) | How far from the location to search. Default is 5,000 metres (5 km). Use smaller for dense urban areas; larger for suburban or rural. |
| Directorist Category | The category on your site where imported listings will be placed. Create categories in Directorist first if none exist yet. |
| Directorist Location | The location taxonomy term to assign to imported listings (if your directory uses location filtering). |
| Listing Status | Override the default status from Settings for this specific import run. |
| Max Listings | Override the maximum results for this specific run. |
Below the main fields, you will find an Options section with three checkboxes:
| Option | What it does |
| Import Reviews | Imports Google reviews as Directorist review comments. Recommended — gives listings immediate social proof. |
| Import Photos | Sideloads the first Google photo as the listing featured image. Best for visual categories like restaurants, hotels, and salons. |
| Update Existing | Refreshes previously imported listings with newer data from Google. Leave off for first imports; use later for maintenance runs. |
When the form is complete, click Import Businesses.
Review and Select from the Preview List #
The importer searches Google Places and returns a list of matching businesses. A header shows how many were found.
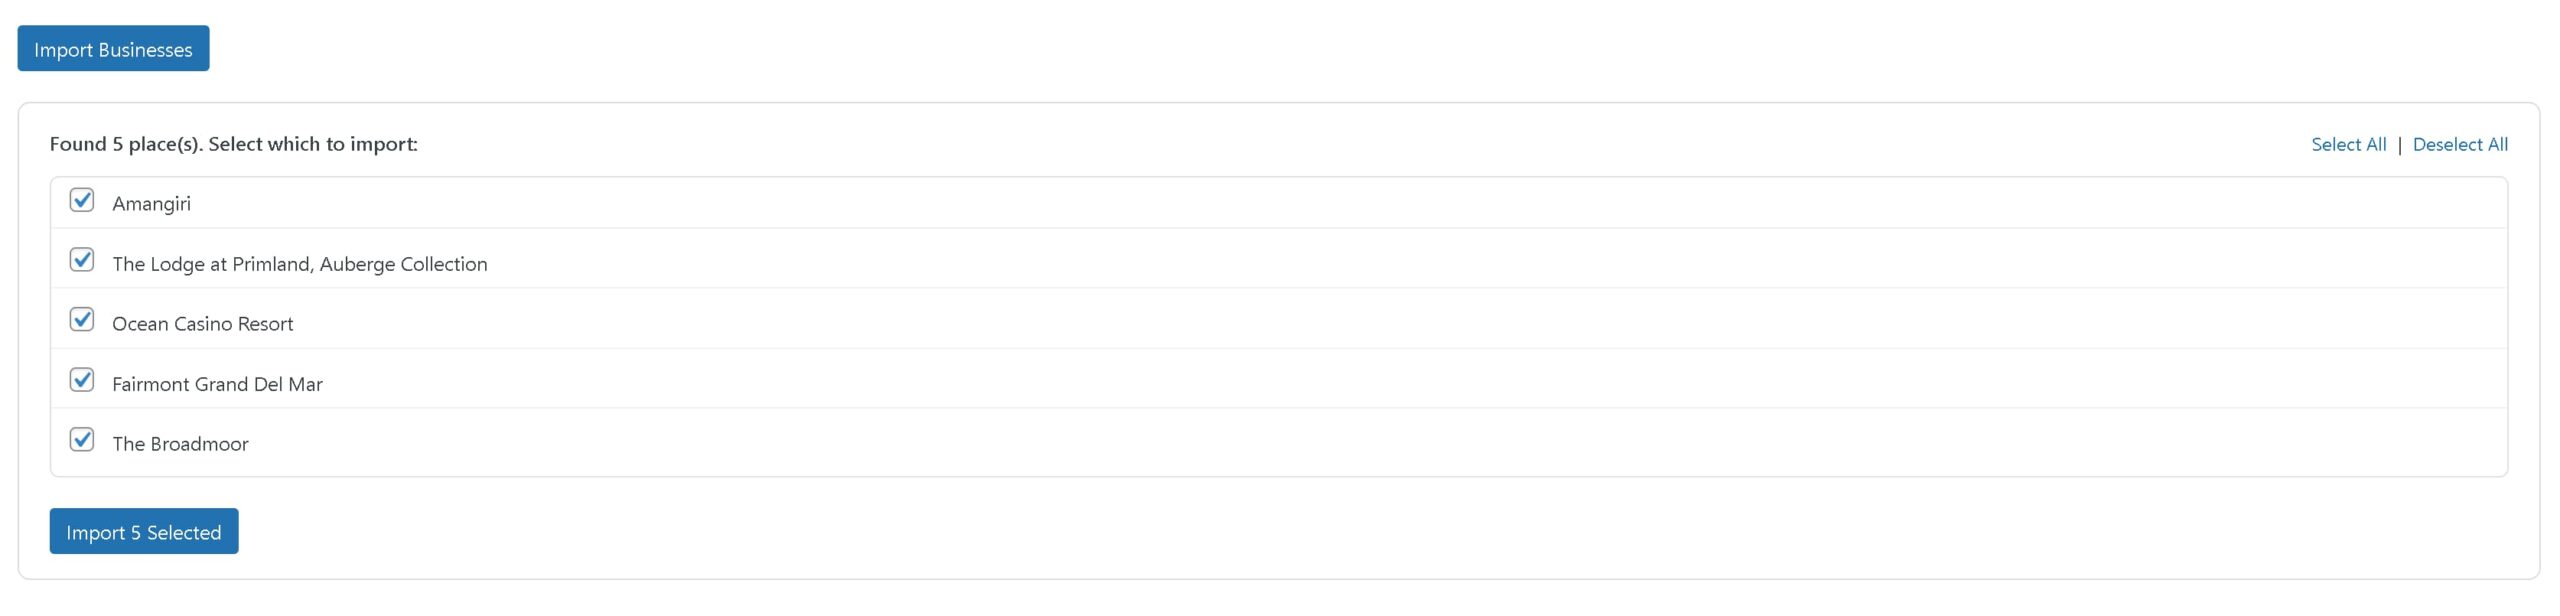
Every result appears as a checkbox row with the business name. You choose exactly what gets imported — nothing is brought in automatically. Use Select All or Deselect All at the top right, or check and uncheck individual entries.
When your selection is ready, click Import Selected.
Monitor the Progress Bar #
The importer processes each listing one at a time. A live progress bar shows which listing is currently being imported — for example, ‘Importing 6 of 20: Party House Community Center.’
Do not close or refresh the page while the import is running. Let it complete before navigating away.
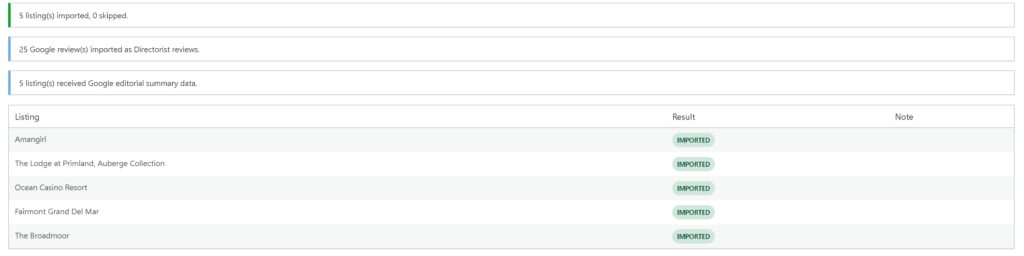
Review the Results #
Once the import finishes, a results screen shows:
- How many listings were successfully imported
- How many Google reviews were imported as Directorist review comments
- A row-by-row breakdown of any listings that were skipped, with a reason for each
Part 2: Importing from RSS/FEED #
The From RSS/FEED tab imports listings from any standard RSS or Atom feed URL. Unlike the Google Business method, which searches on demand, RSS/FEED imports connect to an external source and pull content from it — either once or on an automatic sync schedule.
This method is best for job boards, event directories, real estate directories, classifieds, and any directory where the source publishes new content regularly via a feed.
There are three sub-tabs inside From RSS/FEED:
- Sources — where you add and manage your feed connections
- History — a log of every RSS import that has run
- Settings — default listing status for RSS imports
Step 1 — Add a Listing Source #
Go to the “From RSS/FEED” tab and open the “Sources” sub-tab. Fill in the Add Listing Source form.
Paste a direct RSS or Atom feed URL, or a source page that contains a feed. The importer accepts any standard RSS or Atom feed — real estate feeds, event aggregator feeds, classifieds feeds, and job listing feeds are all compatible.
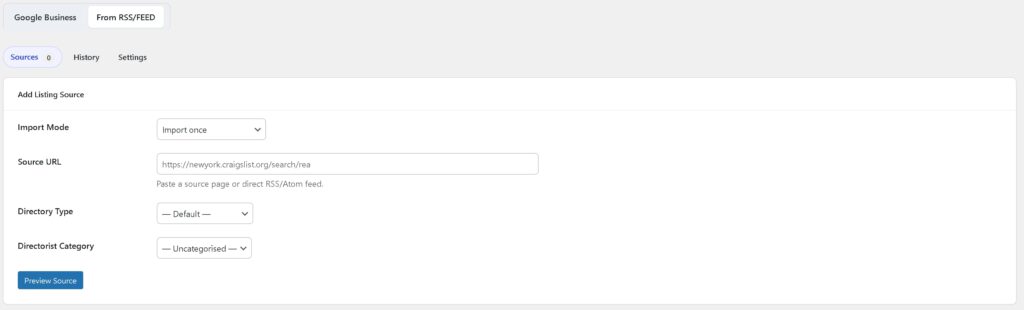
Import Mode #
Choose how you want the importer to handle this source:
- Import once: Pulls from the feed a single time and creates the listings. Use this for a one-off batch from a partner site, a real estate agency’s property feed, or any source you only need to import from once.
- Keep this source in sync: Checks the feed on a set schedule and automatically creates new listings as new content appears. When selected, two additional fields appear: Source Name (a label for this connection, e.g. ‘NYC Real Estate Feed’) and Sync Interval (how often to check — Daily is the default).
Source URL #
Paste a direct RSS or Atom feed URL, or a source page that contains a feed. The importer accepts any standard RSS or Atom feed — real estate feeds, event aggregator feeds, classifieds feeds, and job listing feeds are all compatible.
Directory Type #
Select the Directorist directory type that imported listings should be created under. This determines which submission form fields are available for the imported content.
Directorist Category #
Select the category where imported listings will be placed on your site.
When the form is complete, click Preview Source.
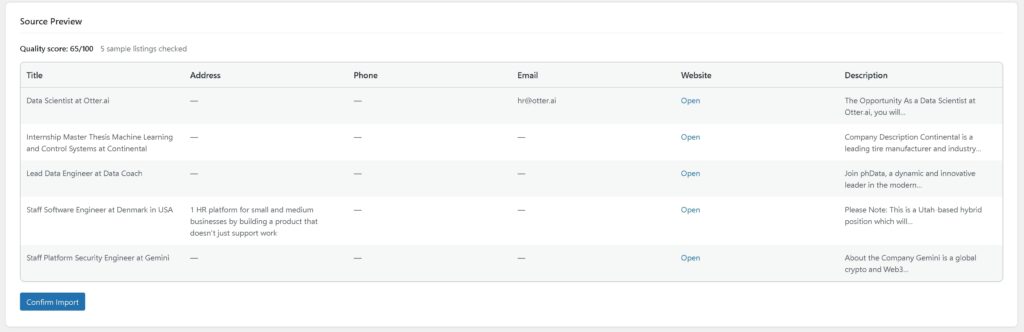
This fetches the feed and shows you what data is available before anything is imported — confirming the feed is accessible and the data structure looks usable.
Step 2 — Manage Connected Sources #
Once a source is saved, it appears in the Connected Sources table below the form.

| Column | What it shows |
| Name | The source name you assigned, or auto-generated from the feed URL |
| Source | The feed URL, shown as a clickable link |
| Directory | The directory type assigned |
| Category | The Directorist category assigned |
| Mode | One-time or sync mode |
| Last Run | When the source was last imported |
| Status | Active or Paused |
| Actions | Edit, Run, or Delete the source |
A newly saved source starts with a Status of Paused. It will not import automatically until you run it manually or it runs on its sync schedule.
- Run — triggers an immediate import from this source
- Edit — opens the source configuration to make changes
- Delete — removes the source permanently. Previously imported listings are not affected.
Step 3 — Review RSS/FEED Import History #
Switch to the History sub-tab to see a log of every RSS/FEED import that has run.
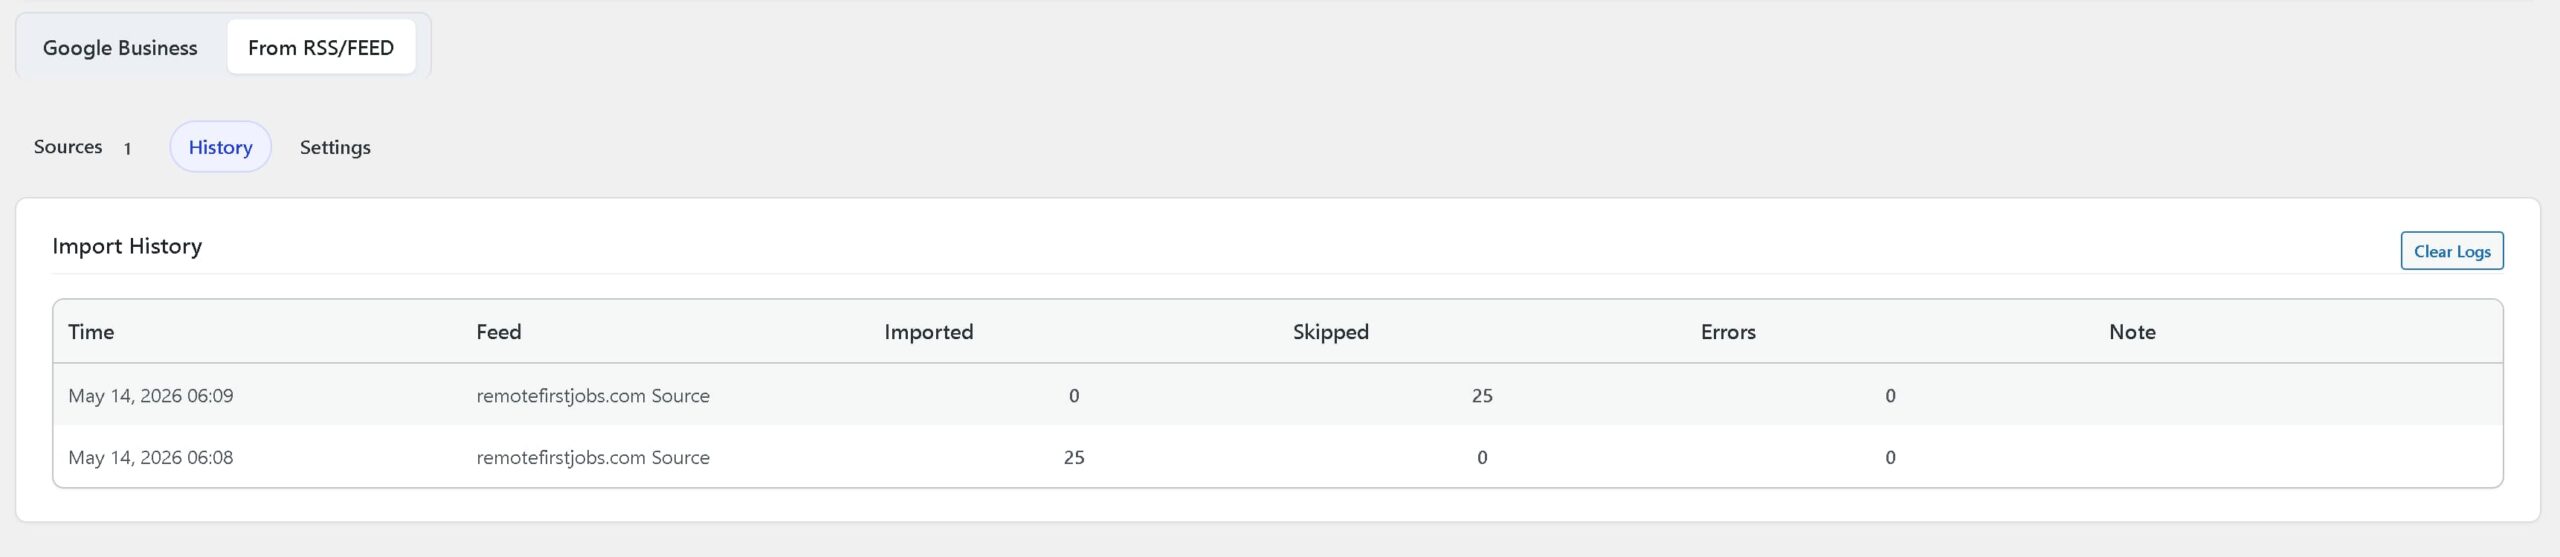
| Column | What it shows |
| Time | Timestamp of the import run |
| Feed | The source name |
| Imported | Number of listings created |
| Skipped | Number of entries not imported |
| Errors | Number of errors encountered |
| Note | Additional detail on errors or skipped entries |
A clean import shows zero skipped and zero errors. If errors appear, the Note column provides more detail. Click Clear Logs to remove the history. This does not affect imported listings.
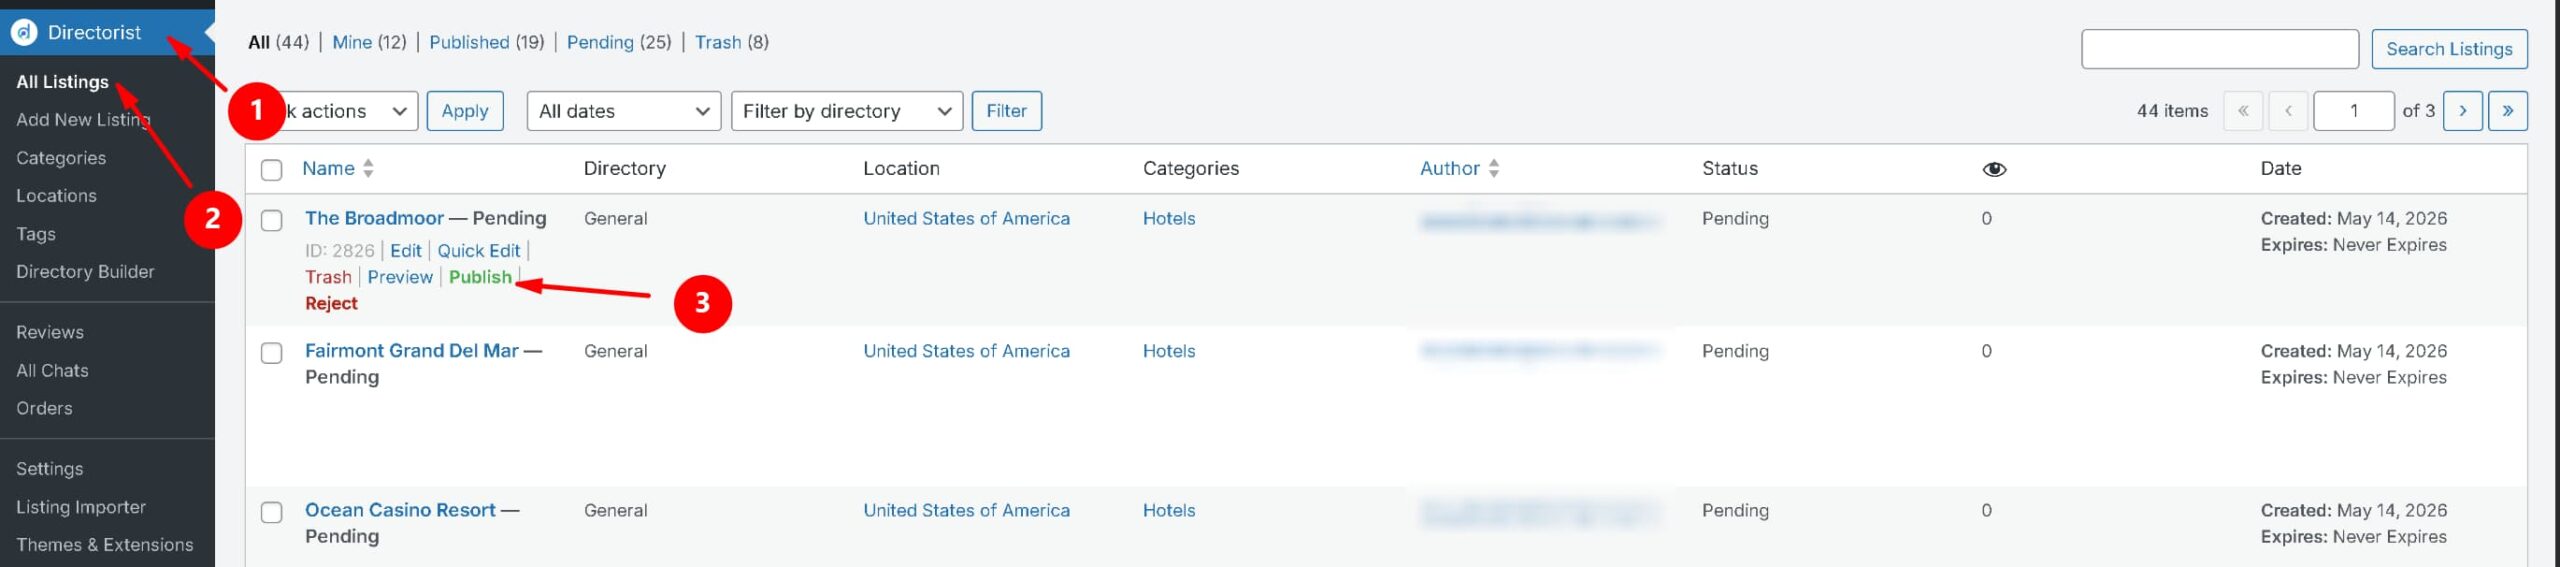
After the Import: Reviewing and Publishing #
Regardless of which import method you used, imported listings arrive in your Directorist dashboard under the status you set. If you used Pending Review, go to All Listings and filter by Pending Review to find them.
Before publishing any imported listing, check the following:
| Check | Why it matters |
| Is the business still operating? | Google data and RSS feeds are not always current. A quick search confirms whether the listing is still valid. |
| Is the address and phone number accurate? | Cross-reference with the business’s own website. For healthcare, legal, and service directories, accuracy is essential. |
| Does the description need rewriting? | Imported descriptions are often generic. A description written for your audience performs better and builds more credibility. |
| Is the category correct? | Listings are assigned to the category you selected at import time. Review whether each should be moved to a more specific subcategory. |
| Are the photos usable? | Imported Google photos vary in quality. For high-priority listings, replacing or supplementing with better images is worth the time. |
Best Practices #
Following these practices will help you get the best results from the Listing Importer.
- Start small: Run your first import with 10 to 20 listings in one category. Check that field mapping is working correctly and listing pages display as expected before scaling up.
- Use specific keywords for Google imports: ‘Italian restaurant’ returns more useful results than ‘restaurant.’ The more specific the keyword, the less sorting you need to do after import.
- Import by location segment: For city directories, import by neighborhood rather than the whole city at once. Smaller batches are easier to review.
- Keep the default status at Pending Review: Nothing goes live until you have checked it. Publish in batches once you are confident in quality.
- Enable photos for visual categories: Restaurants, hotels, salons, and retail benefit significantly from photos. Service businesses like plumbers or accountants benefit less.
- Enable reviews for trust-sensitive categories: Healthcare, legal, and hospitality directories benefit most from imported reviews. Note that imported Google reviews are a snapshot — new Google reviews will not appear automatically after import.
- Use Update Existing for maintenance: After several months, run the same Google Business searches with Update Existing enabled to refresh address, phone, hours, and rating data.
- Track Import History: Before running a new Google Business import, check the history tab to confirm you have not already covered that keyword and location combination.
- Use Keep in Sync for dynamic directories: Job boards, event listings, and classifieds directories publish new content continuously. Connecting these sources in sync mode keeps your directory current without manual intervention.
Troubleshooting #
Google Business Issues #
| Problem | What to do |
| ‘No Google API key configured’ warning on the Import tab | Go to Settings, paste your API key, and click Save Settings before returning to the Import tab. |
| No places found after search | Try a broader keyword, check the location spelling, increase the radius, or run the same search in Google Maps to confirm relevant businesses exist in that area. |
| Large number of skipped listings | Usually caused by Google returning incomplete place data. Try a more specific keyword or a smaller radius. |
| Listings imported without photos | Confirm that Import Photos is enabled. Some businesses do not have Google photos available — add them manually from the listing edit screen. |
| Reviews did not import | Confirm that Import Reviews is enabled in both Settings and in the Options section of the Import tab. Google returns a limited number of reviews per place. |
| Import is slow or times out | Large imports with photos and reviews enabled require more processing. Reduce Max Listings, disable photo import for a test run, or contact your hosting provider to review memory and timeout limits. |
RSS/FEED Issues #
| Problem | What to do |
| Preview Source returns no results or an error | Confirm the feed URL is correct and publicly accessible. Test it in a browser or a feed validator. If the URL redirects, use the final destination URL directly. |
| Listings imported but fields are empty | The feed may use non-standard field names. Check the feed structure and adjust your Directory Type or field mapping if needed. |
| Sync is not running automatically | Confirm the source status is Active (not Paused) and that WordPress cron is running on your site. Some hosting environments disable wp-cron — contact your host if scheduled tasks are not firing. |


