 Up to 35% Off!

The Authorize.net extension lets your directory accept card payments through Authorize.net’s hosted payment page, for one-time listing fees, featured upgrades, or Pricing Plans purchases, including recurring subscriptions with optional free trials. This guide walks through getting your Authorize.net credentials, activating the gateway, registering the webhook, and where orders show up afterward.
Prerequisites #
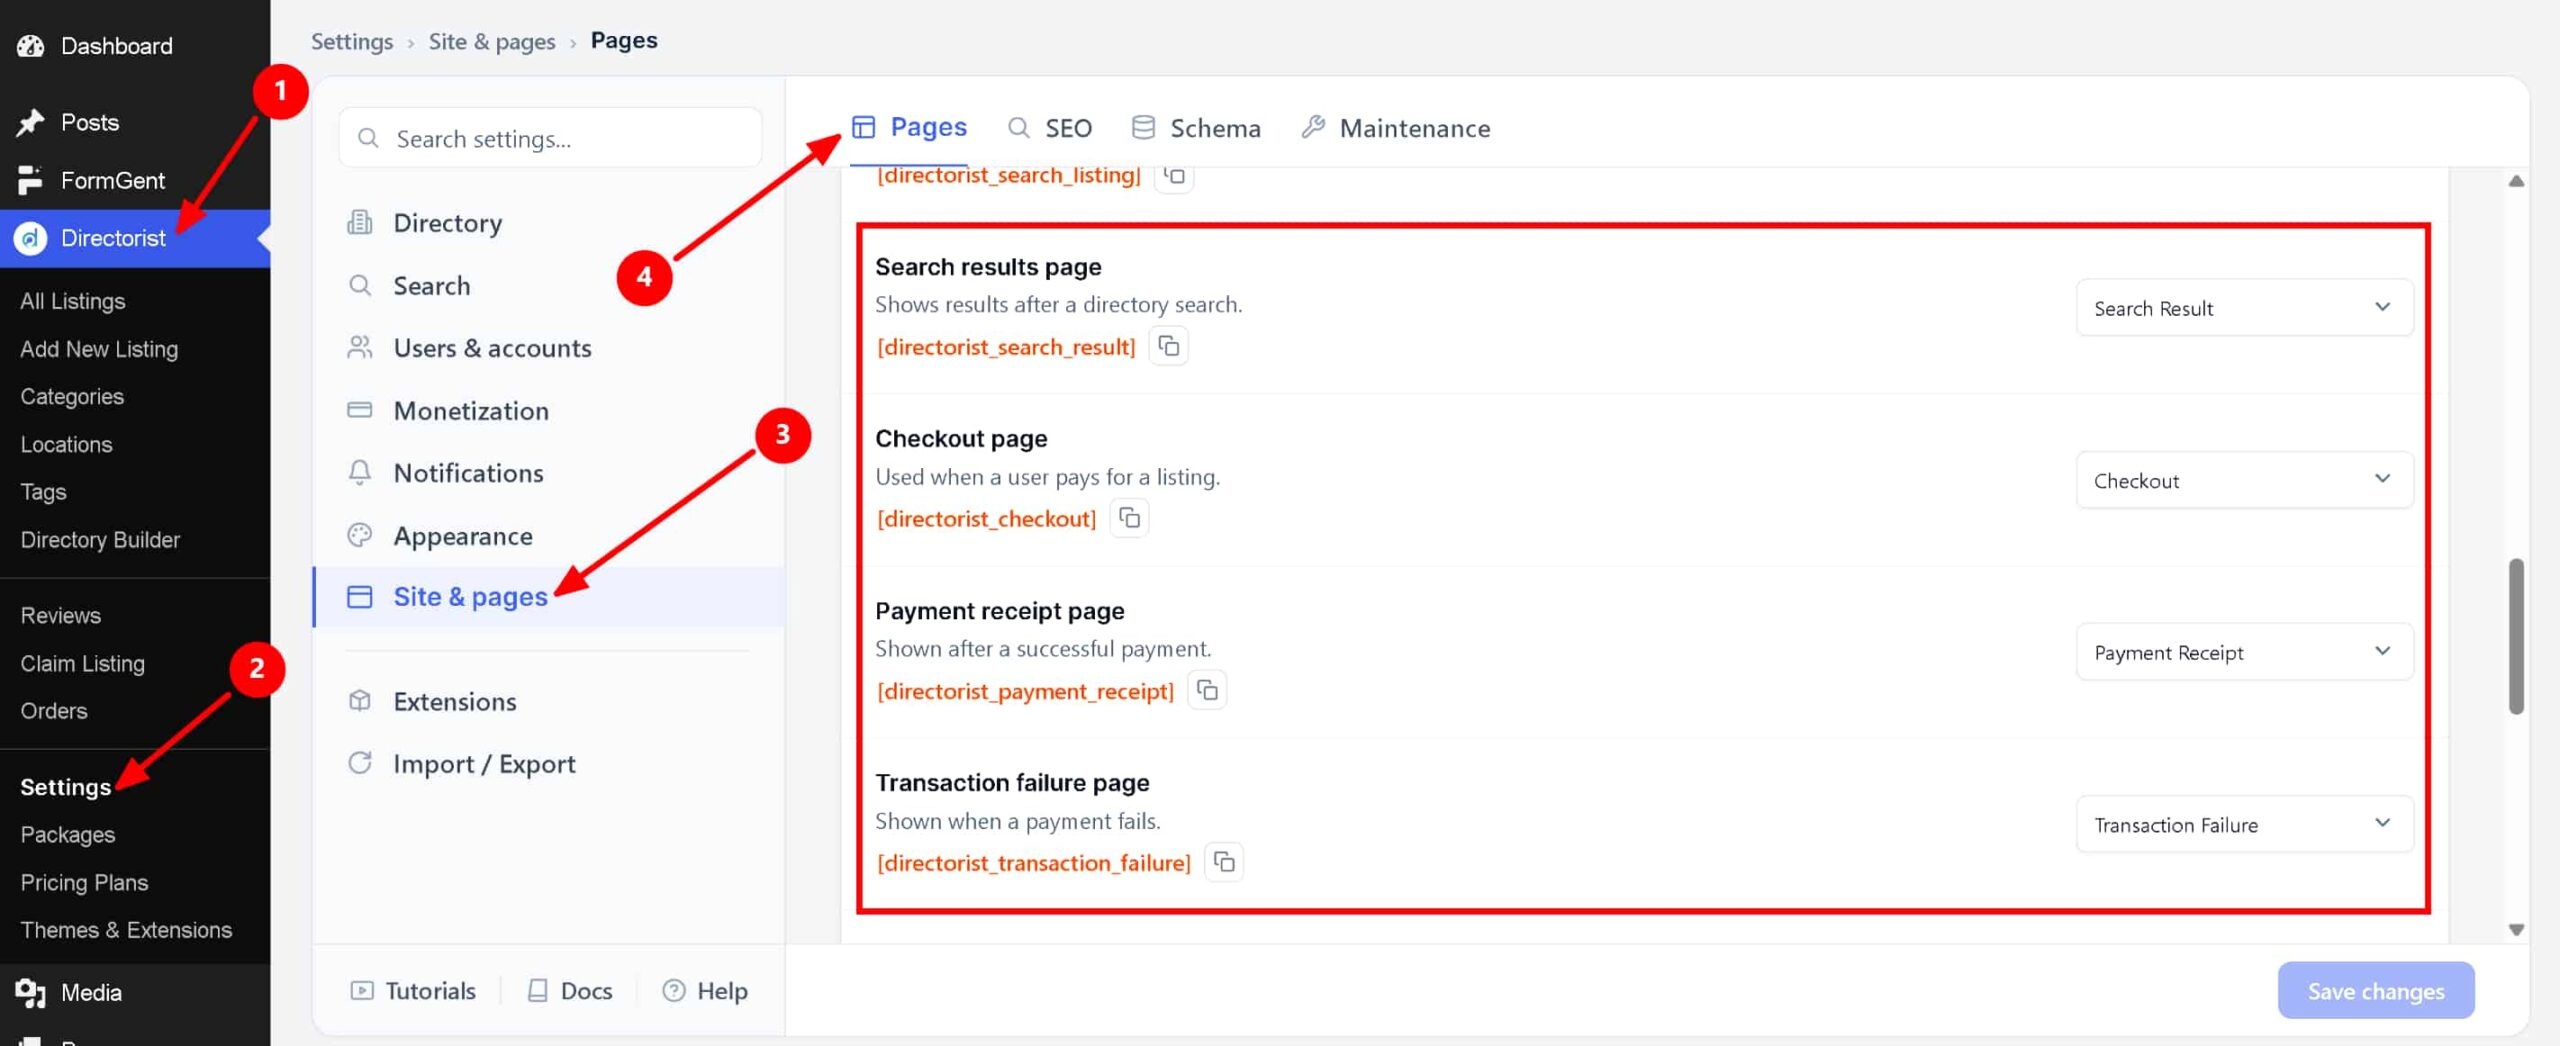
Before setting up the gateway, make sure your checkout pages are configured. Directorist needs these pages set correctly so it knows where to send a user during and after checkout. If you haven’t set them up yet, If you haven’t set them up yet, complete the setup process form Directorist > Settings > Site & Pages > Pages, then continue here.
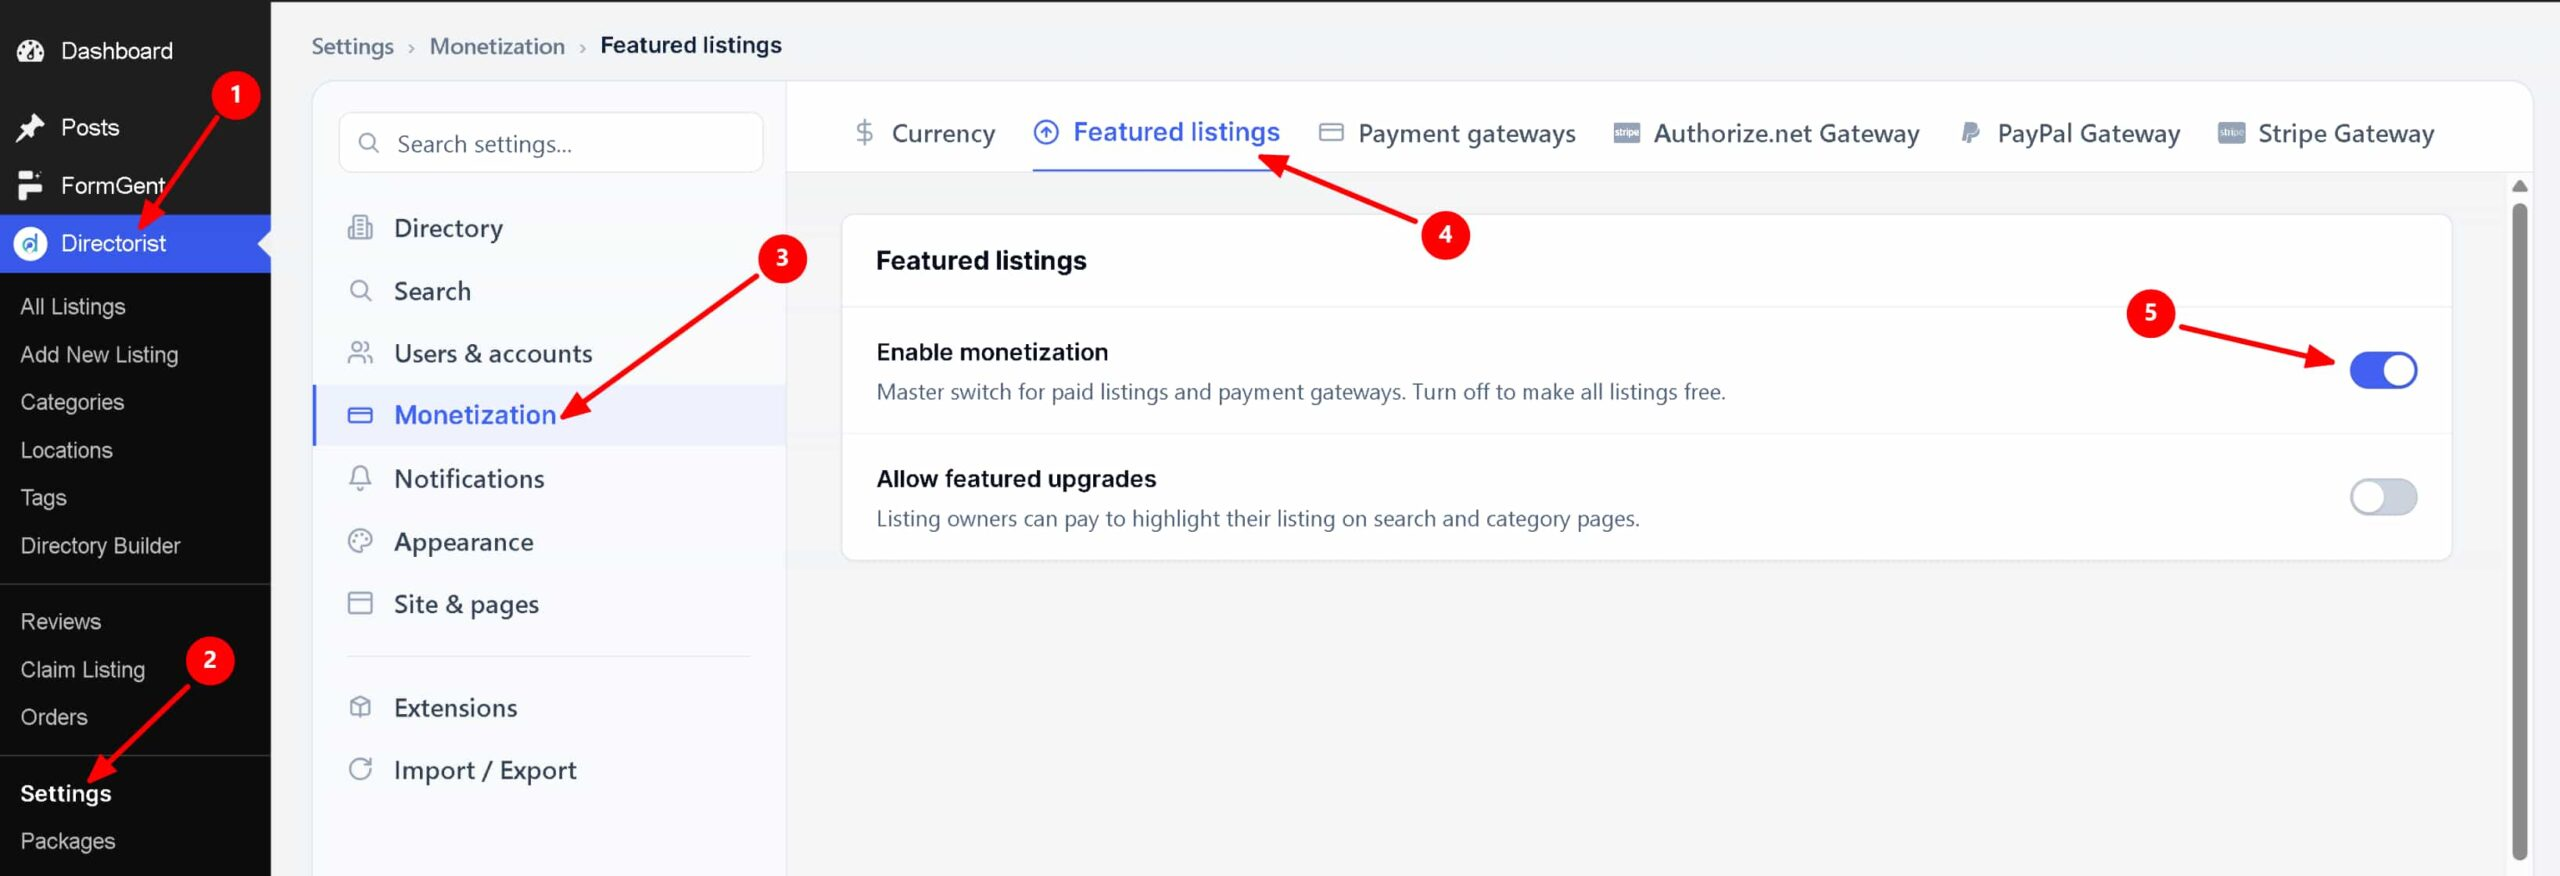
You also need Monetization turned on, since the gateway only appears on the checkout page when monetization is active.
Path: WP Admin → Directorist Listings → Directorist Settings → Monetization Settings
- Go to Monetization Settings.
- Set Enable Monetization Feature to Yes.
- Save your changes.
Webhook registration has two extra requirements: your site must be reachable over a public HTTPS address (no localhost), and pretty permalinks must be enabled in WP Admin → Settings → Permalinks. Registration fails if the webhook URL contains a query string, which is what happens automatically when permalinks are set to the plain “days and name”-less default.
Step 1 – Get Your Authorize.net Credentials #
- Log in to your Authorize.net account.
- Get your API Login ID and Transaction Key. Note that Directorist’s own settings page links to
sandbox.authorize.netfor this, so use whichever of your Authorize.net accounts (sandbox or production) matches the mode you’re configuring. - Separately, get your Signature Key from your Authorize.net account. This key is only used to verify that incoming webhook events genuinely came from Authorize.net.
Unlike some gateways, Authorize.net only has one API Login ID and Transaction Key field, not separate live and sandbox pairs. Enter the credentials that match whichever environment Enable Test Mode currently points to, and swap them if you switch environments.
Step 2 – Activate Authorize.net in Gateway Settings #
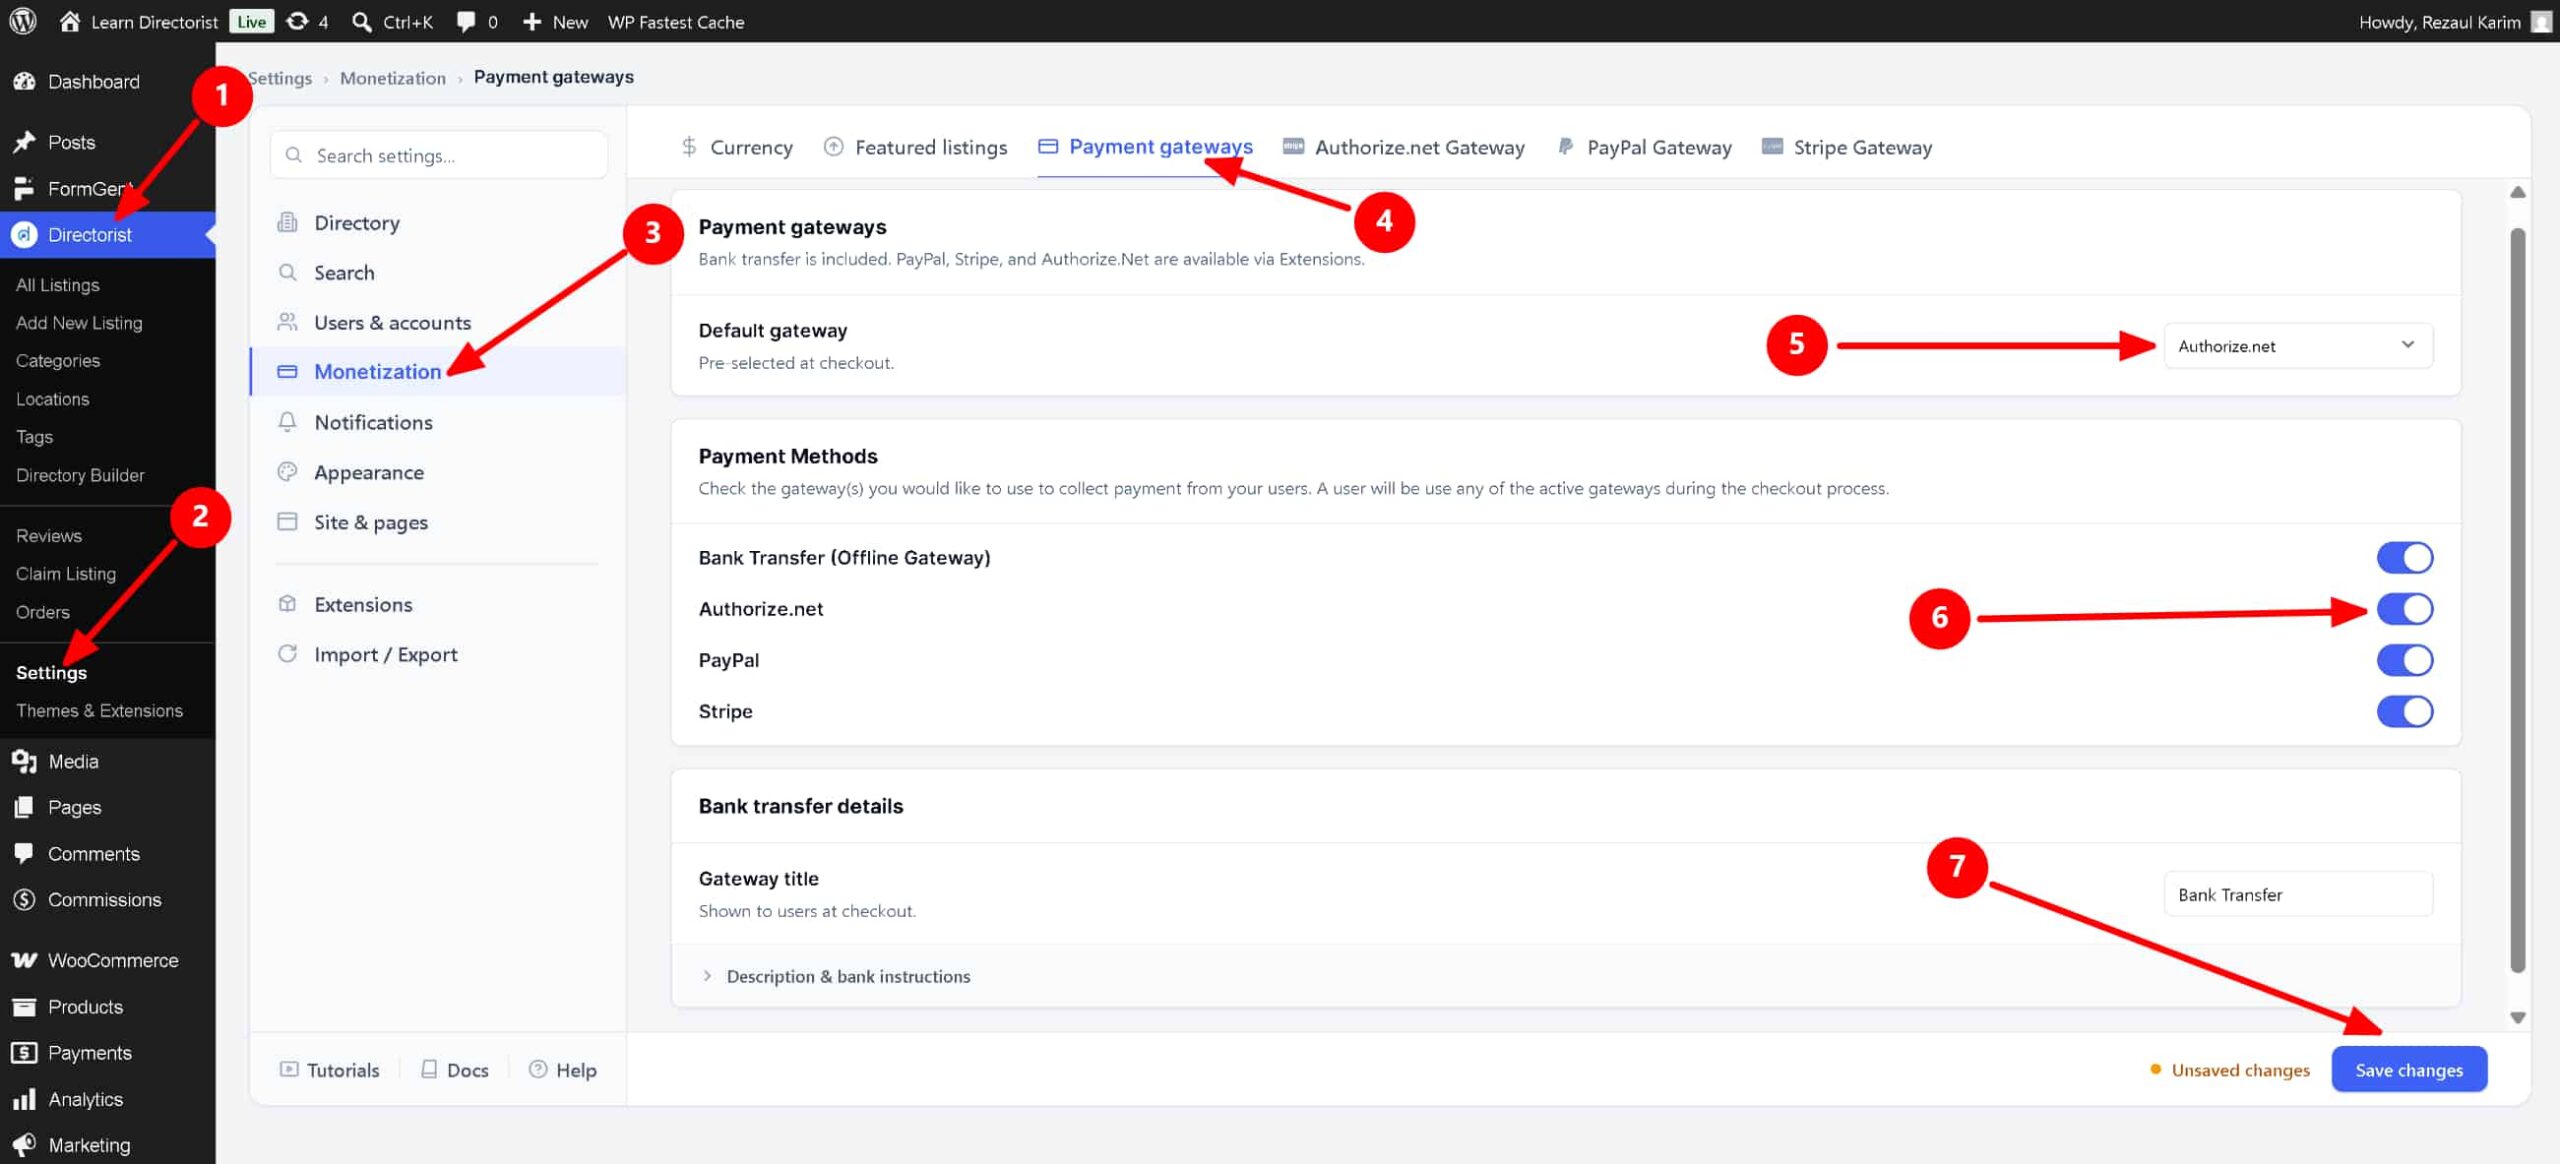
Path: WP Admin → Directorist Listings → Directorist Settings → Monetization Settings → Gateway Settings
- Open the Gateway Settings tab.
- Under Active Gateways, check Authorize.net Gateway. This makes Authorize.net available as a payment option on the checkout page.
- (Optional) To make Authorize.net the pre-selected option at checkout, choose Authorize.net Gateway from the Default Gateway dropdown.
- Click Save.
Step 3 – Configure the Authorize.net Gateway Tab #
Path: WP Admin → Directorist Listings → Directorist Settings → Monetization Settings → Authorize.net Gateway
- Open the Authorize.net Gateway tab.
- To test the integration before going live, set Enable Test Mode to Yes. While test mode is on, Directorist sends transactions to Authorize.net’s sandbox API and no live transactions are processed. Set it back to No before collecting real payments, which switches Directorist to Authorize.net’s production API.
- Enter the text you want buyers to see at checkout in Gateway Title. This defaults to Authorize.net.
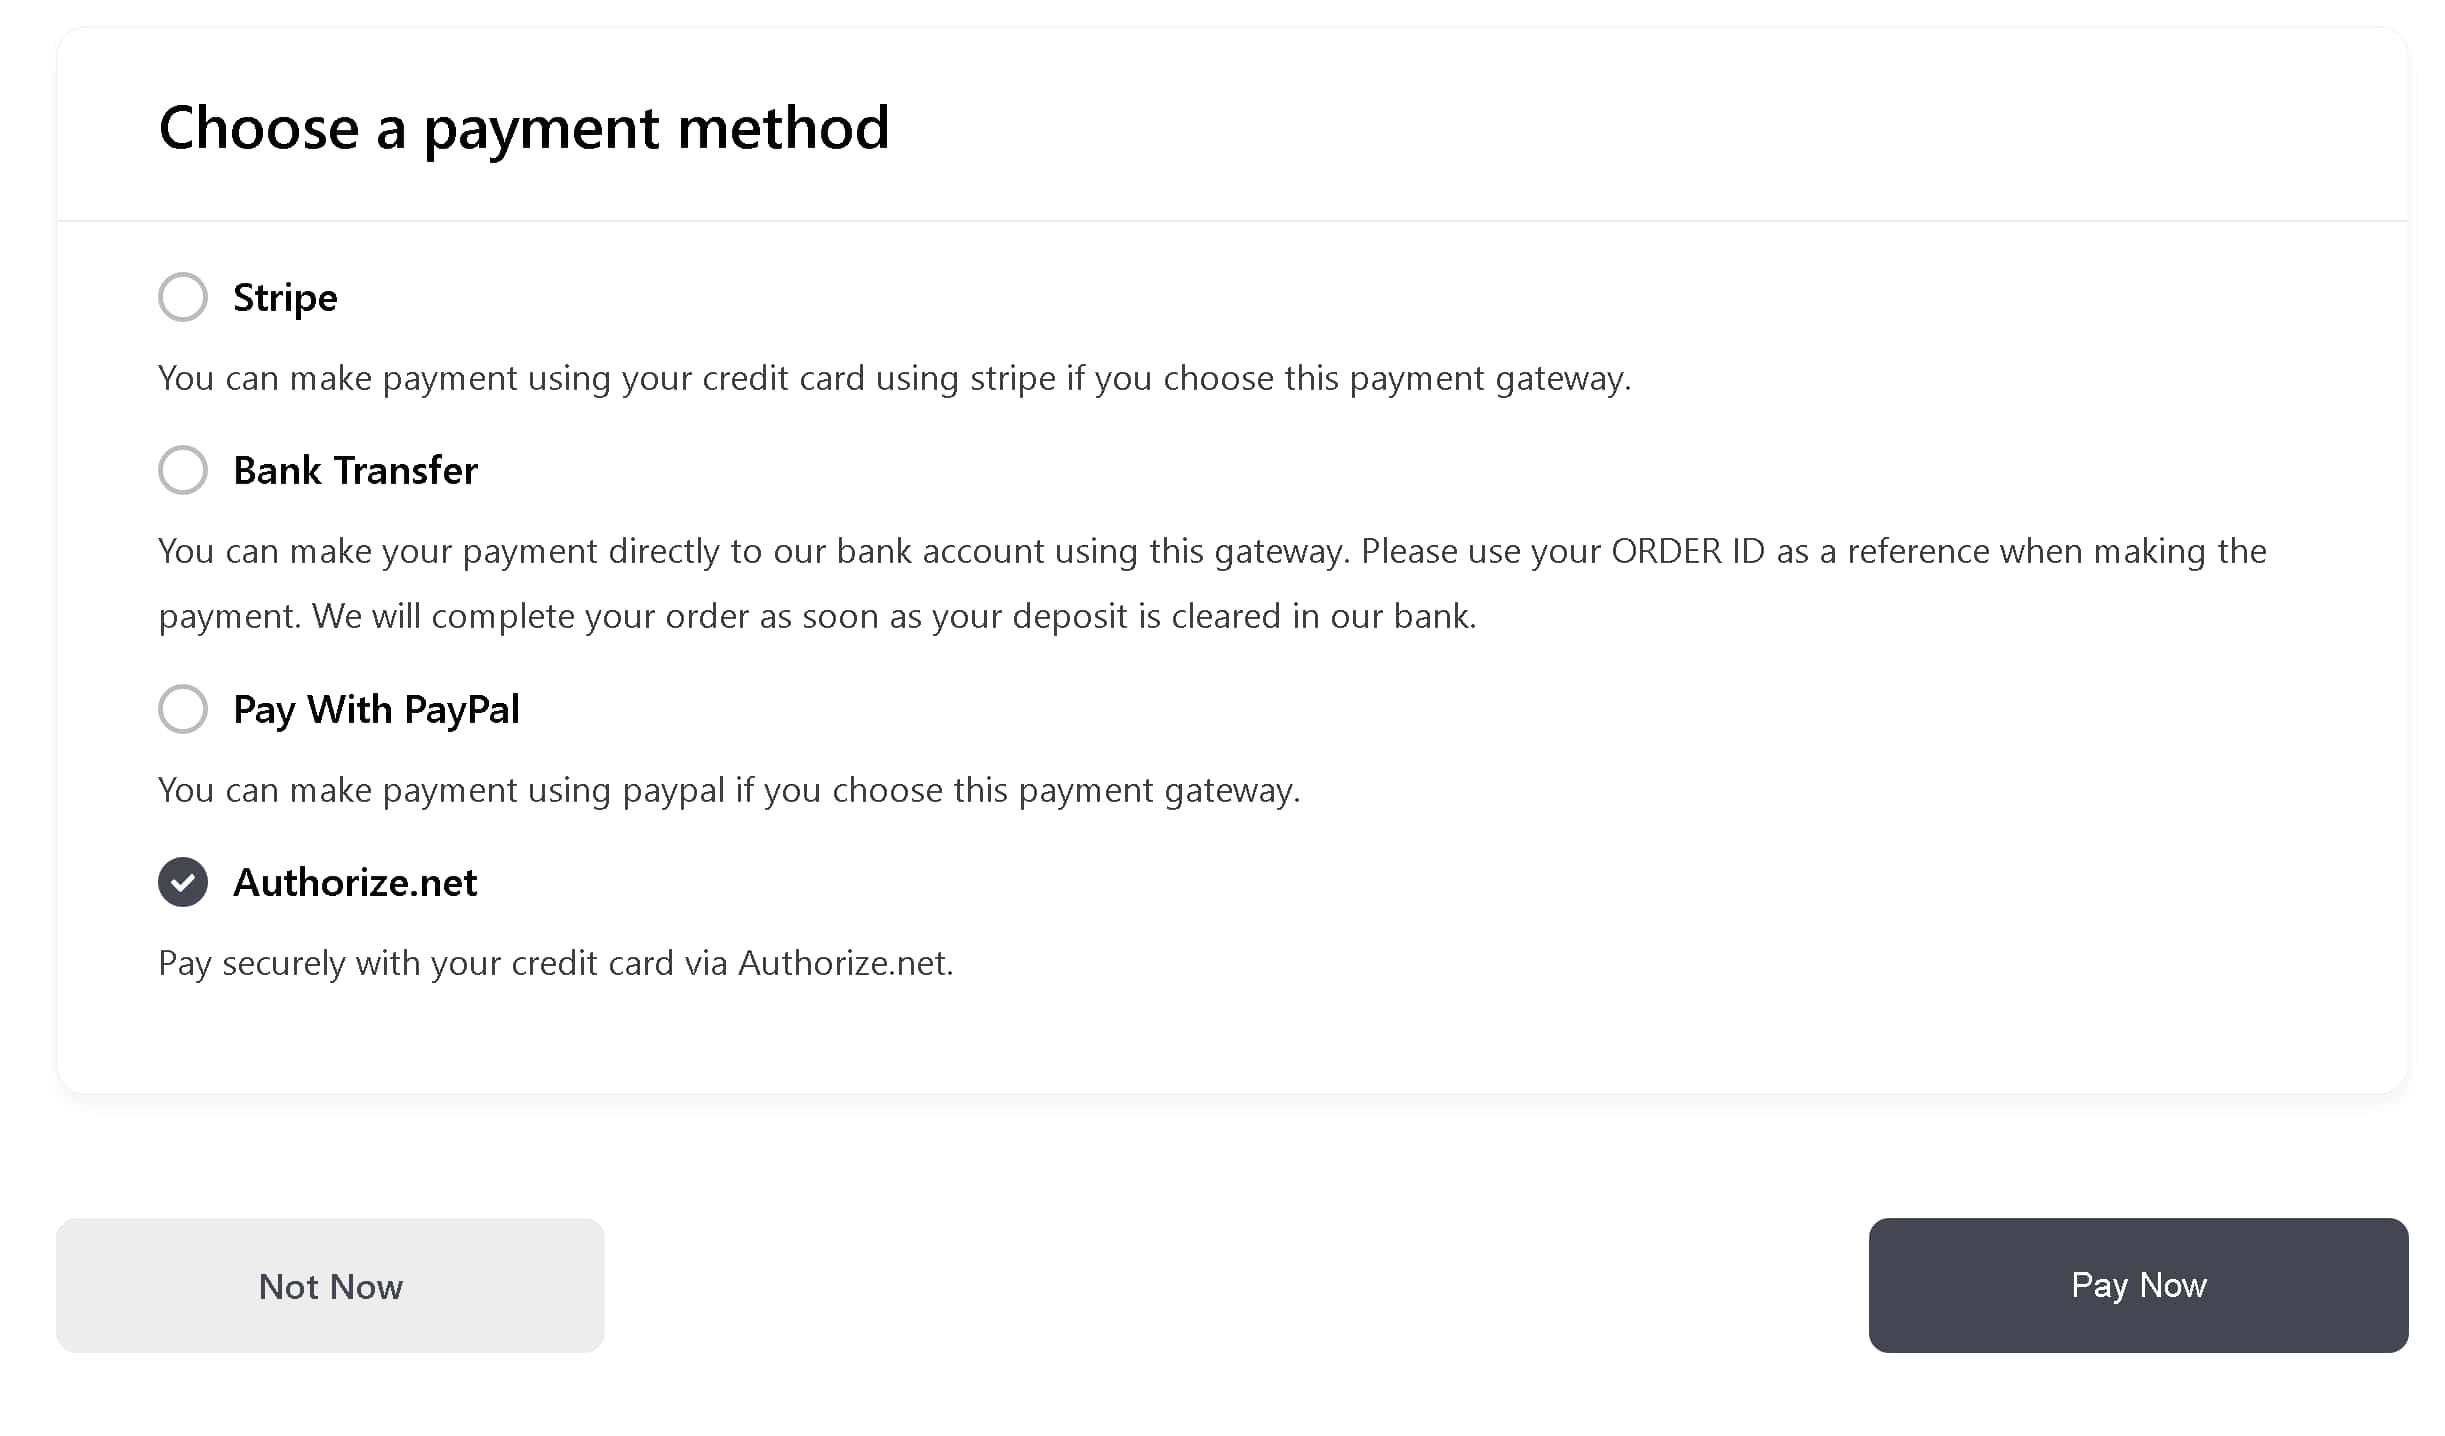
- Enter a short explanation for buyers in Gateway Description. This defaults to “Pay securely with your credit card via Authorize.net.”
- Enter API Login ID and Transaction Key from Step 1.
- Enter Signature Key from Step 1.
- Click Save.
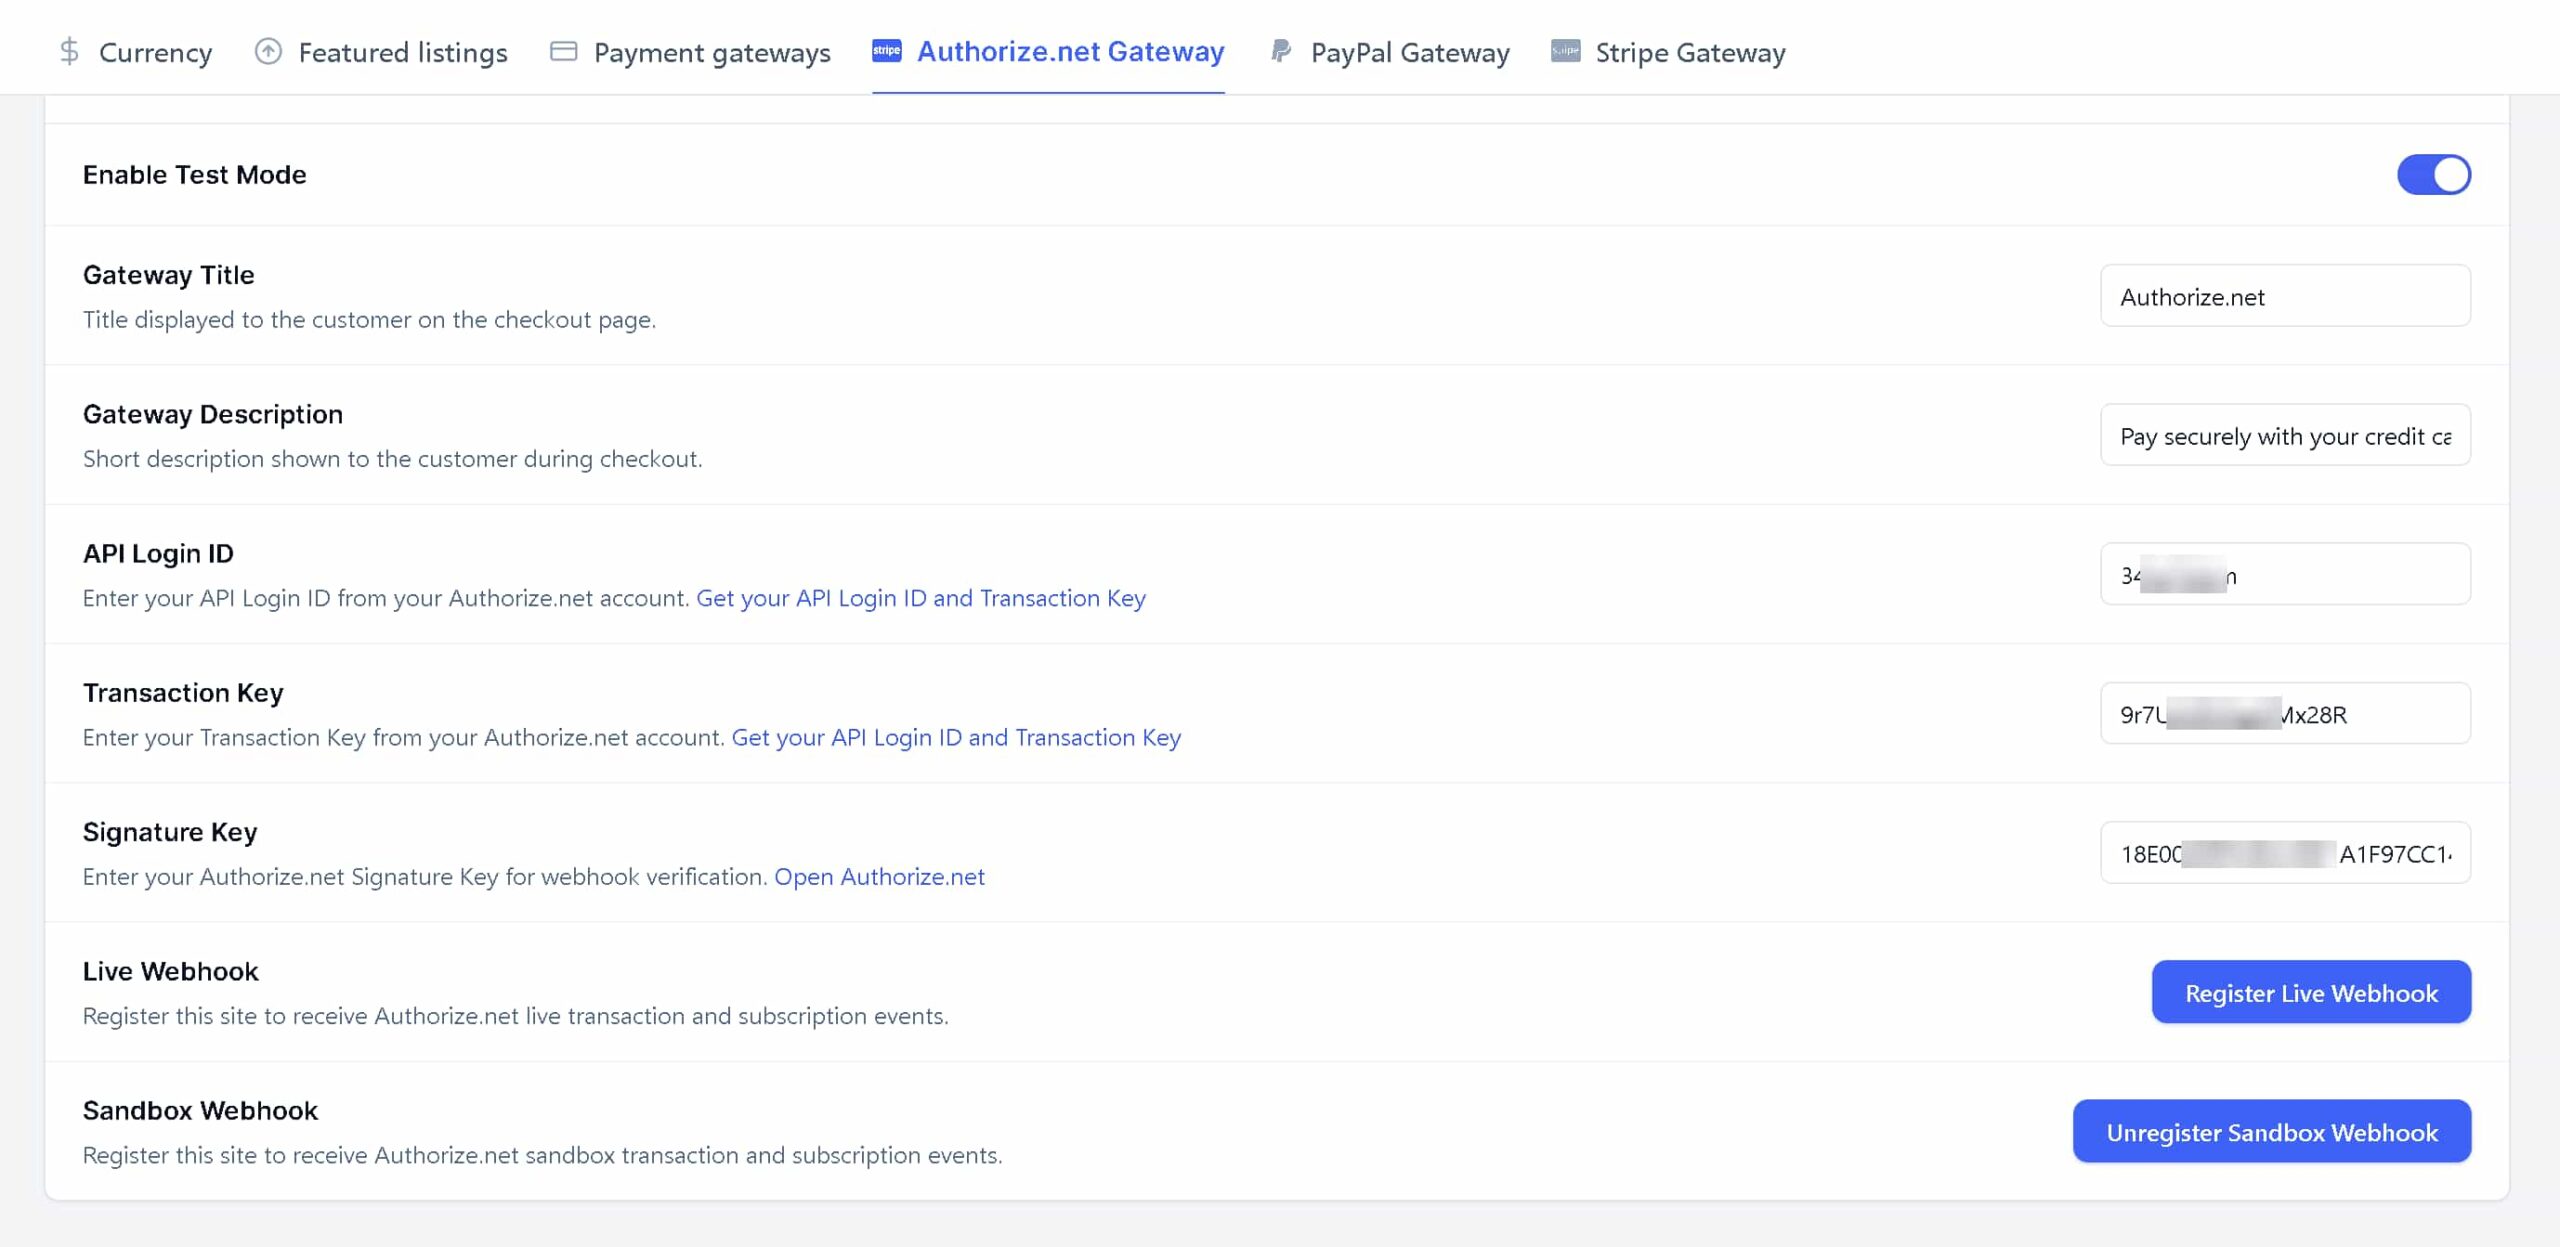
Once saved, Authorize.net appears as a payment option on the checkout page using the title and description you set here. Choosing it sends the buyer to Authorize.net’s hosted payment page to enter their card details, then back to your directory once payment completes.
Step 4 – Register the Webhook #
The webhook is how Authorize.net tells your directory that a transaction or subscription event happened (payment captured, authorized, held for fraud review, voided, or a subscription created, updated, cancelled, suspended, or terminated). Without it, orders won’t update automatically.
- Still on the Authorize.net Gateway tab, find Live Webhook and Sandbox Webhook.
- Click Register Live Webhook to register the webhook for real transactions, and Register Sandbox Webhook to register it for testing. Register whichever mode you’re currently using (matching Enable Test Mode).
- If you need to remove a registered webhook later, click Unregister Live Webhook or Unregister Sandbox Webhook, which appears in place of the register button once a webhook is registered.
If a webhook isn’t registered for the mode you’re currently using, Directorist shows an admin notice reminding you to register it, with a link straight to this settings tab.
Managing Orders #
Every purchase made through Authorize.net, whether it’s a featured listing upgrade or a Pricing Plans purchase, creates an order in Directorist. Once a buyer completes payment on Authorize.net’s hosted page, they’re redirected back to your directory, and the order updates to paid as soon as Authorize.net’s webhook confirms the transaction. For the full walkthrough of finding, reviewing, and managing these orders, see the Managing Orders guide.
Recurring Plan/Package Payments #
Recurring payments for a plan or package work through Authorize.net using its recurring billing and customer profile features. This requires the Directorist Pricing Plans extension (version 3.9.9 or later) with a plan that has subscription billing enabled. If that plan also has a trial period enabled, the buyer’s first billing date is set to when the trial ends rather than immediately, so their card isn’t charged the regular amount until the trial is over. Authorize.net then bills them automatically at the end of each plan term after that, with no manual renewal step needed from the buyer or from you.


